HTML
With Ktor HTML DSL, you can respond to a client with HTML blocks.
HTML DSL
The HTML DSL integrates kotlinx.html so you can build responses as HTML blocks. You can write HTML in Kotlin, interpolate variables, and compose complex layouts with templates.
Add the ktor-server-html-builder artifact:
dependencies:
  - $ktor.server.htmlBuilder
Update Routing.kt:
fun Application.configureRouting() {
    routing {
        get("/") {
            call.respondHtml {
                body { h1 { +"Hello World!" } }
            }
        }
    }
}Task Manager Application
You’ll incrementally build a Task Manager with:
- Viewing all tasks in an HTML table.
- Filtering tasks by priority and name.
- Adding tasks via an HTML form.
Display static HTML content
Add a route that returns static HTML.
Modify Application.configureRouting() to a new route for the URL /task and the GET request type:
import kotlinx.html.*

fun Application.configureRouting() {
    routing {
        get("/") {
            call.respondText("Hello David!")
        }
        get("/task") {
            call.respondHtml {
                body {
                    h1 {
                        +"Tasks"
                    }
                    ul {
                        li {
                            +"Create project documentation"
                        }
                        li {
                            +"Implement user authentication"
                        }
                    }
                }
            }
        }
    }
}
A GET request is the most basic type of request in HTTP. It is triggered when the user types into the browser’s address bar or clicks a normal HTML link.
For now, you’re only returning static content. To notify the client that you will send HTML, you must set the HTTP Content Type header to “text/html.”
Navigate to http://localhost:8080/task in your browser.
You should see the list of tasks:
Tasks
- Create project documentation
- Implement user authentication
Implement a Task Model
-
Inside
srccreate a new subpackage namedmodel. -
Inside the model directory create a new file
Task.kt. -
Open the
Task.ktfile and add the following enum to represent priorities and a class to represent tasks:kotlin src/model/Task.kt package org.jetbrains.amper.ktor.model enum class Priority { Low, Medium, High, Vital } data class Task( val name: String, val description: String, val priority: Priority )Since you will send task information to the client inside HTML tables, also add the following extension function:
kotlin src/model/Task.kt import kotlinx.html.* fun List<Task>.asTable(body: BODY) = body.table { thead { tr { th { +"Name" } th { +"Description" } th { +"Priority" } } this@asTable.map { tr { td { +it.name } td { +it.description } td { +it.priority.name } } } } }The `List::: task
:::.asTable()` function allows a list of tasks to be displayed as a table.
-
Open the
Routing.ktfile and modify the existingApplication.configureRouting()function with the following implementation:kotlin src/Routing.kt import org.jetbrains.amper.ktor.model.* fun Application.configureRouting() { routing { get("/task") { call.respondHtml { body { tasks.asTable(this) } } } } }Instead of returning static content to the client, you are now providing a list of tasks. Since a list cannot be sent directly over the network, it must be converted to a format that the client can understand. In this case, the tasks are converted into an HTML table.
Click the restart button
to restart the application. Navigate to http://localhost:8080/task in your browser. It should display an HTML table with the tasks.
Refactor the model
Before you continue extending your application’s functionality, you should refactor the design by encapsulating the list of values inside a repository. This will allow you to centralize data management and focus on Ktor-specific code.
Return to the TaskRepository.kt file and replace the existing list of tasks with the following code:
object TaskRepository {
    private val tasks = mutableListOf(
        Task("cleaning", "Clean the house", Priority.Low),
        Task("gardening", "Mow the lawn", Priority.Medium),
        Task("shopping", "Buy the groceries", Priority.High),
        Task("painting", "Paint the fence", Priority.Medium)
    )

    fun allTasks(): List<Task> = tasks

    fun tasksByPriority(priority: Priority) = tasks.filter {
        it.priority == priority
    }

    fun taskByName(name: String) = tasks.find {
        it.name.equals(name, ignoreCase = true)
    }

    fun addTask(task: Task) {
        if (taskByName(task.name) != null) {
            throw IllegalStateException("Cannot duplicate task names!")
        }
        tasks.add(task)
    }
}
This implements a basic data store for tasks based on a list. For the purposes of the example, the order in which tasks are added will be maintained, but duplicates will not be allowed by throwing an exception.
Open the Routing.kt file and replace the existing Application.configureRouting() function with the following implementation:
 private val tasks = mutableListOf(
    Task("cleaning", "Clean the house", Priority.Low),
    Task("gardening", "Mow the lawn", Priority.Medium),
    Task("shopping", "Buy the groceries", Priority.High),
    Task("painting", "Paint the fence", Priority.Medium)
)

fun Application.configureRouting() {
    routing {
        get("/") {
            call.respondText("Hello World!")
        }
        get("/task") {
            val tasks = TaskRepository.allTasks()
            call.respondHtml {
                body {
                    tasks.asTable(this)
                }
            }
        }
    }
}Work with parameters
In this iteration, you will allow the user to view tasks by priority. To do this, your application must allow GET requests to the following URLs:
The route you will add is /task/priority/{priority?} where {priority?} represents a path parameter that you will need to extract at runtime, and the question mark is used to indicate that a parameter is optional. The path parameter can have any name you like, but priority seems the obvious choice.
Open the Routing.kt file and add the following route to your code, as shown below:
fun Application.configureRouting() {
    routing {

        // ...

        get("/task/priority/{priority}") {
            val priorityAsText = call.parameters["priority"]
            if (priorityAsText == null) {
                call.respond(HttpStatusCode.BadRequest)
                return@get
            }

            try {
                val priority = Priority.valueOf(priorityAsText.replaceFirstChar { it.uppercase() })
                val tasks = TaskRepository.tasksByPriority(priority)

                if (tasks.isEmpty()) {
                    call.respond(HttpStatusCode.NotFound)
                    return@get
                }

                call.respondHtml {
                    body {
                        tasks.asTable(this)
                    }
                }
            } catch (e: IllegalArgumentException) {
                call.respond(HttpStatusCode.BadRequest)
            }
        }
    }
}
As summarized above, you have written a handler for the URL /task/priority/{priority?}. The symbol priority represents the path parameter that the user has added. Unfortunately, on the server there is no way to guarantee that this is one of the four values of the corresponding Kotlin enumeration, so it must be checked manually.
If the path parameter is absent, the server returns a 400 status code to the client. Otherwise, it extracts the value of the parameter and attempts to convert it to a member of the enumeration. If this fails, an exception will be thrown, which the server catches and returns a 400 status code.
Assuming the conversion is successful, the repository is used to find the matching Tasks. If there are no tasks of the specified priority, the server returns a 404 status code; otherwise, it sends the matches in an HTML table.
You can test this functionality in the browser by requesting the different URLs.
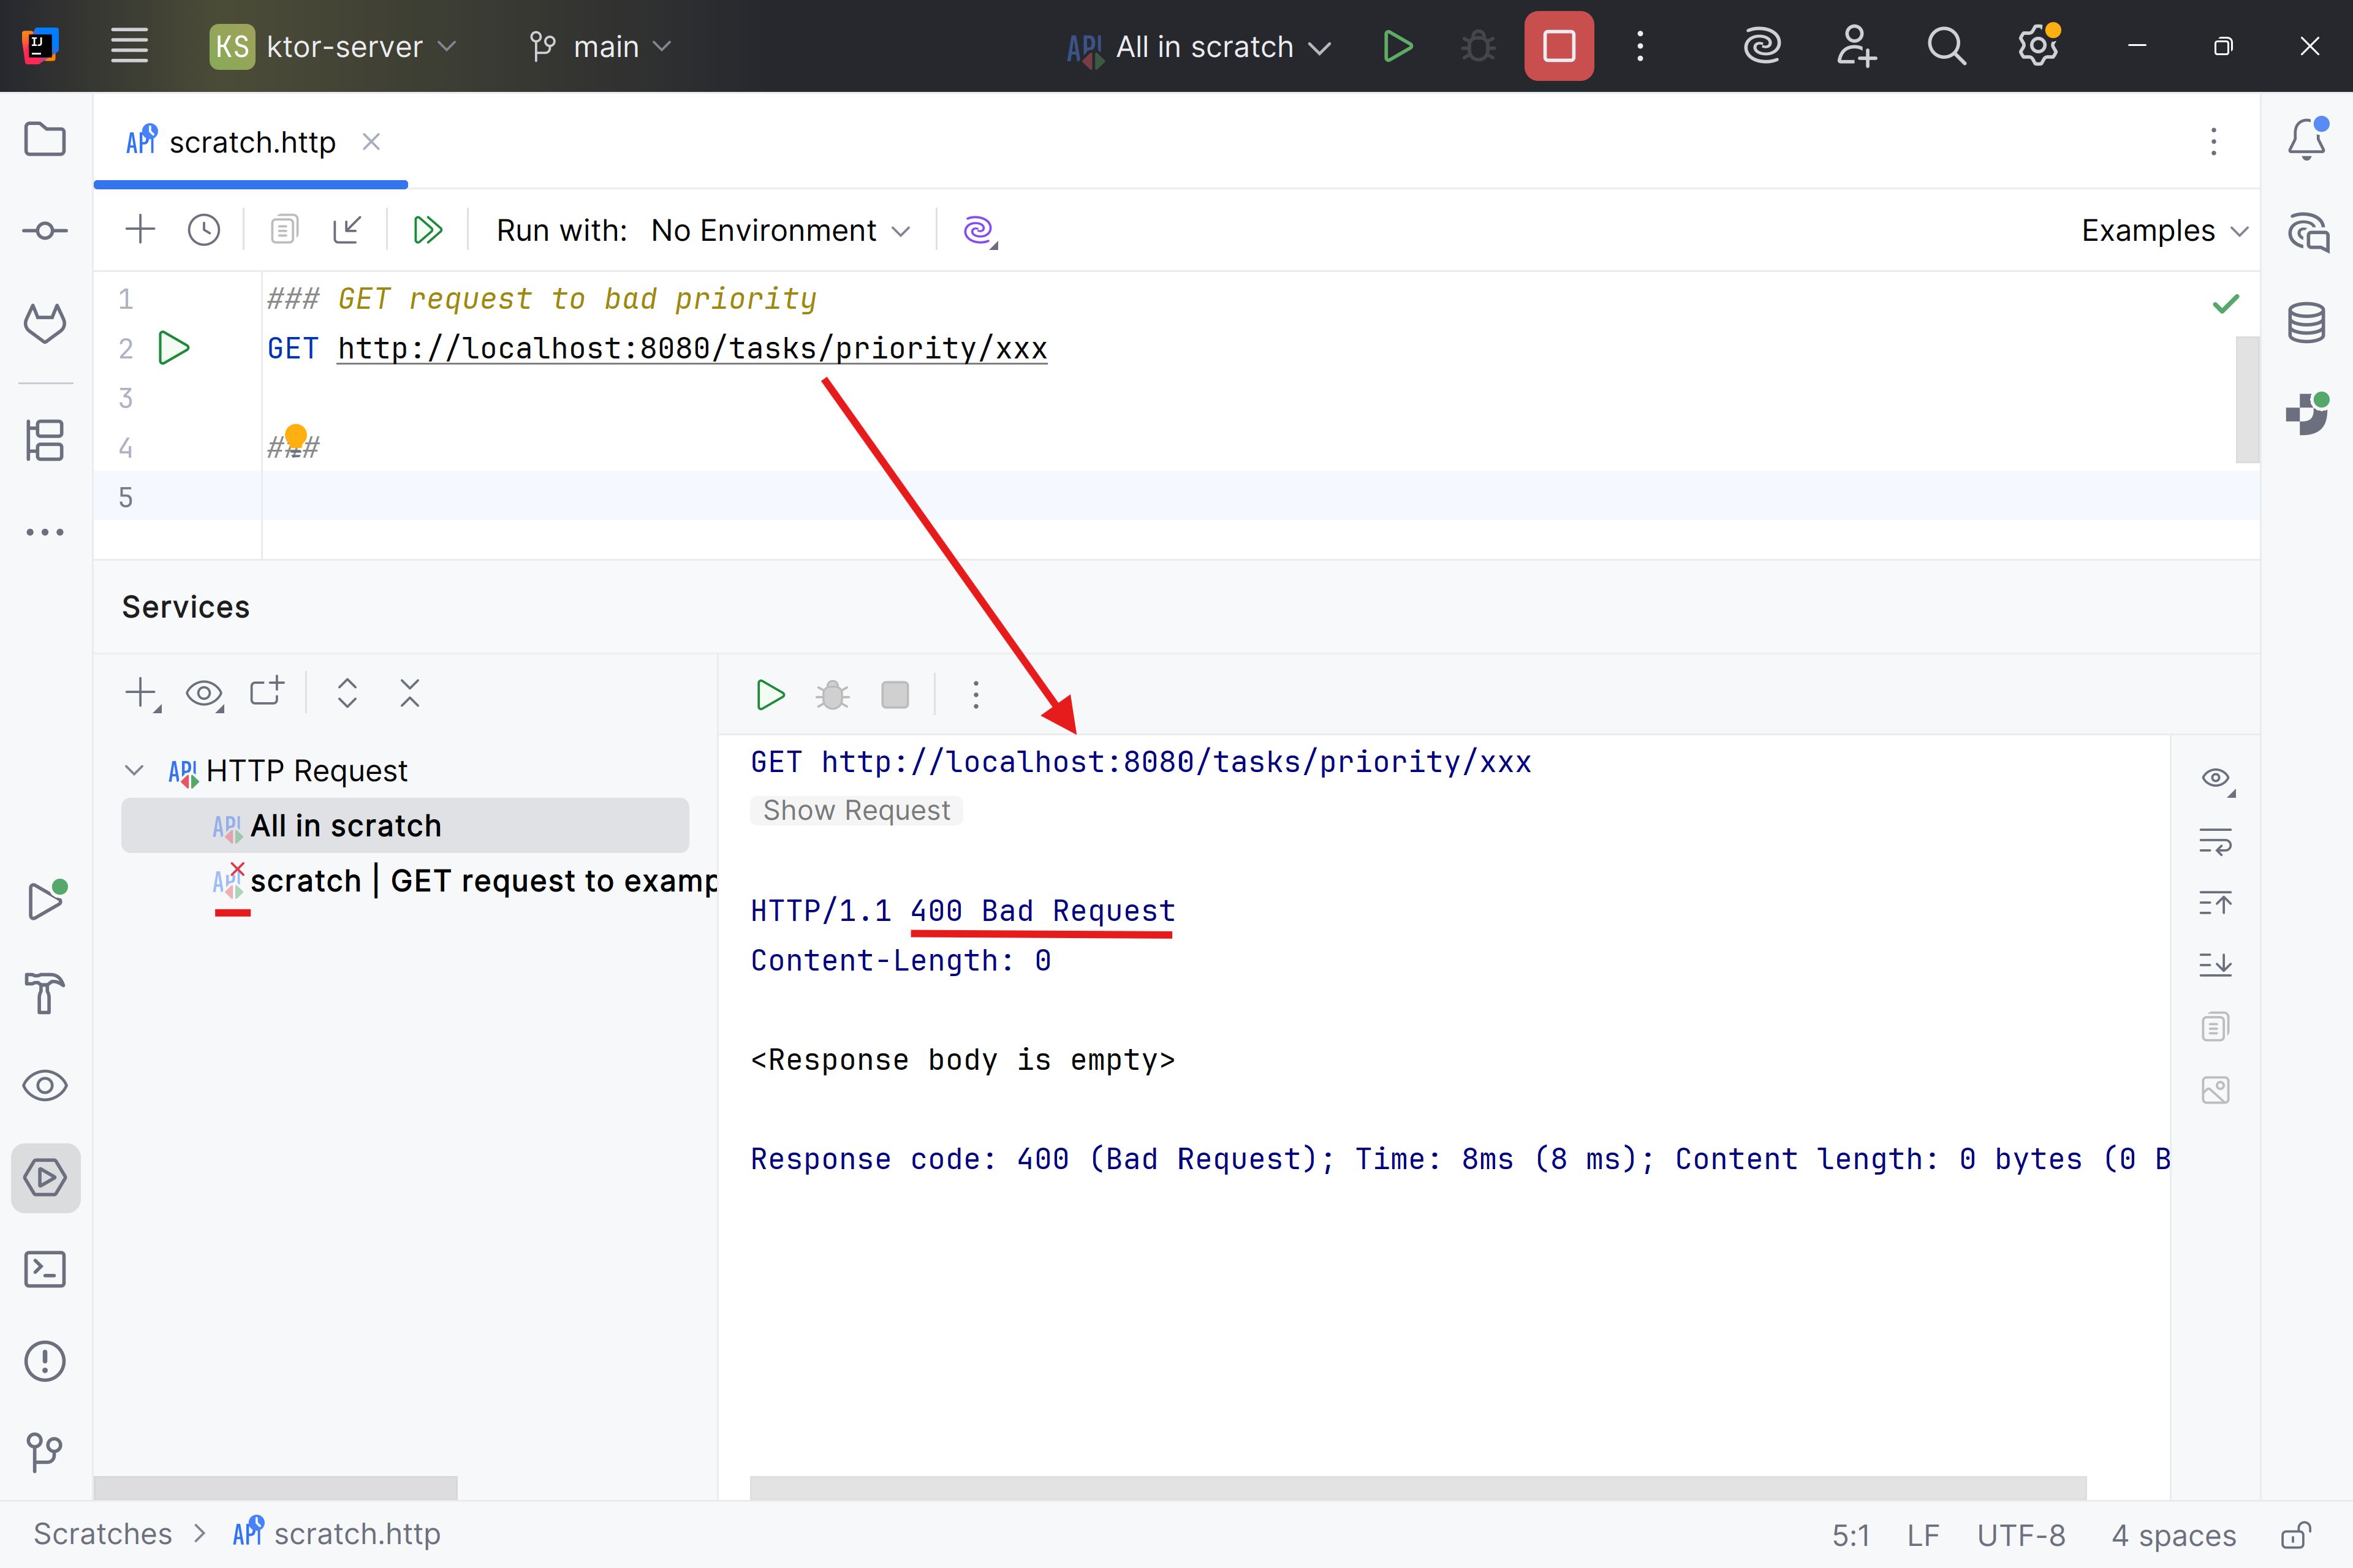
Unfortunately, tests you can perform through the browser are limited in error cases. The browser will not display the details of a failed response unless you use developer extensions.
An easier alternative would be to use a specialized tool such as HTTP Client:
Add unit tests
So far you have added two routes — one to retrieve all tasks and one to retrieve tasks by priority. Tools like HTTP Client allow you to thoroughly test these routes, but they require manual inspection and run externally to Ktor.
This is acceptable when prototyping and in small applications. However, this approach does not scale to large applications where there may be thousands of tests that need to be run frequently. A better solution is to fully automate testing.
Ktor provides its own testing framework to support automated validation of routes. Below, you will write some tests for your application’s existing functionality.
- Create a new directory named
test. - Inside
testcreate a new fileApplicationTest.kt. - Open the
ApplicationTest.ktfile and add the following code:
package org.jetbrains.amper.ktor

import io.ktor.client.request.*
import io.ktor.client.statement.*
import io.ktor.http.*
import io.ktor.server.testing.*
import kotlin.test.Test
import kotlin.test.assertContains
import kotlin.test.assertEquals

class ApplicationTest {
    @Test
    fun tasksCanBeFoundByPriority() = testApplication {
        application {
            module()
        }

        val response = client.get("/task/priority/medium")
        val body = response.bodyAsText()

        assertEquals(HttpStatusCode.OK, response.status)
        assertContains(body, "Mow the lawn")
        assertContains(body, "Paint the fence")
    }

    @Test
    fun invalidPriorityProduces400() = testApplication {
        application {
            module()
        }

        val response = client.get("/task/priority/invalid")
        assertEquals(HttpStatusCode.BadRequest, response.status)
    }

    @Test
    fun unusedPriorityProduces404() = testApplication {
        application {
            module()
        }

        val response = client.get("/task/priority/vital")
        assertEquals(HttpStatusCode.NotFound, response.status)
    }
}
In each of these tests a new instance of Ktor is created. It runs within a test environment, rather than a web server such as Netty. The module you wrote for is loaded, which in turn invokes the routing function. You can then use the built-in client object to send requests to the application and validate the returned responses.
The test can be run within the IDE or as part of your CI/CD pipeline.
To run the tests within the IDE, click the gutter icon
Handle POST requests
You can follow the process described above to create any number of additional routes for GET requests. These would allow the user to fetch tasks using whatever search criteria we like. But users will also want to be able to create new tasks.
In that case the appropriate type of HTTP request is a POST. A POST request is typically triggered when a user completes and submits an HTML form.
Unlike a GET request, a POST request has a body, which contains the names and values of all the inputs that are present on the form. This information is encoded to separate the data from different inputs and to escape illegal characters. You do not need to worry about the details of this process, as the browser and Ktor will manage it for us.
Create the file TaskUI.kt in the ui package and add the following code::
package dev.xtec.ktor.ui

import kotlinx.html.*

object TaskUI {
    fun form(body: BODY, action: String) = body.div {
        h1 {
            + "Adding a new task"
        }
        form(method = FormMethod.post, action = action) {
            div {
                label {
                    htmlFor = "name"
                    + "Name: "
                }
                input(type = InputType.text, name = "name") {
                    id = "name"
                    size = "10"
                }
            }
            div {
                label {
                    htmlFor = "description"
                    + "Description: "
                }
                input(type = InputType.text, name = "description") {
                    id = "description"
                    size = "20"
                }
            }
            div {
                label {
                    htmlFor = "priority"
                    + "Priority: "
                }
                select {
                    id = "priority"
                    name = "priority"
                    option {
                        value = "Low"
                        +"Low"
                    }
                    option {
                        value = "Medium"
                        +"Medium"
                    }
                    option {
                        value = "High"
                        +"High"
                    }
                    option {
                        value = "Vital"
                        +"Vital"
                    }

                }
            }
            input(type = InputType.submit) {
            }
        }
    }
}
Create a new route in Routing.kt to show the form to the user:
    get("/task/new") {
        call.respondHtml {
            body {
                TaskUI.form(this, "/task")
            }
        }
}Add a handler for the form
Next, add a handler for the form at the same route:
fun Application.configureRouting() {
    routing {
        //...

        //add the following route
        post("/task") {
            val formContent = call.receiveParameters()

            val params = Triple(
                formContent["name"] ?: "",
                formContent["description"] ?: "",
                formContent["priority"] ?: ""
            )

            if (params.toList().any { it.isEmpty() }) {
                call.respond(HttpStatusCode.BadRequest)
                return@post
            }

            try {
                val priority = Priority.valueOf(params.third)
                TaskRepository.addTask(
                    Task(
                        params.first,
                        params.second,
                        priority
                    )
                )

                call.respond(HttpStatusCode.NoContent)
            } catch (ex: IllegalArgumentException) {
                call.respond(HttpStatusCode.BadRequest)
            } catch (ex: IllegalStateException) {
                call.respond(HttpStatusCode.BadRequest)
            }
        }
    }
}
As you can see, the new route is mapped to POST requests rather than GET requests. Ktor processes the body of the request via the call to receiveParameters(). This returns a collection of the parameters that were present in the body of the request.
There are three parameters, so you can store the associated values in a Triple. If a parameter is not present, then an empty string is stored instead.
If any of the values are empty, the server will return a response with a status code of 400. Then, it will attempt to convert the third parameter to a Priority and, if successful, add the information to the repository in a new Task. Both of these actions may result in an exception, in which case once again return a status code 400.
Otherwise, if everything is successful, the server will return a 204 status code ( No Content) to the client. This signifies that their request has succeeded, but there’s no fresh information to send them as a result.
Test the finished functionality
Navigate to http://localhost:8080/task/new in the browser.
Fill in the form with sample data and click Submit.
When you submit the form you should not be directed to a new page.
Navigate to the URL http://localhost:8080/task.
You should see that the new task has been added.
To validate the functionality, add the following test to ApplicationTest.kt:
    @Test
    fun newTasksCanBeAdded() = testApplication {
        application {
            module()
        }

        val response1 = client.post("/task/new") {
            header(
                HttpHeaders.ContentType,
                ContentType.Application.FormUrlEncoded.toString()
            )
            setBody(
                listOf(
                    "name" to "swimming",
                    "description" to "Go to the beach",
                    "priority" to "Low"
                ).formUrlEncode()
            )
        }

        assertEquals(HttpStatusCode.NoContent, response1.status)

        val response2 = client.get("/task")
        assertEquals(HttpStatusCode.OK, response2.status)
        val body = response2.bodyAsText()

        assertContains(body, "swimming")
        assertContains(body, "Go to the beach")
    }
In this test two requests are sent to the server, a POST request to create a new task and a GET request to confirm the new task has been added.
When making the first request, the setBody() method is used to insert content into the body of the request.
The test framework provides a formUrlEncode() extension method on collections, which abstracts the process of formatting the data as the browser would.
Refactor the routing
If you examine your routing thus far, you will see that all the routes begin with /task.
You can remove this duplication by placing them into their own sub-route:
fun Application.configureRouting() {
    routing {
        route("/task") {
            get {
                //Code remains the same
            }

            get("/priority/{priority?}") {
                //Code remains the same
            }

            post {
                //Code remains the same
            }
        }
}
If your application reached the stage where you had multiple sub-routes, then it would be appropriate to put each into its own helper function. However, this is not required at present.
Task
Build a small web app to manage Customers, Products, and Orders using Ktor’s HTML DSL.
You’ll implement basic CRUD for primary data and create/read flows for orders with items.
The data will be stored on persistent storage with Exposed
%22%20%20stroke-dasharray=%224%204%22%20stroke-linecap=%22round%22%20stroke-linejoin=%22round%22%20/%3E%3Crect%20data-edge-id=%22edge-0%22%20data-label-kind=%22center%22%20x=%22486.76%22%20y=%2241.70%22%20width=%2279.68%22%20height=%2228.00%22%20rx=%222%22%20ry=%222%22%20fill=%22%23FFFFFF%22%20fill-opacity=%220.85%22%20stroke=%22%2394A3B8%22%20stroke-opacity=%220.35%22%20stroke-width=%220.8%22/%3E%3Cg%20class=%22edgeLabel%22%20data-edge-id=%22edge-0%22%20data-label-kind=%22center%22%3E%3Ctext%20x=%22526.60%22%20y=%2259.20%22%20text-anchor=%22middle%22%20font-family=%22Inter,ui-sans-serif,system-ui,-apple-system,Segoe%20UI,sans-serif%22%20font-size=%2214%22%20fill=%22%230F172A%22%3E%3Ctspan%20x=%22526.60%22%20dy=%220.00%22%3Ecustomer%3C/tspan%3E%3C/text%3E%3C/g%3E%3Cpath%20id=%22edge-1%22%20class=%22edgePath%22%20data-edge-id=%22edge-1%22%20d=%22M%20184.440,100.862%20L%20252.519,73.561%22%20fill=%22none%22%20stroke=%22%2364748B%22%20stroke-width=%221%22%20marker-end=%22url(%23arrow-class-dep-0)%22%20%20stroke-dasharray=%224%204%22%20stroke-linecap=%22round%22%20stroke-linejoin=%22round%22%20/%3E%3Crect%20data-edge-id=%22edge-1%22%20data-label-kind=%22center%22%20x=%22192.08%22%20y=%2273.21%22%20width=%2252.80%22%20height=%2228.00%22%20rx=%222%22%20ry=%222%22%20fill=%22%23FFFFFF%22%20fill-opacity=%220.85%22%20stroke=%22%2394A3B8%22%20stroke-opacity=%220.35%22%20stroke-width=%220.8%22/%3E%3Cg%20class=%22edgeLabel%22%20data-edge-id=%22edge-1%22%20data-label-kind=%22center%22%3E%3Ctext%20x=%22218.48%22%20y=%2290.71%22%20text-anchor=%22middle%22%20font-family=%22Inter,ui-sans-serif,system-ui,-apple-system,Segoe%20UI,sans-serif%22%20font-size=%2214%22%20fill=%22%230F172A%22%3E%3Ctspan%20x=%22218.48%22%20dy=%220.00%22%3Eorder%3C/tspan%3E%3C/text%3E%3C/g%3E%3Cpath%20id=%22edge-2%22%20class=%22edgePath%22%20data-edge-id=%22edge-2%22%20d=%22M%20184.440,164.862%20L%20268.537,192.466%22%20fill=%22none%22%20stroke=%22%2364748B%22%20stroke-width=%221%22%20marker-end=%22url(%23arrow-class-dep-0)%22%20%20stroke-dasharray=%224%204%22%20stroke-linecap=%22round%22%20stroke-linejoin=%22round%22%20/%3E%3Crect%20data-edge-id=%22edge-2%22%20data-label-kind=%22center%22%20x=%22191.13%22%20y=%22164.66%22%20width=%2270.72%22%20height=%2228.00%22%20rx=%222%22%20ry=%222%22%20fill=%22%23FFFFFF%22%20fill-opacity=%220.85%22%20stroke=%22%2394A3B8%22%20stroke-opacity=%220.35%22%20stroke-width=%220.8%22/%3E%3Cg%20class=%22edgeLabel%22%20data-edge-id=%22edge-2%22%20data-label-kind=%22center%22%3E%3Ctext%20x=%22226.49%22%20y=%22182.16%22%20text-anchor=%22middle%22%20font-family=%22Inter,ui-sans-serif,system-ui,-apple-system,Segoe%20UI,sans-serif%22%20font-size=%2214%22%20fill=%22%230F172A%22%3E%3Ctspan%20x=%22226.49%22%20dy=%220.00%22%3Eproduct%3C/tspan%3E%3C/text%3E%3C/g%3E%3Crect%20x=%22577.55%22%20y=%228.01%22%20width=%22215.64%22%20height=%2295.40%22%20rx=%223%22%20ry=%223%22%20fill=%22%23F8FAFC%22%20stroke=%22%2394A3B8%22%20stroke-width=%221%22%20stroke-linejoin=%22round%22%20stroke-linecap=%22round%22/%3E%3Cline%20x1=%22583.55%22%20y1=%2246.96%22%20x2=%22787.19%22%20y2=%2246.96%22%20stroke=%22%2394A3B8%22%20stroke-width=%221.0%22/%3E%3Ctext%20x=%22685.37%22%20y=%2234.01%22%20text-anchor=%22middle%22%20font-family=%22Inter,ui-sans-serif,system-ui,-apple-system,Segoe%20UI,sans-serif%22%20font-size=%2214%22%20fill=%22%230F172A%22%3E%3Ctspan%20x=%22685.37%22%20dy=%220.00%22%20font-weight=%22600%22%3ECustomer%3C/tspan%3E%3C/text%3E%3Ctext%20x=%22607.55%22%20y=%2269.71%22%20text-anchor=%22start%22%20font-family=%22Inter,ui-sans-serif,system-ui,-apple-system,Segoe%20UI,sans-serif%22%20font-size=%2214%22%20fill=%22%230F172A%22%3E%3Ctspan%20x=%22607.55%22%20dy=%220.00%22%3Ename%20text%20primary%20key%3C/tspan%3E%3Ctspan%20x=%22607.55%22%20dy=%2217.85%22%3Eemail%20text%20unique%3C/tspan%3E%3C/text%3E%3Crect%20x=%22257.16%22%20y=%228.00%22%20width=%22223.48%22%20height=%2295.40%22%20rx=%223%22%20ry=%223%22%20fill=%22%23F8FAFC%22%20stroke=%22%2394A3B8%22%20stroke-width=%221%22%20stroke-linejoin=%22round%22%20stroke-linecap=%22round%22/%3E%3Cline%20x1=%22263.16%22%20y1=%2246.95%22%20x2=%22474.64%22%20y2=%2246.95%22%20stroke=%22%2394A3B8%22%20stroke-width=%221.0%22/%3E%3Ctext%20x=%22368.90%22%20y=%2234.00%22%20text-anchor=%22middle%22%20font-family=%22Inter,ui-sans-serif,system-ui,-apple-system,Segoe%20UI,sans-serif%22%20font-size=%2214%22%20fill=%22%230F172A%22%3E%3Ctspan%20x=%22368.90%22%20dy=%220.00%22%20font-weight=%22600%22%3EOrder%3C/tspan%3E%3C/text%3E%3Ctext%20x=%22287.16%22%20y=%2269.70%22%20text-anchor=%22start%22%20font-family=%22Inter,ui-sans-serif,system-ui,-apple-system,Segoe%20UI,sans-serif%22%20font-size=%2214%22%20fill=%22%230F172A%22%3E%3Ctspan%20x=%22287.16%22%20dy=%220.00%22%3Eid%20integer%20primary%20key%3C/tspan%3E%3Ctspan%20x=%22287.16%22%20dy=%2217.85%22%3Edate%20date%3C/tspan%3E%3C/text%3E%3Crect%20x=%228.00%22%20y=%2287.36%22%20width=%22176.44%22%20height=%2291.00%22%20rx=%223%22%20ry=%223%22%20fill=%22%23F8FAFC%22%20stroke=%22%2394A3B8%22%20stroke-width=%221%22%20stroke-linejoin=%22round%22%20stroke-linecap=%22round%22/%3E%3Cline%20x1=%2214.00%22%20y1=%22133.04%22%20x2=%22178.44%22%20y2=%22133.04%22%20stroke=%22%2394A3B8%22%20stroke-width=%221.0%22/%3E%3Ctext%20x=%2296.22%22%20y=%22120.09%22%20text-anchor=%22middle%22%20font-family=%22Inter,ui-sans-serif,system-ui,-apple-system,Segoe%20UI,sans-serif%22%20font-size=%2214%22%20fill=%22%230F172A%22%3E%3Ctspan%20x=%2296.22%22%20dy=%220.00%22%20font-weight=%22600%22%3EOrderItem%3C/tspan%3E%3C/text%3E%3Ctext%20x=%2238.00%22%20y=%22155.79%22%20text-anchor=%22start%22%20font-family=%22Inter,ui-sans-serif,system-ui,-apple-system,Segoe%20UI,sans-serif%22%20font-size=%2214%22%20fill=%22%230F172A%22%3E%3Ctspan%20x=%2238.00%22%20dy=%220.00%22%3Equantity%20integer%3C/tspan%3E%3C/text%3E%3Crect%20x=%22273.29%22%20y=%22153.40%22%20width=%22223.48%22%20height=%22113.25%22%20rx=%223%22%20ry=%223%22%20fill=%22%23F8FAFC%22%20stroke=%22%2394A3B8%22%20stroke-width=%221%22%20stroke-linejoin=%22round%22%20stroke-linecap=%22round%22/%3E%3Cline%20x1=%22279.29%22%20y1=%22192.35%22%20x2=%22490.77%22%20y2=%22192.35%22%20stroke=%22%2394A3B8%22%20stroke-width=%221.0%22/%3E%3Ctext%20x=%22385.03%22%20y=%22179.40%22%20text-anchor=%22middle%22%20font-family=%22Inter,ui-sans-serif,system-ui,-apple-system,Segoe%20UI,sans-serif%22%20font-size=%2214%22%20fill=%22%230F172A%22%3E%3Ctspan%20x=%22385.03%22%20dy=%220.00%22%20font-weight=%22600%22%3EProduct%3C/tspan%3E%3C/text%3E%3Ctext%20x=%22303.29%22%20y=%22215.10%22%20text-anchor=%22start%22%20font-family=%22Inter,ui-sans-serif,system-ui,-apple-system,Segoe%20UI,sans-serif%22%20font-size=%2214%22%20fill=%22%230F172A%22%3E%3Ctspan%20x=%22303.29%22%20dy=%220.00%22%3Eid%20integer%20primary%20key%3C/tspan%3E%3Ctspan%20x=%22303.29%22%20dy=%2217.85%22%3Ename%20text%3C/tspan%3E%3Ctspan%20x=%22303.29%22%20dy=%2217.85%22%3Eprice%20decimal%3C/tspan%3E%3C/text%3E%3C/svg%3E)
%22%20%20stroke-dasharray=%224%204%22%20stroke-linecap=%22round%22%20stroke-linejoin=%22round%22%20/%3E%3Crect%20data-edge-id=%22edge-0%22%20data-label-kind=%22center%22%20x=%22486.76%22%20y=%2241.70%22%20width=%2279.68%22%20height=%2228.00%22%20rx=%222%22%20ry=%222%22%20fill=%22%231e293b%22%20fill-opacity=%220.85%22%20stroke=%22%23475569%22%20stroke-opacity=%220.35%22%20stroke-width=%220.8%22/%3E%3Cg%20class=%22edgeLabel%22%20data-edge-id=%22edge-0%22%20data-label-kind=%22center%22%3E%3Ctext%20x=%22526.60%22%20y=%2259.20%22%20text-anchor=%22middle%22%20font-family=%22Inter,ui-sans-serif,system-ui,-apple-system,Segoe%20UI,sans-serif%22%20font-size=%2214%22%20fill=%22%23f1f5f9%22%3E%3Ctspan%20x=%22526.60%22%20dy=%220.00%22%3Ecustomer%3C/tspan%3E%3C/text%3E%3C/g%3E%3Cpath%20id=%22edge-1%22%20class=%22edgePath%22%20data-edge-id=%22edge-1%22%20d=%22M%20184.440,100.862%20L%20252.519,73.561%22%20fill=%22none%22%20stroke=%22%2394a3b8%22%20stroke-width=%221%22%20marker-end=%22url(%23arrow-class-dep-0)%22%20%20stroke-dasharray=%224%204%22%20stroke-linecap=%22round%22%20stroke-linejoin=%22round%22%20/%3E%3Crect%20data-edge-id=%22edge-1%22%20data-label-kind=%22center%22%20x=%22192.08%22%20y=%2273.21%22%20width=%2252.80%22%20height=%2228.00%22%20rx=%222%22%20ry=%222%22%20fill=%22%231e293b%22%20fill-opacity=%220.85%22%20stroke=%22%23475569%22%20stroke-opacity=%220.35%22%20stroke-width=%220.8%22/%3E%3Cg%20class=%22edgeLabel%22%20data-edge-id=%22edge-1%22%20data-label-kind=%22center%22%3E%3Ctext%20x=%22218.48%22%20y=%2290.71%22%20text-anchor=%22middle%22%20font-family=%22Inter,ui-sans-serif,system-ui,-apple-system,Segoe%20UI,sans-serif%22%20font-size=%2214%22%20fill=%22%23f1f5f9%22%3E%3Ctspan%20x=%22218.48%22%20dy=%220.00%22%3Eorder%3C/tspan%3E%3C/text%3E%3C/g%3E%3Cpath%20id=%22edge-2%22%20class=%22edgePath%22%20data-edge-id=%22edge-2%22%20d=%22M%20184.440,164.862%20L%20268.537,192.466%22%20fill=%22none%22%20stroke=%22%2394a3b8%22%20stroke-width=%221%22%20marker-end=%22url(%23arrow-class-dep-0)%22%20%20stroke-dasharray=%224%204%22%20stroke-linecap=%22round%22%20stroke-linejoin=%22round%22%20/%3E%3Crect%20data-edge-id=%22edge-2%22%20data-label-kind=%22center%22%20x=%22191.13%22%20y=%22164.66%22%20width=%2270.72%22%20height=%2228.00%22%20rx=%222%22%20ry=%222%22%20fill=%22%231e293b%22%20fill-opacity=%220.85%22%20stroke=%22%23475569%22%20stroke-opacity=%220.35%22%20stroke-width=%220.8%22/%3E%3Cg%20class=%22edgeLabel%22%20data-edge-id=%22edge-2%22%20data-label-kind=%22center%22%3E%3Ctext%20x=%22226.49%22%20y=%22182.16%22%20text-anchor=%22middle%22%20font-family=%22Inter,ui-sans-serif,system-ui,-apple-system,Segoe%20UI,sans-serif%22%20font-size=%2214%22%20fill=%22%23f1f5f9%22%3E%3Ctspan%20x=%22226.49%22%20dy=%220.00%22%3Eproduct%3C/tspan%3E%3C/text%3E%3C/g%3E%3Crect%20x=%22577.55%22%20y=%228.01%22%20width=%22215.64%22%20height=%2295.40%22%20rx=%223%22%20ry=%223%22%20fill=%22%231e293b%22%20stroke=%22%23475569%22%20stroke-width=%221%22%20stroke-linejoin=%22round%22%20stroke-linecap=%22round%22/%3E%3Cline%20x1=%22583.55%22%20y1=%2246.96%22%20x2=%22787.19%22%20y2=%2246.96%22%20stroke=%22%23475569%22%20stroke-width=%221.0%22/%3E%3Ctext%20x=%22685.37%22%20y=%2234.01%22%20text-anchor=%22middle%22%20font-family=%22Inter,ui-sans-serif,system-ui,-apple-system,Segoe%20UI,sans-serif%22%20font-size=%2214%22%20fill=%22%23f1f5f9%22%3E%3Ctspan%20x=%22685.37%22%20dy=%220.00%22%20font-weight=%22600%22%3ECustomer%3C/tspan%3E%3C/text%3E%3Ctext%20x=%22607.55%22%20y=%2269.71%22%20text-anchor=%22start%22%20font-family=%22Inter,ui-sans-serif,system-ui,-apple-system,Segoe%20UI,sans-serif%22%20font-size=%2214%22%20fill=%22%23f1f5f9%22%3E%3Ctspan%20x=%22607.55%22%20dy=%220.00%22%3Ename%20text%20primary%20key%3C/tspan%3E%3Ctspan%20x=%22607.55%22%20dy=%2217.85%22%3Eemail%20text%20unique%3C/tspan%3E%3C/text%3E%3Crect%20x=%22257.16%22%20y=%228.00%22%20width=%22223.48%22%20height=%2295.40%22%20rx=%223%22%20ry=%223%22%20fill=%22%231e293b%22%20stroke=%22%23475569%22%20stroke-width=%221%22%20stroke-linejoin=%22round%22%20stroke-linecap=%22round%22/%3E%3Cline%20x1=%22263.16%22%20y1=%2246.95%22%20x2=%22474.64%22%20y2=%2246.95%22%20stroke=%22%23475569%22%20stroke-width=%221.0%22/%3E%3Ctext%20x=%22368.90%22%20y=%2234.00%22%20text-anchor=%22middle%22%20font-family=%22Inter,ui-sans-serif,system-ui,-apple-system,Segoe%20UI,sans-serif%22%20font-size=%2214%22%20fill=%22%23f1f5f9%22%3E%3Ctspan%20x=%22368.90%22%20dy=%220.00%22%20font-weight=%22600%22%3EOrder%3C/tspan%3E%3C/text%3E%3Ctext%20x=%22287.16%22%20y=%2269.70%22%20text-anchor=%22start%22%20font-family=%22Inter,ui-sans-serif,system-ui,-apple-system,Segoe%20UI,sans-serif%22%20font-size=%2214%22%20fill=%22%23f1f5f9%22%3E%3Ctspan%20x=%22287.16%22%20dy=%220.00%22%3Eid%20integer%20primary%20key%3C/tspan%3E%3Ctspan%20x=%22287.16%22%20dy=%2217.85%22%3Edate%20date%3C/tspan%3E%3C/text%3E%3Crect%20x=%228.00%22%20y=%2287.36%22%20width=%22176.44%22%20height=%2291.00%22%20rx=%223%22%20ry=%223%22%20fill=%22%231e293b%22%20stroke=%22%23475569%22%20stroke-width=%221%22%20stroke-linejoin=%22round%22%20stroke-linecap=%22round%22/%3E%3Cline%20x1=%2214.00%22%20y1=%22133.04%22%20x2=%22178.44%22%20y2=%22133.04%22%20stroke=%22%23475569%22%20stroke-width=%221.0%22/%3E%3Ctext%20x=%2296.22%22%20y=%22120.09%22%20text-anchor=%22middle%22%20font-family=%22Inter,ui-sans-serif,system-ui,-apple-system,Segoe%20UI,sans-serif%22%20font-size=%2214%22%20fill=%22%23f1f5f9%22%3E%3Ctspan%20x=%2296.22%22%20dy=%220.00%22%20font-weight=%22600%22%3EOrderItem%3C/tspan%3E%3C/text%3E%3Ctext%20x=%2238.00%22%20y=%22155.79%22%20text-anchor=%22start%22%20font-family=%22Inter,ui-sans-serif,system-ui,-apple-system,Segoe%20UI,sans-serif%22%20font-size=%2214%22%20fill=%22%23f1f5f9%22%3E%3Ctspan%20x=%2238.00%22%20dy=%220.00%22%3Equantity%20integer%3C/tspan%3E%3C/text%3E%3Crect%20x=%22273.29%22%20y=%22153.40%22%20width=%22223.48%22%20height=%22113.25%22%20rx=%223%22%20ry=%223%22%20fill=%22%231e293b%22%20stroke=%22%23475569%22%20stroke-width=%221%22%20stroke-linejoin=%22round%22%20stroke-linecap=%22round%22/%3E%3Cline%20x1=%22279.29%22%20y1=%22192.35%22%20x2=%22490.77%22%20y2=%22192.35%22%20stroke=%22%23475569%22%20stroke-width=%221.0%22/%3E%3Ctext%20x=%22385.03%22%20y=%22179.40%22%20text-anchor=%22middle%22%20font-family=%22Inter,ui-sans-serif,system-ui,-apple-system,Segoe%20UI,sans-serif%22%20font-size=%2214%22%20fill=%22%23f1f5f9%22%3E%3Ctspan%20x=%22385.03%22%20dy=%220.00%22%20font-weight=%22600%22%3EProduct%3C/tspan%3E%3C/text%3E%3Ctext%20x=%22303.29%22%20y=%22215.10%22%20text-anchor=%22start%22%20font-family=%22Inter,ui-sans-serif,system-ui,-apple-system,Segoe%20UI,sans-serif%22%20font-size=%2214%22%20fill=%22%23f1f5f9%22%3E%3Ctspan%20x=%22303.29%22%20dy=%220.00%22%3Eid%20integer%20primary%20key%3C/tspan%3E%3Ctspan%20x=%22303.29%22%20dy=%2217.85%22%3Ename%20text%3C/tspan%3E%3Ctspan%20x=%22303.29%22%20dy=%2217.85%22%3Eprice%20decimal%3C/tspan%3E%3C/text%3E%3C/svg%3E)