Linux - Shell

The shell is a terminal that allows you to interact with the machine via typed commands.

Introduction

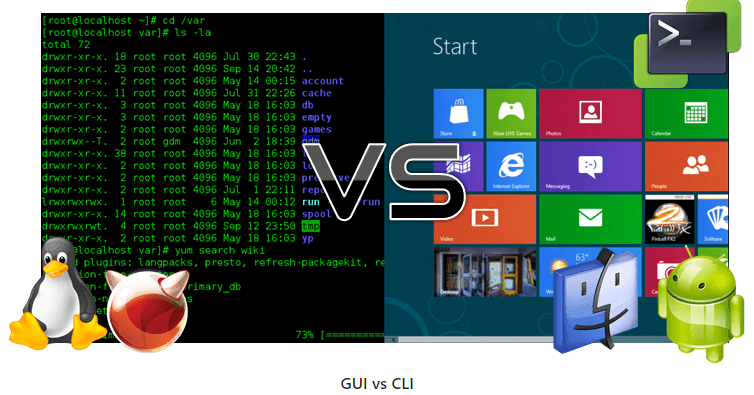
Humans and computers often interact in many different ways, such as via keyboard and mouse, touch-screen interfaces, or voice recognition systems. The most commonly used way to interact with personal computers is called a graphical user interface (GUI). With a GUI, we give instructions by clicking the mouse and using menu-based interactions.

Although the visual aid of a GUI makes learning intuitive, this way of giving instructions to a computer scales very poorly. Imagine the following task: for a literature search, you must copy the third line from a thousand text files in a thousand different directories and paste it into a single file. If you use a GUI, you’ll not only be clicking around for several hours, but you might also make mistakes during this repetitive process. This is where we leverage the Unix shell.

The Unix shell is both a command-line interface (CLI) and a scripting language, allowing repetitive tasks to be done automatically and quickly. With the right commands, the shell can repeat tasks with or without any modification as many times as we want. Using the shell, the literature example task can be completed in seconds.

Shell

Create a virtual machine with Windows - Windows Subsystem for Linux (WSL)

A shell is a program where you type commands. You can launch complex software or do simple tasks (e.g., create a directory) in one line. The most popular Unix shell is Bash (the “Bourne Again SHell”).

Using a shell takes some learning. Unlike GUIs, CLIs do not show options by default — you learn a small set of commands that go a long way. The shell’s “grammar” lets you combine tools into powerful pipelines, script your workflows, and work reproducibly. It is also the simplest way to interact with remote machines and clusters.

When the shell opens, it shows a prompt, meaning it’s ready for input:

Terminal window
$

We’ll show the prompt as $.

Nota

Type only what follows $ and press Enter to run it.

The prompt is followed by a text cursor.

Your prompt may include extra info like username and host:

Terminal window
box@shell $

That’s fine — focus on the $.

Try your first command, ls (list):

Terminal window
$ ls

It prints the contents of the current directory. If it’s empty, you’ll just see the prompt again.

You can also list a specific directory:

Terminal window
$ ls /home/
box

If a command is unknown:

Terminal window
$ ks
ks: command not found

This usually means a typo or the program isn’t installed.

File System

The file system organizes data into files and directories (folders).

We’ll use a few commands to navigate and manage them.

Find where you are with pwd (“print working directory”):

Terminal window
$ pwd
/home/box

This is user box’s home directory.

The file system is a tree with the root / at the top:

/

bin

dev

home

tmp

The file system looks like an upside-down tree.

The topmost directory is the root directory that contains everything else. To refer to it, you use the forward slash character, /; this character is the first slash in /home/box.

Inside this directory are several other directories:

binwhere some built-in programs are stored
devdevices attached to the local file system
homewhere users’ personal directories are found
tmpfor temporary files that should not be stored long term

We know our current working directory /home/box is stored inside /home because /home is the first part of its name. Similarly, you know that /home is stored inside the root directory / because its name begins with /.

Slash

/ at the start of a path means the root directory.

Inside a path, / is just a separator.

Under /home, we find a directory for each user with an account on the shell machine, in this case only box.

/

bin

dev

home

tmp

box

User box’s files are stored in /home/box.

box is the user in our examples; therefore, we consider /home/box our home directory.

Usually, when you open a new command prompt, you will start in your home directory.

List contents

Let’s fetch some sample data:

Terminal window
$ cd
$ curl https://gitlab.com/xtec/linux/shell/-/raw/main/shell-data.tar.gz | tar -xz

Now we’ll learn the command that lets us see the contents of our file system.

You can see what’s in our home directory by running ls:

Terminal window
$ ls
shell-data

ls prints the names of files and directories in the current working directory. We can make its output more understandable by using the -F option, which tells ls to classify the output by adding a marker to file and directory names indicating what they are:

  • a trailing / indicates a directory
  • @ indicates a link
  • * indicates an executable

Depending on the shell’s default configuration, you can also use colors to indicate whether each entry is a file or directory.

Terminal window
$ ls -F
shell-data/

Here, you can see that the home directory only contains subdirectories. Any name in the output that doesn’t have a classification mark is a file in the current working directory.

If the screen is too cluttered, you can clear your terminal using the clear command or Ctrl + D. You can access previous commands using the and keys to move line by line, or by scrolling in your terminal.

--help

ls has many other options.

There are two common ways to find out how to use a command and which options it accepts:

  1. You can pass the --help option to any command, e.g., ls --help
  2. You can read its manual with man (manual): man ls

There’s also the option of Google and ChatGPT, but sooner or later you’ll discover that these options we explain are very useful too.

Most bash commands and programs people have written to run from inside bash support the --help option that

Terminal window
$ ls --help
Usage: ls [OPTION]... [FILE]...
List information about the FILEs (the current directory by default).
Sort entries alphabetically if none of -cftuvSUX nor --sort is specified.
Mandatory arguments to long options are mandatory for short options too.
-a, --all do not ignore entries starting with .
...

If you try to use an unsupported option, ls and other commands usually print an error like:

Terminal window
$ ls -j
ls: invalid option -- 'j'
Try 'ls --help' for more information.

man

Another way to learn ls is to type

Terminal window
$ man ls

This command will turn your terminal into a page with a description of the ls command and its options.

To navigate the man pages,

  • Use and to move line by line
  • Try B and the space bar to jump up and down a whole page.
  • To search for a character or word in the man pages, use the / key followed by the character or word you are searching for. Sometimes the search yields multiple hits. If so, you can move between hits using N (for forward) and Shift + N (for backward).

To exit the man pages, press Q.

Exploring other directories

We can use ls not only in the current working directory, but we can use it to list the contents of a different directory.

Let’s take a look at our shell-data directory by running ls -F shell-data, i.e., the ls command with the -F option and the shell-data argument.

The shell-data argument tells ls that we want a listing of something other than our current working directory:

Terminal window
$ ls -F shell-data
exercise-data/ north-pacific-gyre/

Note that if you pass as argument a directory that doesn’t exist in your current working directory, this command returns an error:

Terminal window
$ ls -F kkk
ls: cannot access 'kkk': No such file or directory

Organizing things hierarchically helps us find things when we look for them.

If you want, you can store everything directly in your home directory, in this case /home/box; Linux doesn’t mind and is completely indifferent.

But it may be more useful for you to store some files in separate folders (remember that Linux doesn’t care) with names that explain what they hold, for example /home/box/travel/egypt to store photos from your trip to Egypt.

Now that you know the exercise-data directory is located in the shell-data directory, you can use the same strategy as before.

You can look at its contents by passing a directory name to ls:

Terminal window
$ ls -F shell-data/exercise-data
alkanes/ animal-counts/ creatures/ numbers.txt writing/

Change directory

Another option is to change our location to a different directory, so that we are no longer in our home directory. The command to change location is cd followed by the name of the directory to change our working directory.

cd stands for change dir, which is somewhat misleading because the command doesn’t change the directory itself, but changes the shell’s current working directory. In other words, it changes the shell’s setting for which directory we are in.

The command cd is similar to double-clicking on a folder in a graphical interface to enter that folder.

For example, you can enter the exercise-data directory:

Terminal window
box@shell:~$ pwd
box@shell:~$ cd shell-data
box@shell:~/shell-data$ cd exercise-data
box@shell:~/shell-data/exercise-data$

You’ll notice that cd prints nothing. This is normal. Many shell commands show nothing on screen even when they run correctly.

What you will notice is that the prompt has changed because it shows where you are relative to your directory.

If you want to know the absolute path you can run the pwd command (“path working directory”):

Terminal window
$ pwd
/home/box/shell-data/exercise-data

If you now run ls -F without arguments, it will list the contents of /home/box/shell-data because that’s where we are now:

Terminal window
$ ls -F
alkanes/ animal-counts/ creatures/ numbers.txt writing/

We now know how to go down the directory tree (i.e., how to enter a subdirectory), but how do we go up (i.e., leave a directory and go to its parent directory)?

You might try the following:

Terminal window
$ cd shell-data
-bash: cd: shell-data: No such file or directory

But we get an error! Why is that?

With our methods so far, cd can only see subdirectories within your current directory.

There are different ways to see directories above your current location; we’ll start with the simplest one.

There is a shortcut in the shell to go up one directory level.

It works like this:

Terminal window
box@shell:~/shell-data/exercise-data$ cd ..
box@shell:~/shell-data$

.. is a special directory name meaning “the directory that contains this one,” or more precisely, the parent of the current directory.

If we run pwd after cd you can see we’re back at /home/box:

Terminal window
$ pwd
/home/box/shell-data

The special directory .. does not appear when you run ls.

If you want to show it, you can add the -a option to ls -F:

Terminal window
$ ls -F -a
./ ../ exercise-data/ north-pacific-gyre/

-a means “show all” (including hidden files); this forces ls to show us the names of files and directories that start with ., such as .. (for example, if we are in /home/box it refers to the /home directory).

As you can see, it also shows another special directory called ., which means “the current working directory.” It may seem redundant to have a name for the current directory, but soon you’ll see some uses.

Note that in most command-line tools there may be several options that can be combined with a single - without spaces between options; ls -F -a is equivalent to ls -Fa.

These three commands are the basic commands for navigating the file system on your computer: pwd, ls, and cd. What happens if you type cd by itself, without passing a directory as an argument?

Terminal window
box@shell:~/shell-data$ cd
box@shell:~$

As the prompt indicates and you can verify with the pwd command, you have returned to your home directory:

Terminal window
$ pwd
/home/box

It turns out that cd without an argument takes you back to your home directory, which is great if you get lost in your file system.

Try returning to the exercise-data directory. Last time you used two commands, but we can actually chain directory names together to move to exercise-data in a single step:

Terminal window
box@shell:~$ cd shell-data/exercise-data
box@shell:~/shell-data/exercise-data$

Check that you’ve moved to the right place by running pwd and ls -F:

Terminal window
$ pwd
/home/box/shell-data/exercise-data
$ ls -F
alkanes/ animal-counts/ creatures/ numbers.txt writing/

If you want to go up one level from the exercise-data directory you can use cd

But there’s another way to move to any directory, regardless of your current location.

Until now, when specifying directory names, or even a directory path (as before), you have been using relative paths. When you use a relative path with a command like ls or cd, the command tries to find that location from where we are instead of from the root of the file system.

However, it is possible to specify the absolute path to a directory by including the full path from the root directory, which is indicated by a leading slash. The slash / tells the computer to follow the path from the root of the file system, so it always refers to exactly one directory, no matter where we are when we run the command.

This allows us to move to our shell-data directory from anywhere in the file system (including from inside exercise-data).

To find the absolute path we’re looking for, we can use pwd and then extract the part we need to move to shell-data.

Terminal window
$ pwd
/home/box/shell-data/exercise-data
$ cd /home/box/shell-data

Run pwd and ls -F to make sure we’re in the directory we expect.

Two more shortcuts

The shell interprets the tilde character (~) at the beginning of a path as “the current user’s home directory.”

For example, if box’s home directory is /home/box, then ~/shell-data is equivalent to /home/box/shell-data.

This only works if ~ is the first character in the path; kkk/~/xxx is not equivalent to kkk/home/box/xxx.

Another shortcut is the - (dash) character.

cd - translates to the previous directory you were in, which is faster than having to remember and then type the full path.

This is a very efficient way to move back and forth between two directories, i.e., if you run cd - twice, you end up back in the starting directory.

The difference between cd .. and cd - is that the first takes you up, while the second takes you back.

Try it! First navigate to ~/shell-data (you should already be there).

Nota

To type the ~ character, use AltGr + 4 (at the same time) and space.

Terminal window
$ cd ~/shell-data

Now do a cd to the exercise-data/creatures directory:

Terminal window
$ cd exercise-data/creatures

Now if you run cd - you’ll see you’ve returned to ~/shell-data

Terminal window
$ cd -
$ pwd

Run cd - again and you return to ~/shell-data/exercise-data/creatures.

Absolute vs relative paths

Starting from /home/box/shell-data, which of the following commands can you use to navigate to the home directory, which is /home/box?

Terminal window
$ cd .
$ cd /
$ cd /home/box
$ cd ../..
$ cd ~
$ cd home
$ cd ~/shell-data/..
$ cd
$ cd ..

Try each option (remember that with cd - you can go back to where you were before):

Tab completion

Return to the user box’s home directory and show the files in the folder shell-data/exercise-data/alkanes/

Terminal window
$ cd
$ ls shell-data/exercise-data/alkanes/
cubane.pdb ethane.pdb methane.pdb octane.pdb pentane.pdb propane.pdb
Terminal window
$ ls sh

and then press Tab, the terminal automatically completes the directory name for you:

Terminal window
$ ls shell-data/

If you press Tab again, nothing happens, since there are 2 possibilities; pressing Tab twice shows a list of all files, and so on.

This is called tab completion, and we’ll see it in many other tools as we go.

Working with files and directories

Now we know how to explore files and directories, but how do we create them in the first place?

Return to the user box’s directory and create a new directory called thesis using the mkdir thesis command (which produces no output):

Terminal window
$ cd
$ mkdir thesis

As its name suggests, mkdir means “make directory.”

Since thesis is a relative path (i.e., it does not start with a /), the new directory is created in the current working directory:

Terminal window
$ ls -F
shell-data/ tesi/
Two ways to do the same

Using the terminal to create a directory is no different from using a graphical file browser. If you are in a desktop environment, you can open the current directory using your operating system’s graphical file browser; the thesis directory will appear there as well. While they are two different ways of interacting with files, the files and directories we work with are the same.

Good naming for files and directories

Using complicated names for files and directories can make your life very complicated when working on the command line.

Here are some helpful tips for naming your files from now on:

  1. Do not use whitespace like you do in Windows. Whitespace can make a name more meaningful, but since it’s used to separate arguments on the command line, it’s best to avoid it in file and directory names. You can use - or _ instead of spaces.

  2. Do not start the name with a - (dash). Commands treat names beginning with - as options.

  3. Use only letters, numbers, . (dot), - (dash), and _ (underscore).

Many other characters have special meaning on the command line and we will learn them during this lesson. Some will simply prevent your command from working; others can even cause you to lose data.

If you need to refer to file or directory names that contain whitespace or other non-alphanumeric characters, you must put the name in double quotes ("").

Since we just created the thesis directory, it is still empty:

Terminal window
$ ls -F thesis

Let’s change our working directory to thesis using cd, and then run a text editor called nano to create a file named draft.txt:

Terminal window
$ cd thesis
$ nano draft.txt
Linux - nano

Which editor to use? When we say “nano is a text editor,” we really mean “text”: it only works with simple character data, not tables, images, or any other user-friendly format like Word or OpenOffice.

On Unix systems (like Linux and macOS) many programmers use Emacs o Vim, but both require more time to familiarize yourself with.

And most importantly, all Linux configuration files are in text format; if you try to edit them with Word or OpenOffice …

Type a few lines of text. When we’re happy with our text, we can press Ctrl-O (press the Ctrl key, and while holding it, press O) to write the data to disk (we’ll be asked which file to save this to: press Enter to accept the suggested default draft.txt).

When our file is saved, we can use Ctrl-X to exit the editor and return to the terminal.

Tecla Control, Ctrl o ^

The Control key is also called the “Ctrl” key.

There are various ways to indicate using the Control key. For example, an instruction to press the Control key and, while holding it, press the X key, may be described in any of the following ways: Control-X, Control+X, Ctrl-X, Ctrl+X, ^X, C-x.

In nano, along the bottom of the screen you see ^G Get Help and ^O WriteOut.

This means you can use Control-G for help and Control-O to save your file.

nano leaves no output on the screen after you exit the program, but ls now shows that we have created a file named draft.txt:

Terminal window
$ ls
draft.txt

Let’s clean up a bit by running rm draft.txt:

Terminal window
$ rm draft.txt

This command removes files (rm is short for remove).

If you run ls again, the output will be empty once more, indicating our file is gone:

Terminal window
$ ls
Reomve is forever

The Linux terminal does not have a recycle bin from which we can restore deleted files (although most Linux graphical interfaces do).

Instead, when we delete files, they are unlinked from the file system so their disk storage space can be reused.

There are tools to find and recover deleted files, as explained at Seguretat - Recuperació, but there’s no guarantee they will work in all situations, since the computer may recycle the file’s disk space immediately, losing it permanently.

Let’s create the file again, and then go up one directory to /home/box using cd ..:

If you try to delete the entire thesis directory using rm thesis, we get an error message:

Terminal window
$ rm thesis/
rm: cannot remove 'thesis/': Is a directory

This happens because rm normally works only with files, not directories.

To actually get rid of thesis, we must also delete the draft.txt file.

Terminal window
$ rm -r thesis/
Deleting files in a directory recursively can be a very dangerous operation

If we are concerned about what we might delete, we can add the “interactive” option -i to rm, which will ask us to confirm each step:

Terminal window
$ rm -ri shell-data/
rm: descend into directory 'shell-data/'? y
rm: descend into directory 'shell-data/north-pacific-gyre'? y
rm: remove regular file 'shell-data/north-pacific-gyre/NENE01843A.txt'?

At any time you can cancel with ^C.

We will create the directory and the file once more. (Note that this time we are running nano with the path thesis/draft.txt, instead of going into the thesis directory and running nano draft.txt)

Terminal window
$ ls
$ mkdir thesis
$ nano thesis/draft.txt
$ ls thesis

draft.txt is not a particularly informative name, so let’s rename the file using the mv command, which is short for move:

Terminal window
$ mv thesis/draft.txt thesis/quotes.txt

The first parameter tells mv what we are moving, while the second indicates where to move it.

In this case we are moving thesis/draft.txt to thesis/quotes.txt, which has the same effect as renaming the file.

As expected, ls shows us that thesis now contains a file named quotes.txt:

Terminal window
$ ls thesis
quotes.txt

Be careful when specifying the destination filename, as mv silently replaces any existing file with the same name, causing data loss.

An additional flag, mv -i (or mv --interactive), can be used to make mv ask for confirmation before overwriting.

For consistency, mv also works on directories, i.e., there is no separate mvdir command.

We’ll move quotes.txt to the current working directory. We will use mv again, but this time we will only use a directory name as the second parameter to indicate to mv that we want to keep the filename but put the file somewhere new (that’s why the command is called “move.”)

In this case, the directory name we use is the special directory name . that we mentioned earlier:

Terminal window
$ mv thesis/quotes.txt .

The result is to move the file from the directory it was in to the current working directory.

ls now shows us that thesis is empty:

Terminal window
$ ls thesis

Also, ls with a filename or directory name as a parameter only lists that file or directory.

We can use this to see that quotes.txt is still in our current directory:

Terminal window
$ ls quotes.txt
quotes.txt

The cp command works similarly to mv, except it copies a file instead of moving it.

You can check it did the right thing using ls with two paths as parameters — like most Linux commands, ls can take multiple paths at once:

Terminal window
$ cp quotes.txt thesis/quotations.txt
$ ls quotes.txt thesis/quotations.txt
quotes.txt tesi/quotations.txt

To prove we made a copy, delete the quotes.txt file from the current directory and then run the same ls again.

Terminal window
después ejecutemos el mismo ls de nuevo.
$ rm quotes.txt
$ ls quotes.txt thesis/quotations.txt
ls: cannot access quotes.txt: No such file or directory
thesis/quotations.txt

This time the error tells us that quotes.txt cannot be found in the current directory, but it finds the copy in thesis that we didn’t delete.

What's in a name?

In this part of the lesson, we always use the .txt extension.

This is just a convention: we could name the file mythesis or almost anything we want in Linux, not in Windows 😂!!

However, most people use two-part names to make it easier (for them and their programs) to distinguish between file types. The second part of the name thesis.txt is called the filename extension and indicates the type of data the file contains: .txt indicates a plain text file, .pdf indicates a PDF document, .cfg is a configuration file full of parameters for some program, .png is a PNG image, and so on.

This is just a convention, though an important one. Files contain only bytes: it’s up to us and our programs to interpret those bytes according to the rules for text files, PDF documents, configuration files, images, etc.

Naming a PNG image of a whale as whale.mp3 does not magically turn it into a recording of whale song, although it might make the operating system try to open it with a music player when someone double-clicks it.

Pipes and filters

Now that we know some basic commands, we can finally see the shell’s most powerful feature: how easily it lets us combine existing programs in new ways.

We will start with a directory called alkanes that contains six files describing some simple organic molecules.

The .pdb extension indicates that these files are in Protein Data Bank format, a simple text format that specifies the type and position of each atom in the molecule.

Terminal window
$ ls ~/shell-data/exercise-data/alkanes
cubane.pdb ethane.pdb methane.pdb octane.pdb pentane.pdb propane.pdb
$ nano ~/shell-data/exercise-data/alkanes/cubane.pdb

Enter this directory using cd and run the command wc *.pdb:

$ cd ~/shell-data/exercise-data/alkanes/
box@shell:~/shell-data/exercise-data/alkanes$ wc *.pdb
20 156 1158 cubane.pdb
12 84 622 ethane.pdb
9 57 422 methane.pdb
30 246 1828 octane.pdb
21 165 1226 pentane.pdb
15 111 825 propane.pdb
107 819 6081 total

wc is the word count command: it counts the number of lines, words, and characters in a file.

The * in *.pdb matches zero or more characters, so the shell expands *.pdb into a list of all .pdb files in the current directory.

Special characters

* is a special character or wildcard. It matches zero or more characters, so *.pdb matches ethane.pdb, propane.pdb, and every file that ends with .pdb.

On the other hand, p*.pdb matches only pentane.pdb and propane.pdb, because the p at the start matches filenames beginning with the letter p.

? is also a special character, but it only matches a single character. This means p?.pdb could match pi.pdb or p5.pdb (if they existed in the molecules directory), but not propane.pdb

. We can use any number of special characters at once: for example, p*.p?* matches anything that starts with a p and ends with ., p and at least one more character (since ? must match one character, and the final * can match any number of characters).

Therefore, p*.p?* will match preferred.practice or even p.pi (since the first * may match no characters), but not quality.practice (since it doesn’t start with p) or preferred.p because there is not at least one character after .p.

When the shell recognizes a special character it expands it to create a list of matching filenames before running the selected command.

As an exception, if a wildcard expression matches no files, the shell will pass the expression to the command as-is.

For example, running ls *.pdf in the molecules directory (which contains only files with names ending in .pdb) results in an error message indicating that there is no file named *.pdf.

However, generally commands like wc and ls see the lists of filenames matching these expressions, not the wildcards themselves. It’s the shell, not other programs, that handles wildcard expansion; this is another example of orthogonal design.

Task

In the alkanes directory, which variation of the ls command will produce this output: ethane.pdb methane.pdb?

Terminal window
$ ls *t*ane.pdb
$ ls *t?ne.*
$ ls *t??ne.pdb
$ ls ethane.*

If you run wc -l instead of wc, the output shows only the number of lines per file:

Terminal window
$ wc -l *.pdb
20 cubane.pdb
12 ethane.pdb
9 methane.pdb
30 octane.pdb
21 pentane.pdb
15 propane.pdb
107 total

We can also use wc -w to get only the word count, or wc -c to get only the character count.

Terminal window
$ wc -w *.pdb
$ wc -c *.pdb

Redirect

Which of these files is the shortest?

It’s an easy question to answer when there are only six files, but what if there were 6,000?

Our first step toward a solution is to run the command:

Terminal window
$ wc -l *.pdb > lengths.txt

The greater-than symbol > tells the shell to redirect the command’s output to a file instead of printing it to the screen.

That’s why there’s no screen output: instead of displaying it, everything wc prints has been sent to the file lengths.txt.

If the file doesn’t exist, the shell will create it. If the file exists, it will be overwritten silently, which can cause data loss and therefore requires care.

ls lengths.txt confirms that the file exists:

Terminal window
$ ls lengths.txt
lengths.txt

We can now send the contents of lenghts.txt to the screen using cat lengths.txt.

cat means “concatenate”: it prints the contents of files one after the other.

In this case there is only one file, so cat just shows us what it contains::

Terminal window
$ cat lengths.txt
20 cubane.pdb
12 ethane.pdb
9 methane.pdb
30 octane.pdb
21 pentane.pdb
15 propane.pdb
107 total
Paging output

We will keep using cat in this lesson for convenience and consistency, but it has the disadvantage that it always dumps the entire file to the screen.

In practice, the less command is more useful, used as $ less lengths.txt.

This command shows only the content of the file that fits on one screen and then pauses. You can advance to the next screen by pressing the space bar, or go back by pressing b (back). To quit, press q (quit).

Sort

Now we’ll use the sort command to sort the content.

We will also use the -n flag to specify that the sort order we require is numeric rather than alphabetic. T

This doesn’t change the file; it only displays the sorted result on screen:

Terminal window
$ sort -n lengths.txt
9 methane.pdb
12 ethane.pdb
15 propane.pdb
20 cubane.pdb
21 pentane.pdb
30 octane.pdb
107 total

We can put the sorted list of lines into another temporary file called sorted-lengths.txt by putting > sorted-lengths.txt after the command, just as we used > lengths.txt to put wc’s output into lengths.txt.

Terminal window
$ sort -n lengths.txt > sorted-lengths.txt

When you’ve done this, you can run another command called head to get the first lines of sorted-lengths.txt:

Terminal window
$ head -n 1 sorted-lengths.txt
9 methane.pdb

The -n 1 parameter to head indicates that we only want the first line of the file; -n 20 would get the first 20, and so on.

Since sorted-lengths.txt contains the lengths of our files sorted from smallest to largest, head’s output should be the file with the fewest lines.

Pipe

If you find this confusing, you are not alone: even once you understand what wc, sort, and head do, all these intermediate files make it hard to follow what’s going on.

We can make it easier to understand by running sort and head together:

Terminal window
$ sort -n lengths.txt | head -n 1
9 methane.pdb

The vertical bar | between the two commands is called a “pipe.”

La barra vertical | entre les dues ordres es denomina “pipe” (pronunciat paip).

A pipe tells the shell we want to use the output of the command on the left as input to the command on the right.

The computer may create a temporary file if necessary, copy data from one program to another in memory, or anything else required; we don’t need to understand that to make it work.

Nothing stops us from chaining pipes in sequence.

For example, you can send the output of wc directly to sort, and then the resulting output to head.

Thus, first use a pipe to send the output of wc to sort:

Terminal window
$ wc -l *.pdb | sort -n
9 methane.pdb
12 ethane.pdb
15 propane.pdb
20 cubane.pdb
21 pentane.pdb
30 octane.pdb
107 total

And now send the output of that pipe, through another pipe, to head, so the complete pipeline becomes:

Terminal window
$ wc -l *.pdb | sort -n | head -n 1
9 methane.pdb

When a computer runs a program (any program) it creates a process in memory to store the program’s software and its current state.

Each process has:

  1. An input channel called standard input (stdin).
  2. A default output channel called standard output (stdout).
  3. A channel called standard error (stderr) also exists. This channel is usually used for error or diagnostic messages and allows the user to pipe the output of a program to another while still receiving error messages in the terminal.

The shell is actually another program.

Under normal circumstances, what we enter on the keyboard is sent to the shell’s standard input, and what it produces on standard output is displayed on our screen. When we tell the shell to run a program, it creates a new process and temporarily sends what we type on our keyboard to that process’s standard input, and what the process sends to standard output, the shell sends to the terminal screen.

Pipeline

When we run wc -l *.pdb > lengths.txt:

  • The shell starts by telling the computer to create a new process to run the wc program
  • Since we have provided some filenames as parameters, wc reads them instead of standard input.
  • And since we used > to redirect the output to a file, the shell connects the process’s standard output to that file.

And if we run wc -l *.pdb | sort -n | head -n 1, we get three processes with data flowing from the files, through wc to sort, from sort to head, and finally to the screen.

This simple idea is why Unix has been so successful.

Instead of creating huge programs that try to do many different things, Unix programmers focus on creating many simple tools that do their job well and can cooperate with each other.

This programming model is called “pipes and filters.” We’ve already seen pipes; a filter is a program like wc or sort that transforms input into output.

Almost all standard Unix tools can work this way: unless told otherwise, they read from standard input, do something with what they read, and write to standard output.

The key is that any program that reads lines of text from standard input and writes lines of text to standard output can be combined with any other program that behaves this way as well.

You can and should write your programs this way so that you and others can put these programs into pipelines and multiply their power.

Tasks

Nelle Nemo

Nelle Nemo, a marine biologist, has just returned from a six-month survey of the North Pacific Gyre, where she has been sampling gelatinous marine life in the Great Pacific Garbage Patch.

Nelle has processed her samples on her assay machine, generating 17 files in the shell-data/north-pacific-gyre/ directory.

As a quick review, from her home directory, Nelle types:

Terminal window
$ cd ~/shell-data/north-pacific-gyre/
$ wc -l *.txt
300 NENE01729A.txt
300 NENE01729B.txt
300 NENE01736A.txt
300 NENE01751A.txt
300 NENE01751B.txt
300 NENE01812A.txt
300 NENE01843A.txt
300 NENE01843B.txt
300 NENE01971Z.txt
300 NENE01978A.txt
300 NENE01978B.txt
240 NENE02018B.txt
300 NENE02040A.txt
300 NENE02040B.txt
300 NENE02040Z.txt
300 NENE02043A.txt
300 NENE02043B.txt
5040 en total

If you look closely there is one file with only 240 lines.

This makes it easier to see:

Terminal window
$ wc -l *.txt | sort -n | head -n 5
240 NENE02018B.txt
300 NENE01729A.txt
300 NENE01729B.txt
300 NENE01736A.txt
300 NENE01751A.txt

When Nelle goes back and reviews it, she sees she ran that assay at 8:00 on a Monday morning. Someone probably used the same machine over the weekend and forgot to reset it.

Before reanalyzing this sample, she decides to check whether some files have too much data:

Terminal window
$ wc -l *.txt | sort -n | tail -n 5
300 NENE02040B.txt
300 NENE02040Z.txt
300 NENE02043A.txt
300 NENE02043B.txt
5040 total

These numbers look good; there is no file with more than 300 lines.

But what is this Z on the antepenultimate line?

All samples must be labeled with “A” or “B”; by convention, her lab uses Z to indicate samples with missing information.

To find other files like this, Nelle does the following:

Terminal window
$ ls *Z.txt
NENE01971Z.txt NENE02040Z.txt

As expected, when she checks the log on the laptop, there is no depth recorded for any of these samples.

Since it’s too late to obtain the information otherwise, she must exclude these two files from her analysis.

She could simply delete them using rm, but there are actually some analyses she might do later where depth doesn’t matter, so instead of deleting them, she will just be careful to select files using the wildcard expression *[AB].txt.

As always, * matches any number of characters; the expression [AB] matches ‘A’ or ‘B’, so it matches the names of all the valid data files she has.

Terminal window
$ ls *[AB].txt

Sorting numbers

Create a file example.txt with the following information (with nano):

10
2
19
22
6

You can also create the file with this command

Terminal window
$ echo $'10\n2\n19\n22\n6' > exemple.txt

If we run sort on this file the output is:

$ sort example.txt
10
19
2
22
6

And the reason is that they are sorted alphabetically like a dictionary.

For the computer, the characters that represent letters, numbers, or other things are all the same!

If you want to tell sort that these are numbers and should be sorted numerically, you must use the -n flag

Terminal window
$ sort -n example.txt
2
6
10
19
22

Redirection

If you run the echo command, what you type will be printed on screen:

Terminal window
$ echo "Hola classe"
Hola classe

If you want, you can redirect the command’s output to a file instead of to the terminal with >:

Terminal window
$ echo "Hola classe" > classe.txt
$ ls classe.txt
classe.txt
$ cat classe.txt
Hola classe

In many activities we will create files this way instead of using nano.

pipe

At the beginning of the activity you downloaded some compressed files with this command:

Terminal window
$ curl https://gitlab.com/xtec/linux/shell/-/raw/main/shell-data.tar.gz | tar -xz

We used a pipe | to chain two commands.

Now let’s do it step by step.

First delete the shell data directory:

Terminal window
$ cd
$ rm -rf shell-data/

Next download the shell.data.tar.gz file:

Terminal window
$ curl https://gitlab.com/xtec/linux/shell/-/raw/main/shell-data.tar.gz -o shell-data.tar.gz
% Total % Received % Xferd Average Speed Time Time Time Current
Dload Upload Total Spent Left Speed
100 441k 100 441k 0 0 321k 0 0:00:01 0:00:01 --:--:-- 322k
box@user:~$ ls *gz
shell-data.tar.gz

Now we need to extract the file with the tar command as we will explain in Linux - Arxivar , and delete the file:

Terminal window
$ tar xfz shell-data.tar.gz
$ rm shell-data.tar.gz
$ ls -F
classe.txt shell-data/

As we did in this activity, we will often use pipes because it’s faster, as you can verify again:

Terminal window
$ rm -rf shell-data/
$ curl https://gitlab.com/xtec/linux/shell/-/raw/main/shell-data.tar.gz | tar -xz
$ ls -F
classe.txt shell-data/