PyMOL és un sistema de visualització molecular
On this page
Introducció
PyMOL és una eina molt útil per interactuar, inspeccionar i analitzar l’estructura 3D d’una proteïna.
Tot i que PyMOL té una interfície potent i flexible, és complexa i pot semblar aclaparadora per als nous usuaris.
El poder complet de PyMOL s’obté quan fas servir la línia d’ordres.
El més important és provar-ho i experimentar. Com més utilitzis PyMOL, més fàcil serà fer-lo servir i més aprendràs sobre les proteïnes i el programa.
Instal·la PyMOL al teu ordinador personal
Instal·la Pymol a la teva carpeta d’usuari (no necessites permisos d’administrador):
Invoke-WebRequest https://github.com/kullik01/pymol-open-source-windows-setup/releases/download/v3.1.0/PyMOL_Open_source_v3.1.0a0_WINx64_portable.zip -OutFile PyMOL.zipExpand-Archive -Path PyMOL.zip -DestinationPath $env:USERPROFILE\PyMolExecuta el programa Open-Source-PyMOL.exe que es troba a la carpeta PyMOL.
sudo apt install pymolSi tens problemes utilitza el gestor de paquets conda (TODO)
Primers Passos
You will start learning about PyMOL by looking at the enzyme Hen Egg lysozyme in complex with the trisaccharide inhibitor tri-(N-acetylglucosamine) or tri-NAG).
Atomic coordinates for this model are contained in the Protein Data Bank file with code 1HEW.
El primer pas és carregar el teu fitxer PDB: Fitxer > Obtenir PDB… i escull 1HEW.
PDB files are essentially a set of atomic coordinates or “atom placements” read by PyMOL in a
defined format to allow a molecular structure to be built. PDB file names consist of a number
followed by three characters — for example, 1HEW.
Ara hauries d’estar veient un model de línies verdes, blaves i vermelles sobre un fons negre.
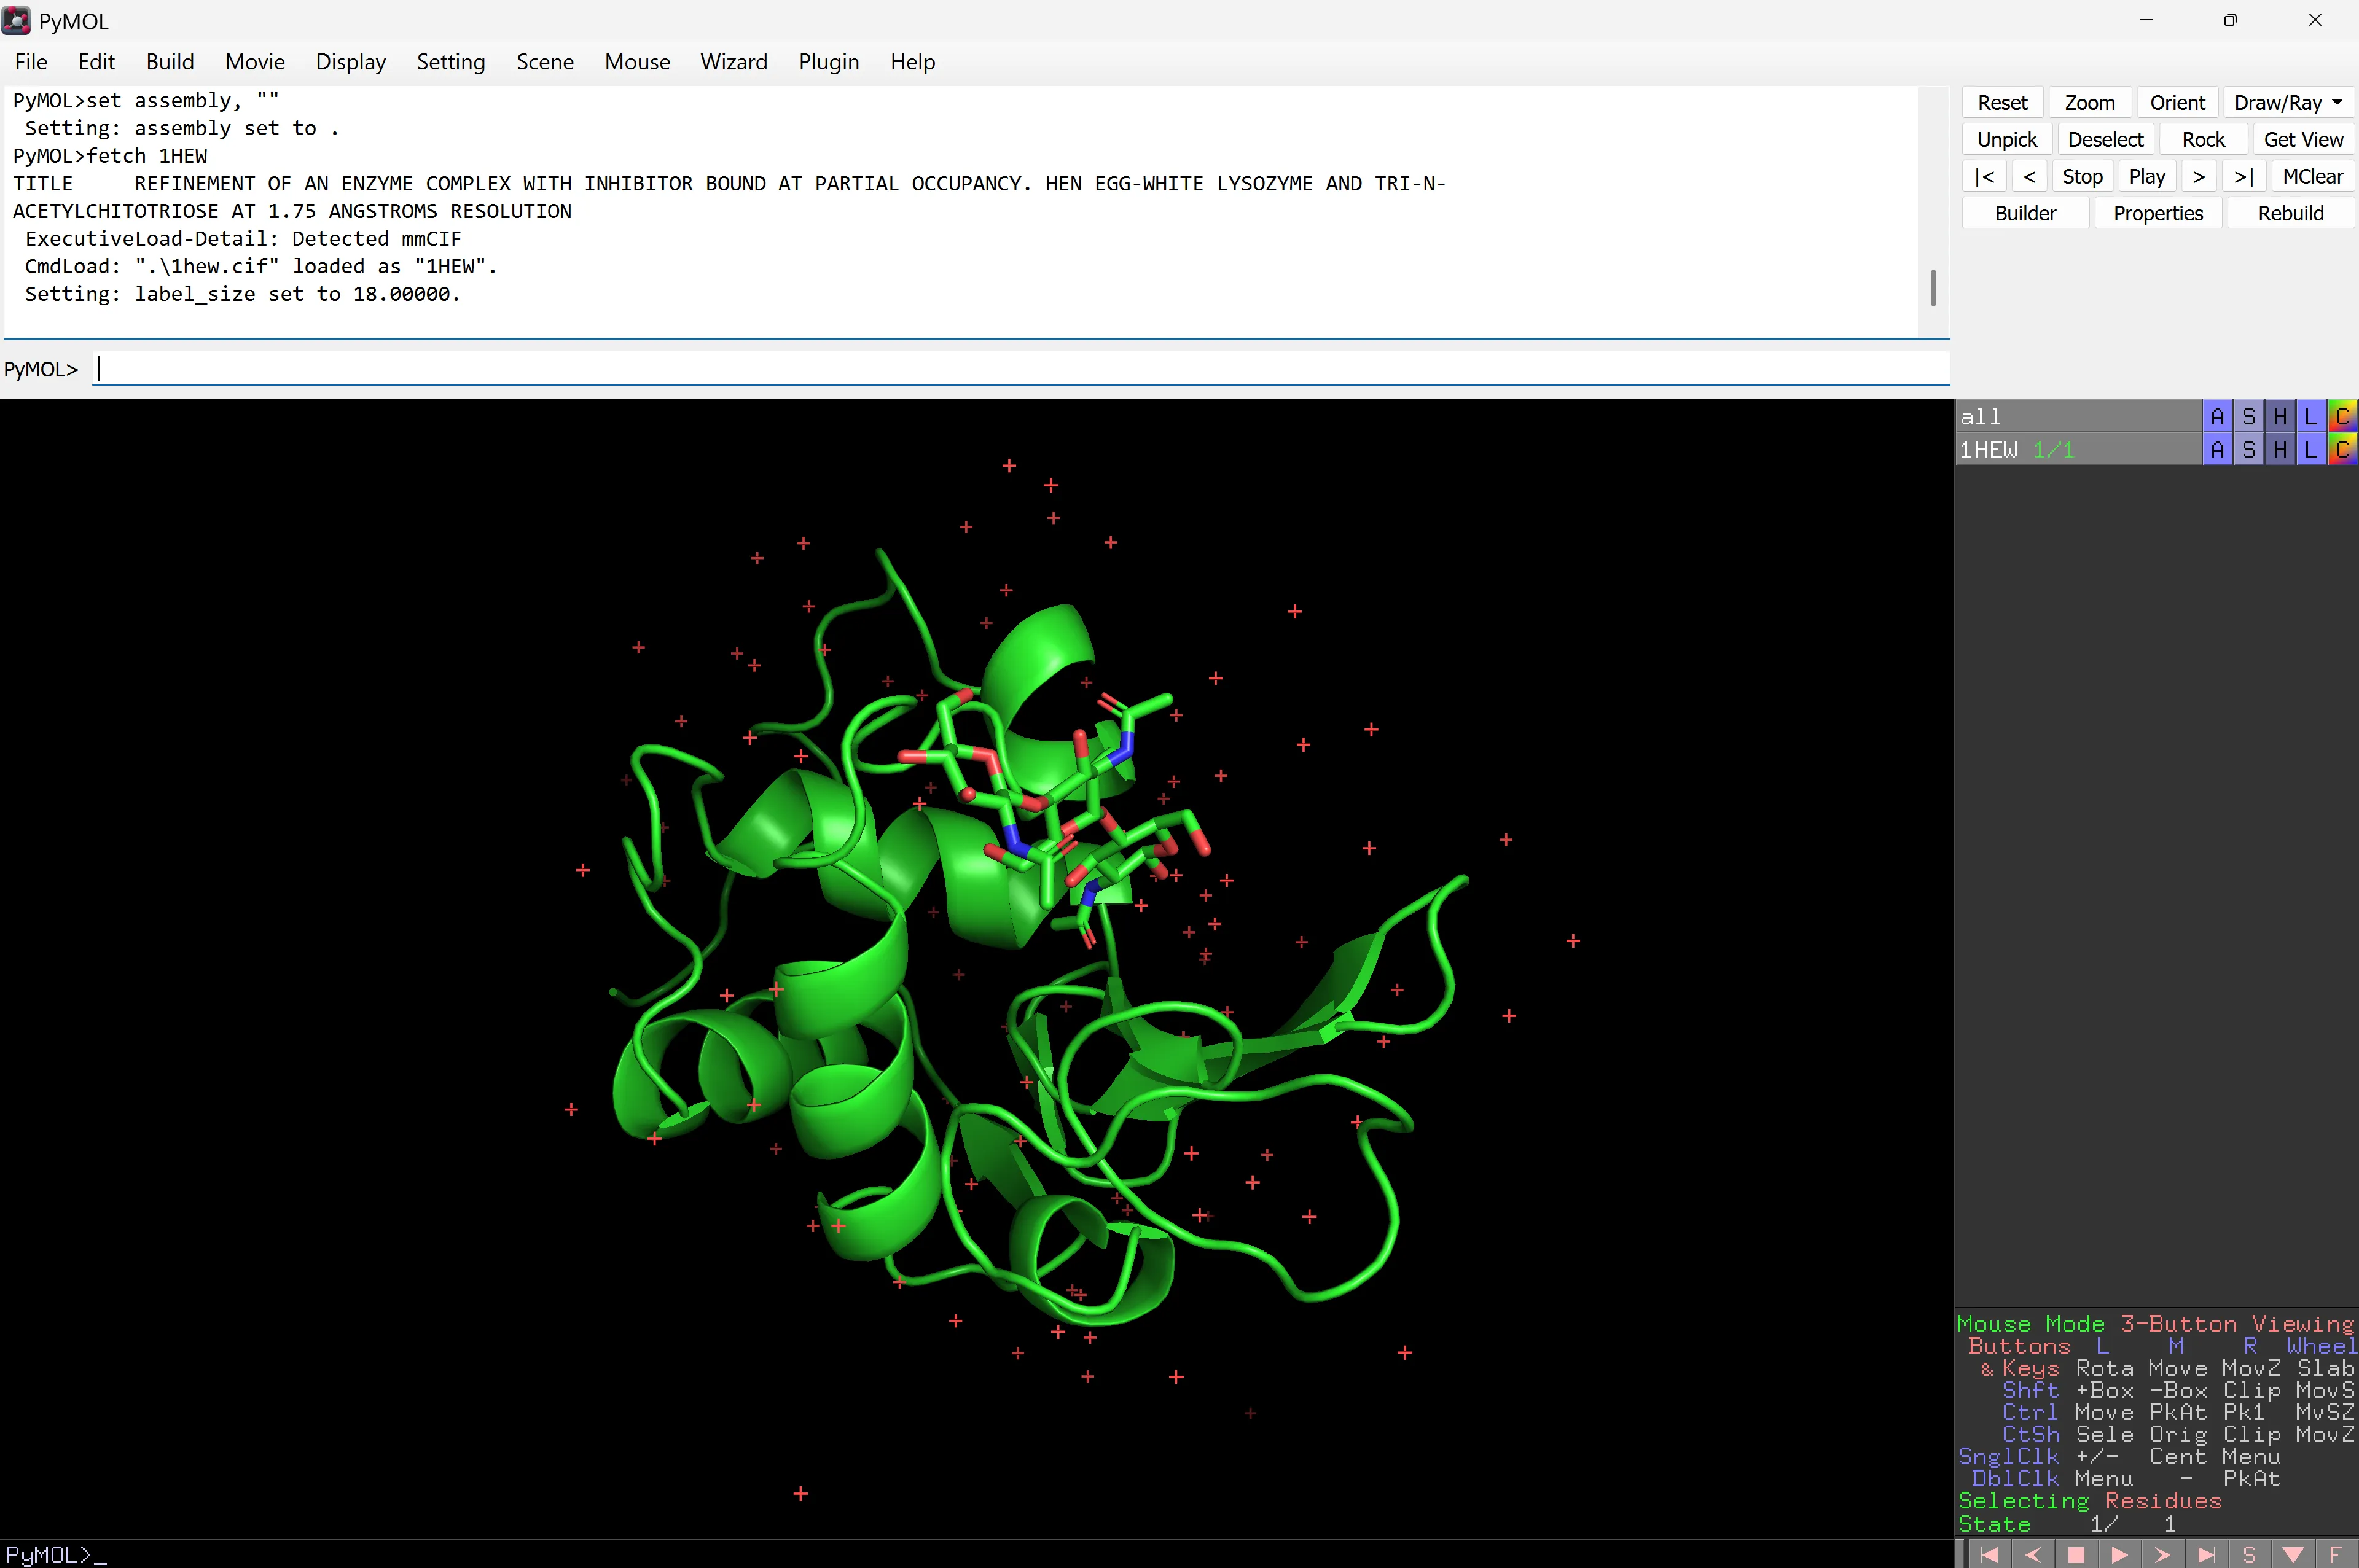
Lysozyme (PDB code 1HEW) is a small single-chain protein containing 129 amino acids. It folds into a compact structure with an active site cleft that binds to certain carbohydrates.
Lysozyme acts as a non-specific defense against bacteria and fungi. It is a component of the innate immune system and is an important part of an infant’s diet to ward off diarrhea. It is an enzyme known for its ability to degrade the polysaccharide architecture of many kinds of cell walls, normally for protection against bacterial infection.
tri‑NAG is a short chain of three N‑acetylglucosamine sugars that mimics part of a bacterial cell‑wall polysaccharide; it binds in the active site cleft of lysozyme, where it acts as an inhibitor
N‑acetylglucosamine is a very common building block in biology:
-
In bacterial cell walls, NAG alternates with N‑acetylmuramic acid (NAM) to form long chains:
…– NAG – NAM – NAG – NAM –…. These chains are cross‑linked by short peptides, forming peptidoglycan, the rigid mesh that surrounds many bacterial cells. -
In chitin (e.g. in insect exoskeletons and fungal cell walls), the polymer is almost entirely NAG:
…– NAG – NAG – NAG – NAG –…
Because of this, NAG‑containing fragments are natural substrates or recognition motifs for enzymes that break down bacterial cell walls or chitin.
N‑acetylglucosamine (NAG) is a very common building block in bacterial cell walls.
NAG alternates with N‑acetylmuramic acid (NAM) to form long chains: …– NAG – NAM – NAG – NAM –…
These chains are cross‑linked by short peptides, forming peptidoglycan, the rigid mesh that surrounds many bacterial cells. In chitin (e.g. in insect exoskeletons and fungal cell walls), the polymer is almost entirely NAG: …– NAG – NAG – NAG – NAG –… Because of this, NAG‑containing fragments are natural substrates or recognition motifs for enzymes that break down bacterial cell walls or chitin.
Aquesta representació en brut és poc útil, ja que és difícil determinar les regions importants d’una estructura. Intenta trobar l’inhibidor, que està compost per tres anells en forma de cadira de N-acetilglucosa. No és fàcil, però a mesura que avancem en el tutorial, aprendràs com presentar la informació clarament.
Prova de rotar i fer zoom:
| Rotar | Prem i mantén el botó esquerre del ratolí i mou el ratolí |
| Apropar i allunyar | Prem i mantén el botó dret del ratolí i mou el ratolí |
| Roda del ratolí | Desplaça per veure la vista “slab” de la molècula canviar. La vista “slab” et permet mirar dins d’una molècula de proteïna. |
Panell d’objectes
Alternativament, mira el quadre inferior dret del panell d’objectes per veure les comandes basades en el ratolí.
Aquí es descriuen opcions i comandes addicionals disponibles quan s’utilitza el ratolí conjuntament amb el teclat.
És important que et familiaritzis amb l’ús dels botons de comanda principals en el panell d’objectes, ja que s’utilitzen per accedir als menús desplegables contextuals.
Aquests estan etiquetats com:
A | Acció | Permet realitzar diverses accions, anàlisis i càlculs |
S | Mostrar | Permet aplicar un efecte gràfic particular a una selecció de residus/molècules |
H | Amagar | Igual que S però amaga l’efecte gràfic |
L | Etiqueta | Permet afegir una etiqueta |
C | Color | Altera l’esquema de colors d’una selecció o objecte particular |
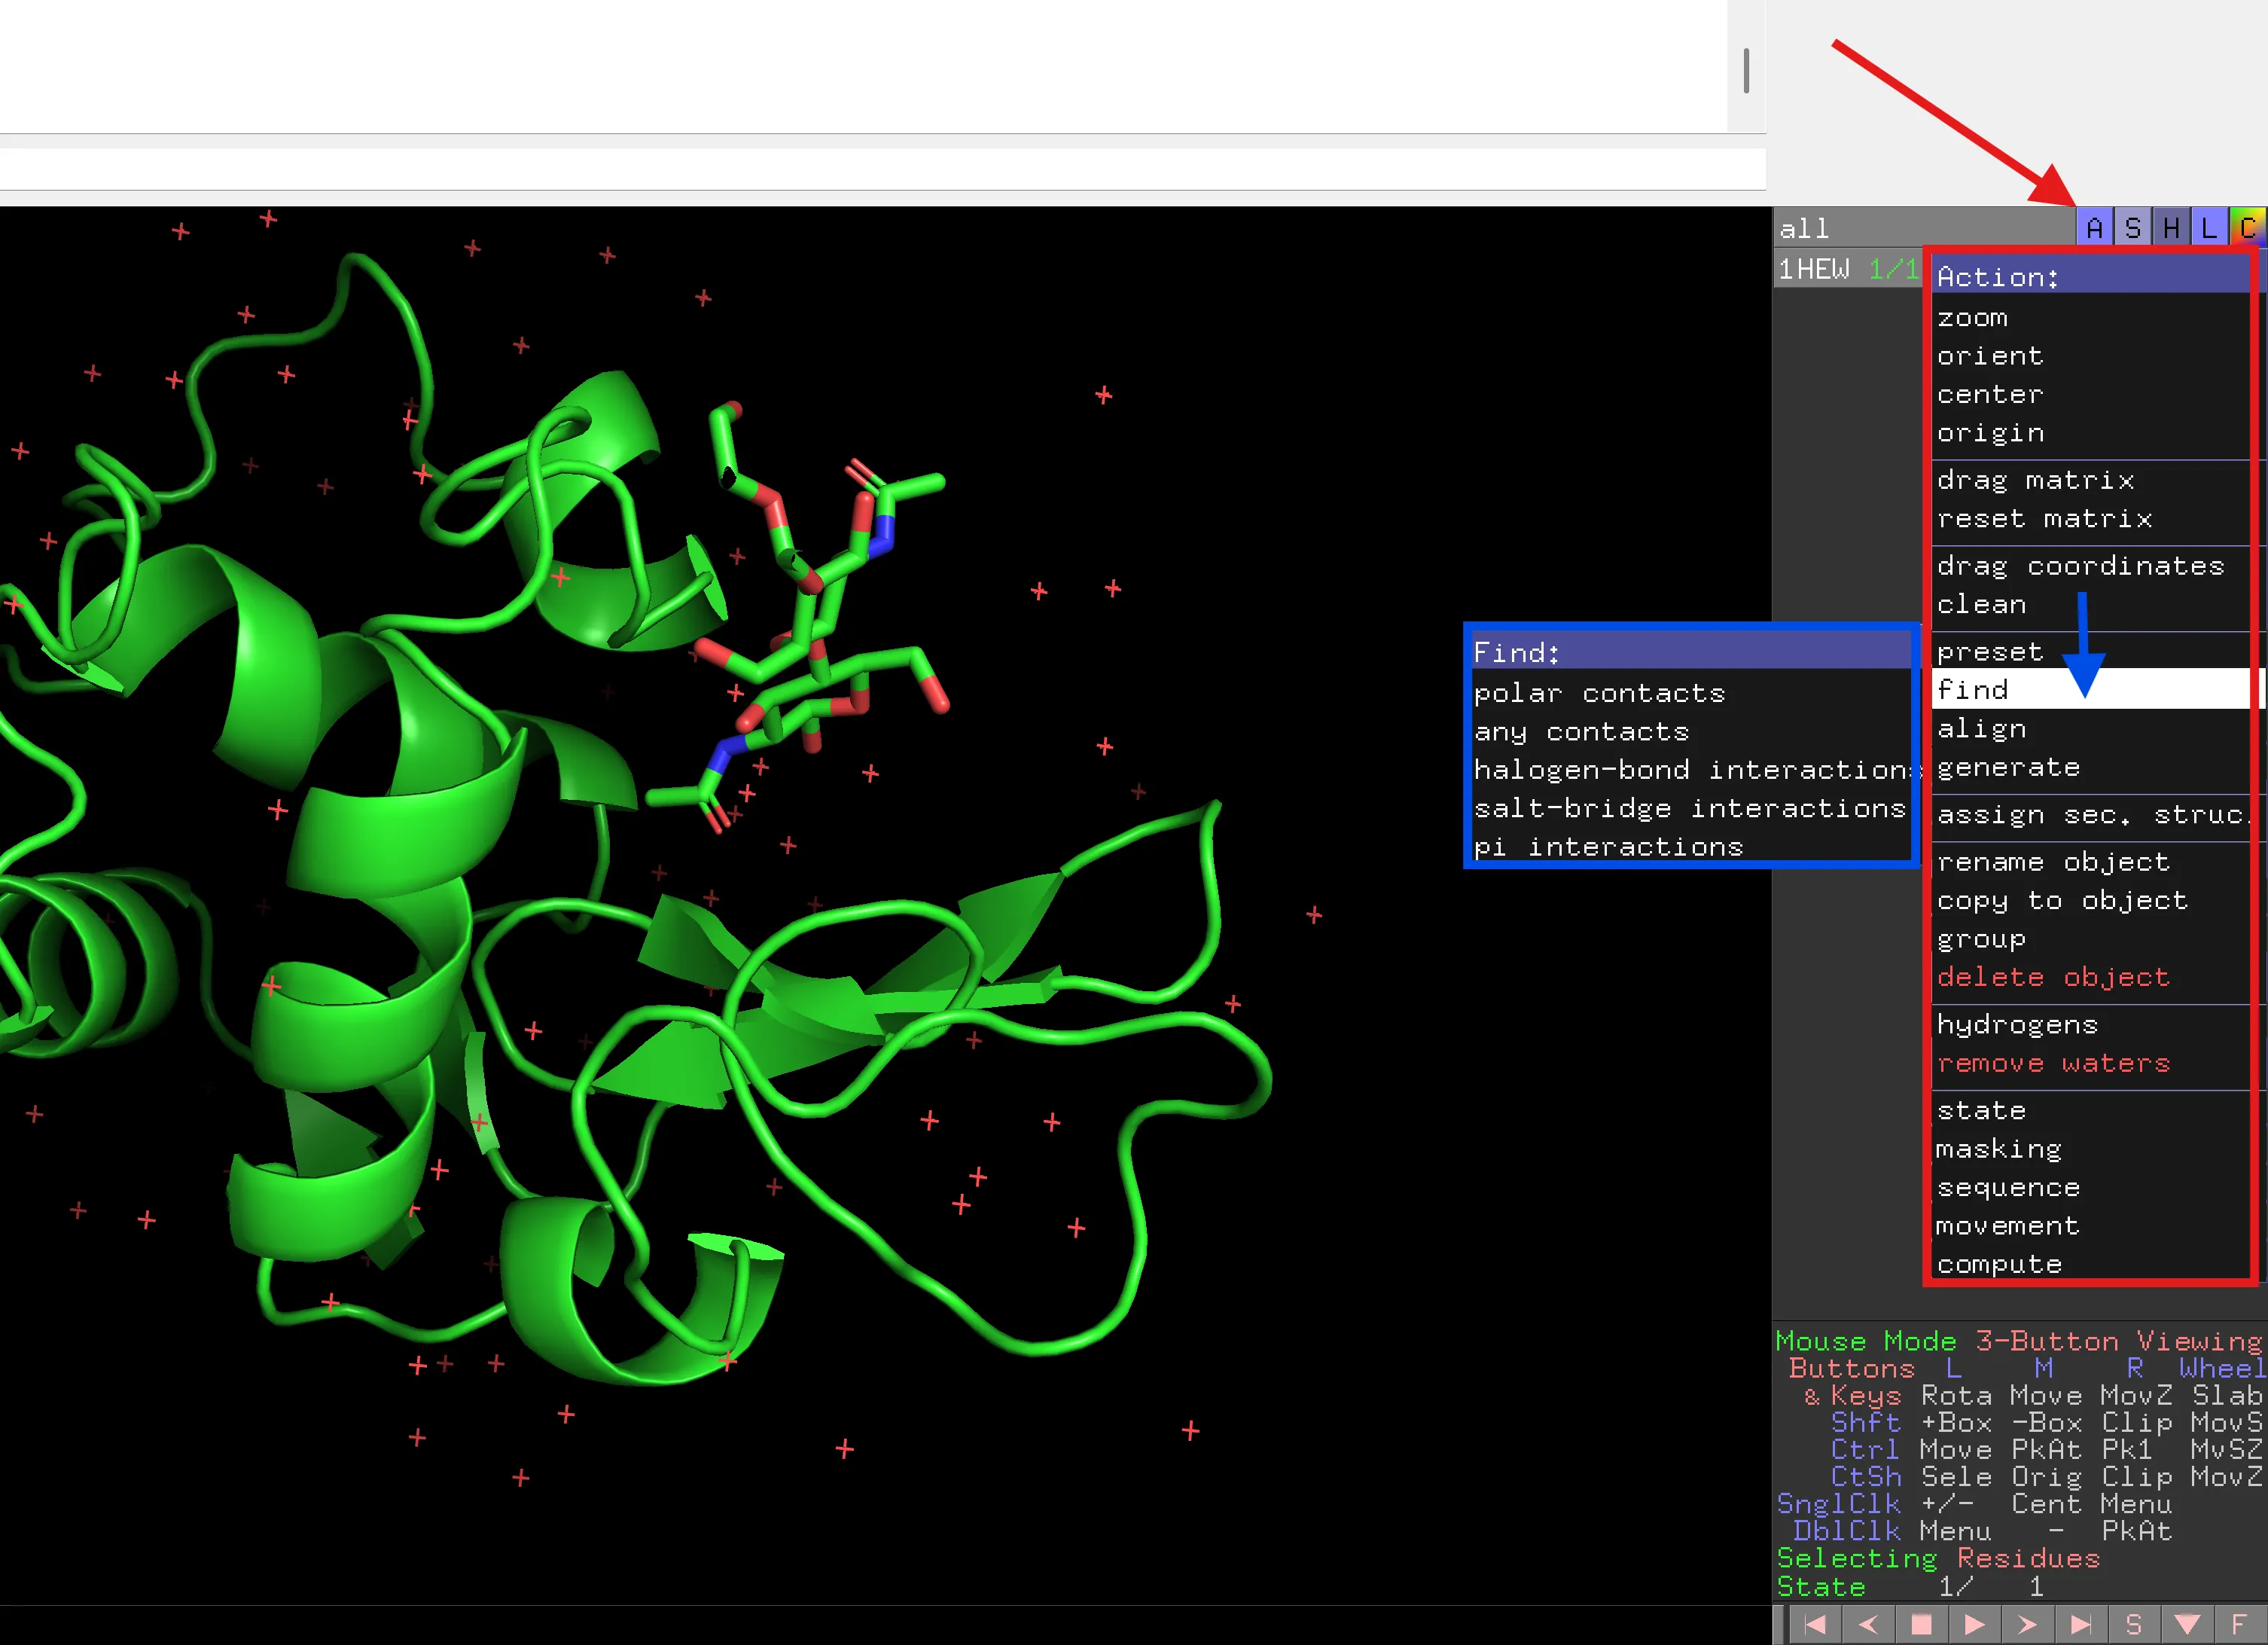
Utilitzant el botó esquerre del ratolí, pots accedir als menús desplegables. Prem cada un dels botons i observa el següent nivell de comandes.
Prova el següent:
| 1HEW | H > cartoon | La representació de cartoon verda desapareix |
| 1HEW | S > lines | Ara veus la representació de línies |
| 1HEW | H > waters | Les creus vermelles, que són molècules d’aigua, desapareixen |
És important tenir en compte que cada un dels botons es pot aplicar a diversos aspectes dels fitxers pdb segons les regions/cadenes/residus que formen una selecció particular.
Les pestanyes per defecte són:
all | refers to all atoms, including multiple PDB files if present |
1HEW | refers to all the atoms in a particular PDB file, namely the PDB loaded |
(sele) | refers to the atoms in a particular selection. |
També pots utilitzar les pestanyes individuals per alternar la vista de la teva estructura. Prova de prémer la pestanya all en gris. La pestanya es tornarà negra i l’estructura desapareixerà.
Prem la pestanya una altra vegada i el quadre es tornarà gris i la teva estructura tornarà a aparèixer. Recorda que aquestes pestanyes són jeràrquiques, així que si tens una selecció particular de residus dins d’un fitxer PDB, alterar el fitxer PDB principal afectarà les seleccions relacionades amb aquest fitxer PDB. Ho veurem més endavant.
De vegades és més fàcil veure la proteïna sobre un fons blanc. Això és especialment important quan prepares imatges per a publicacions. Per tant, per canviar el fons a blanc: Display > Background > White
Panell de seqüència
El següent pas és mostrar la seqüència al panell de seqüència. Per fer això, prem el botó S a la part inferior dreta de la pantalla (no el botó S descrit anteriorment).
A sobre de la finestra principal de l’estructura de la proteïna, apareixerà text – aquesta és la seqüència de les proteïnes més altres “lletres”.
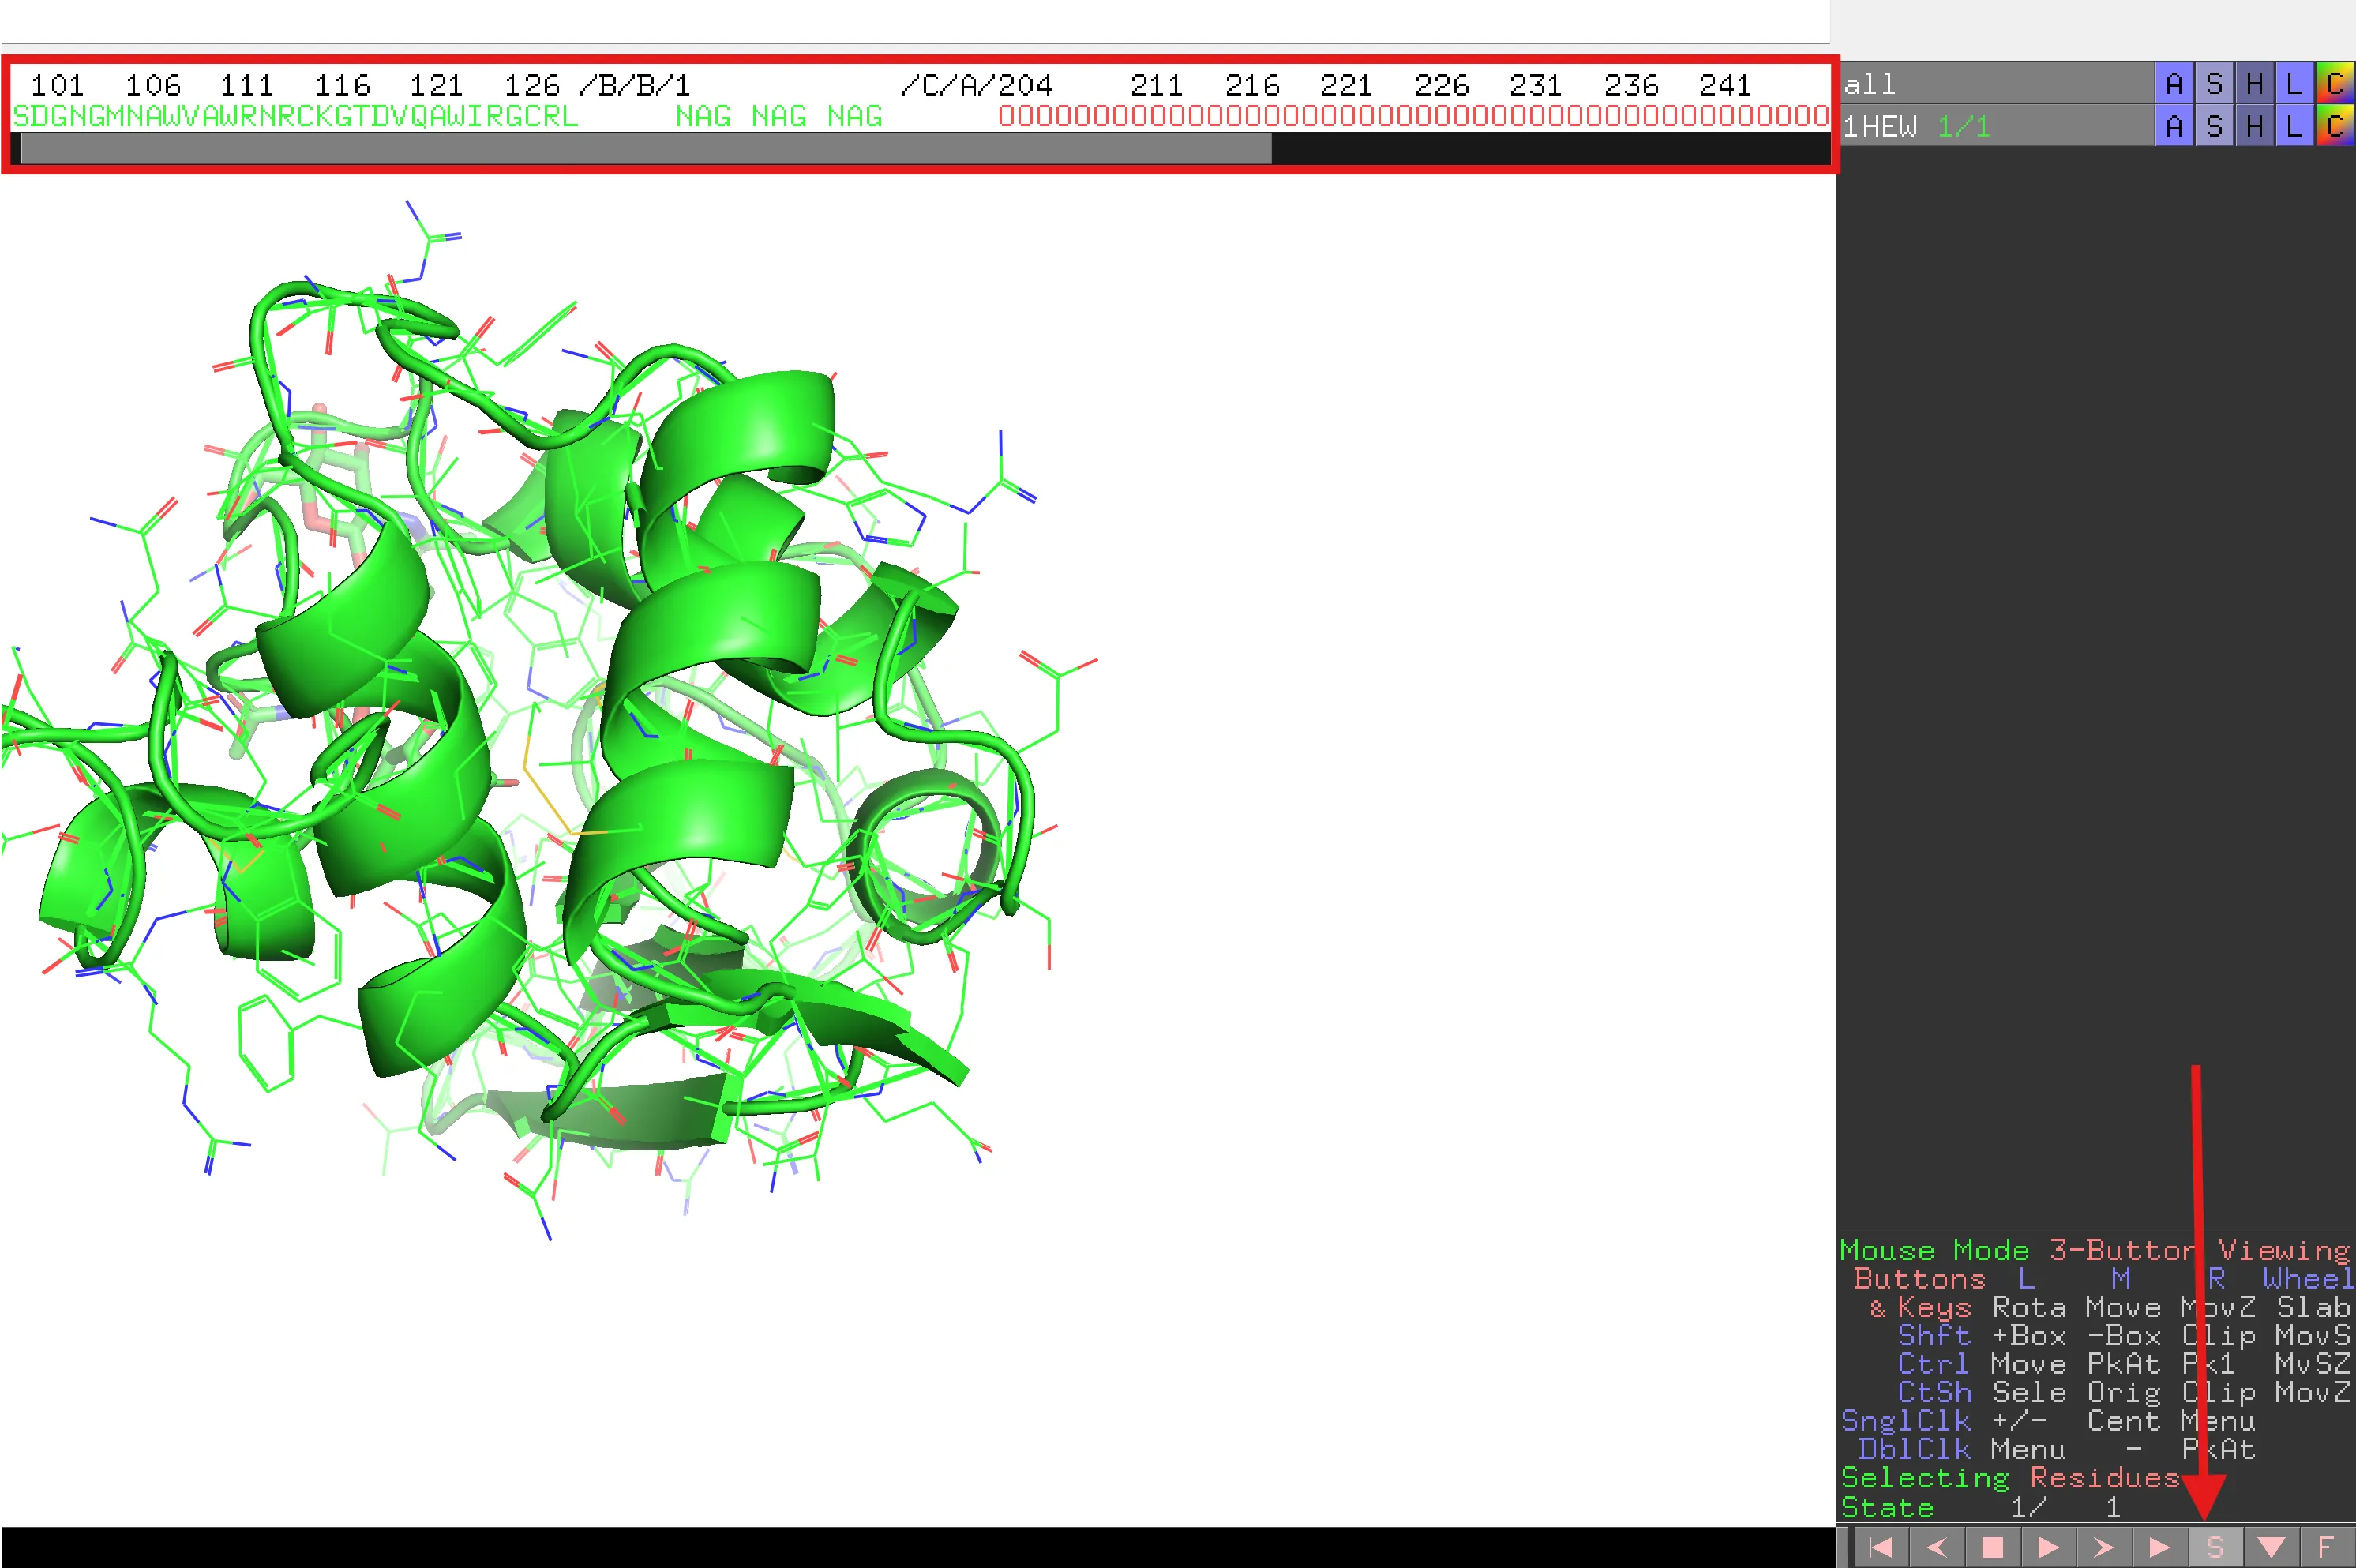
Utilitzant la barra de desplaçament, desplaça’t cap a la dreta per veure la resta de la seqüència de la proteïna i les altres lletres. El NAG són les unitats individuals de l’inhibidor trisacàrid i les O vermelles són les molècules d’aigua, comunament presents en estructures determinades per cristal·lografia de raigs X. Tot i que les aigües poden jugar un paper important en l’estructura i funció de les proteïnes, potser voldrem eliminar-les si cal. Podem amagar-les (vegeu més amunt) o eliminar-les completament. Les eliminarem per poder generar imatges fàcilment.
all ‘A’ > remove waters
Una manera molt senzilla de generar una figura útil per a publicació és provar el següent:
1HEW ‘A’ > preset > publication.
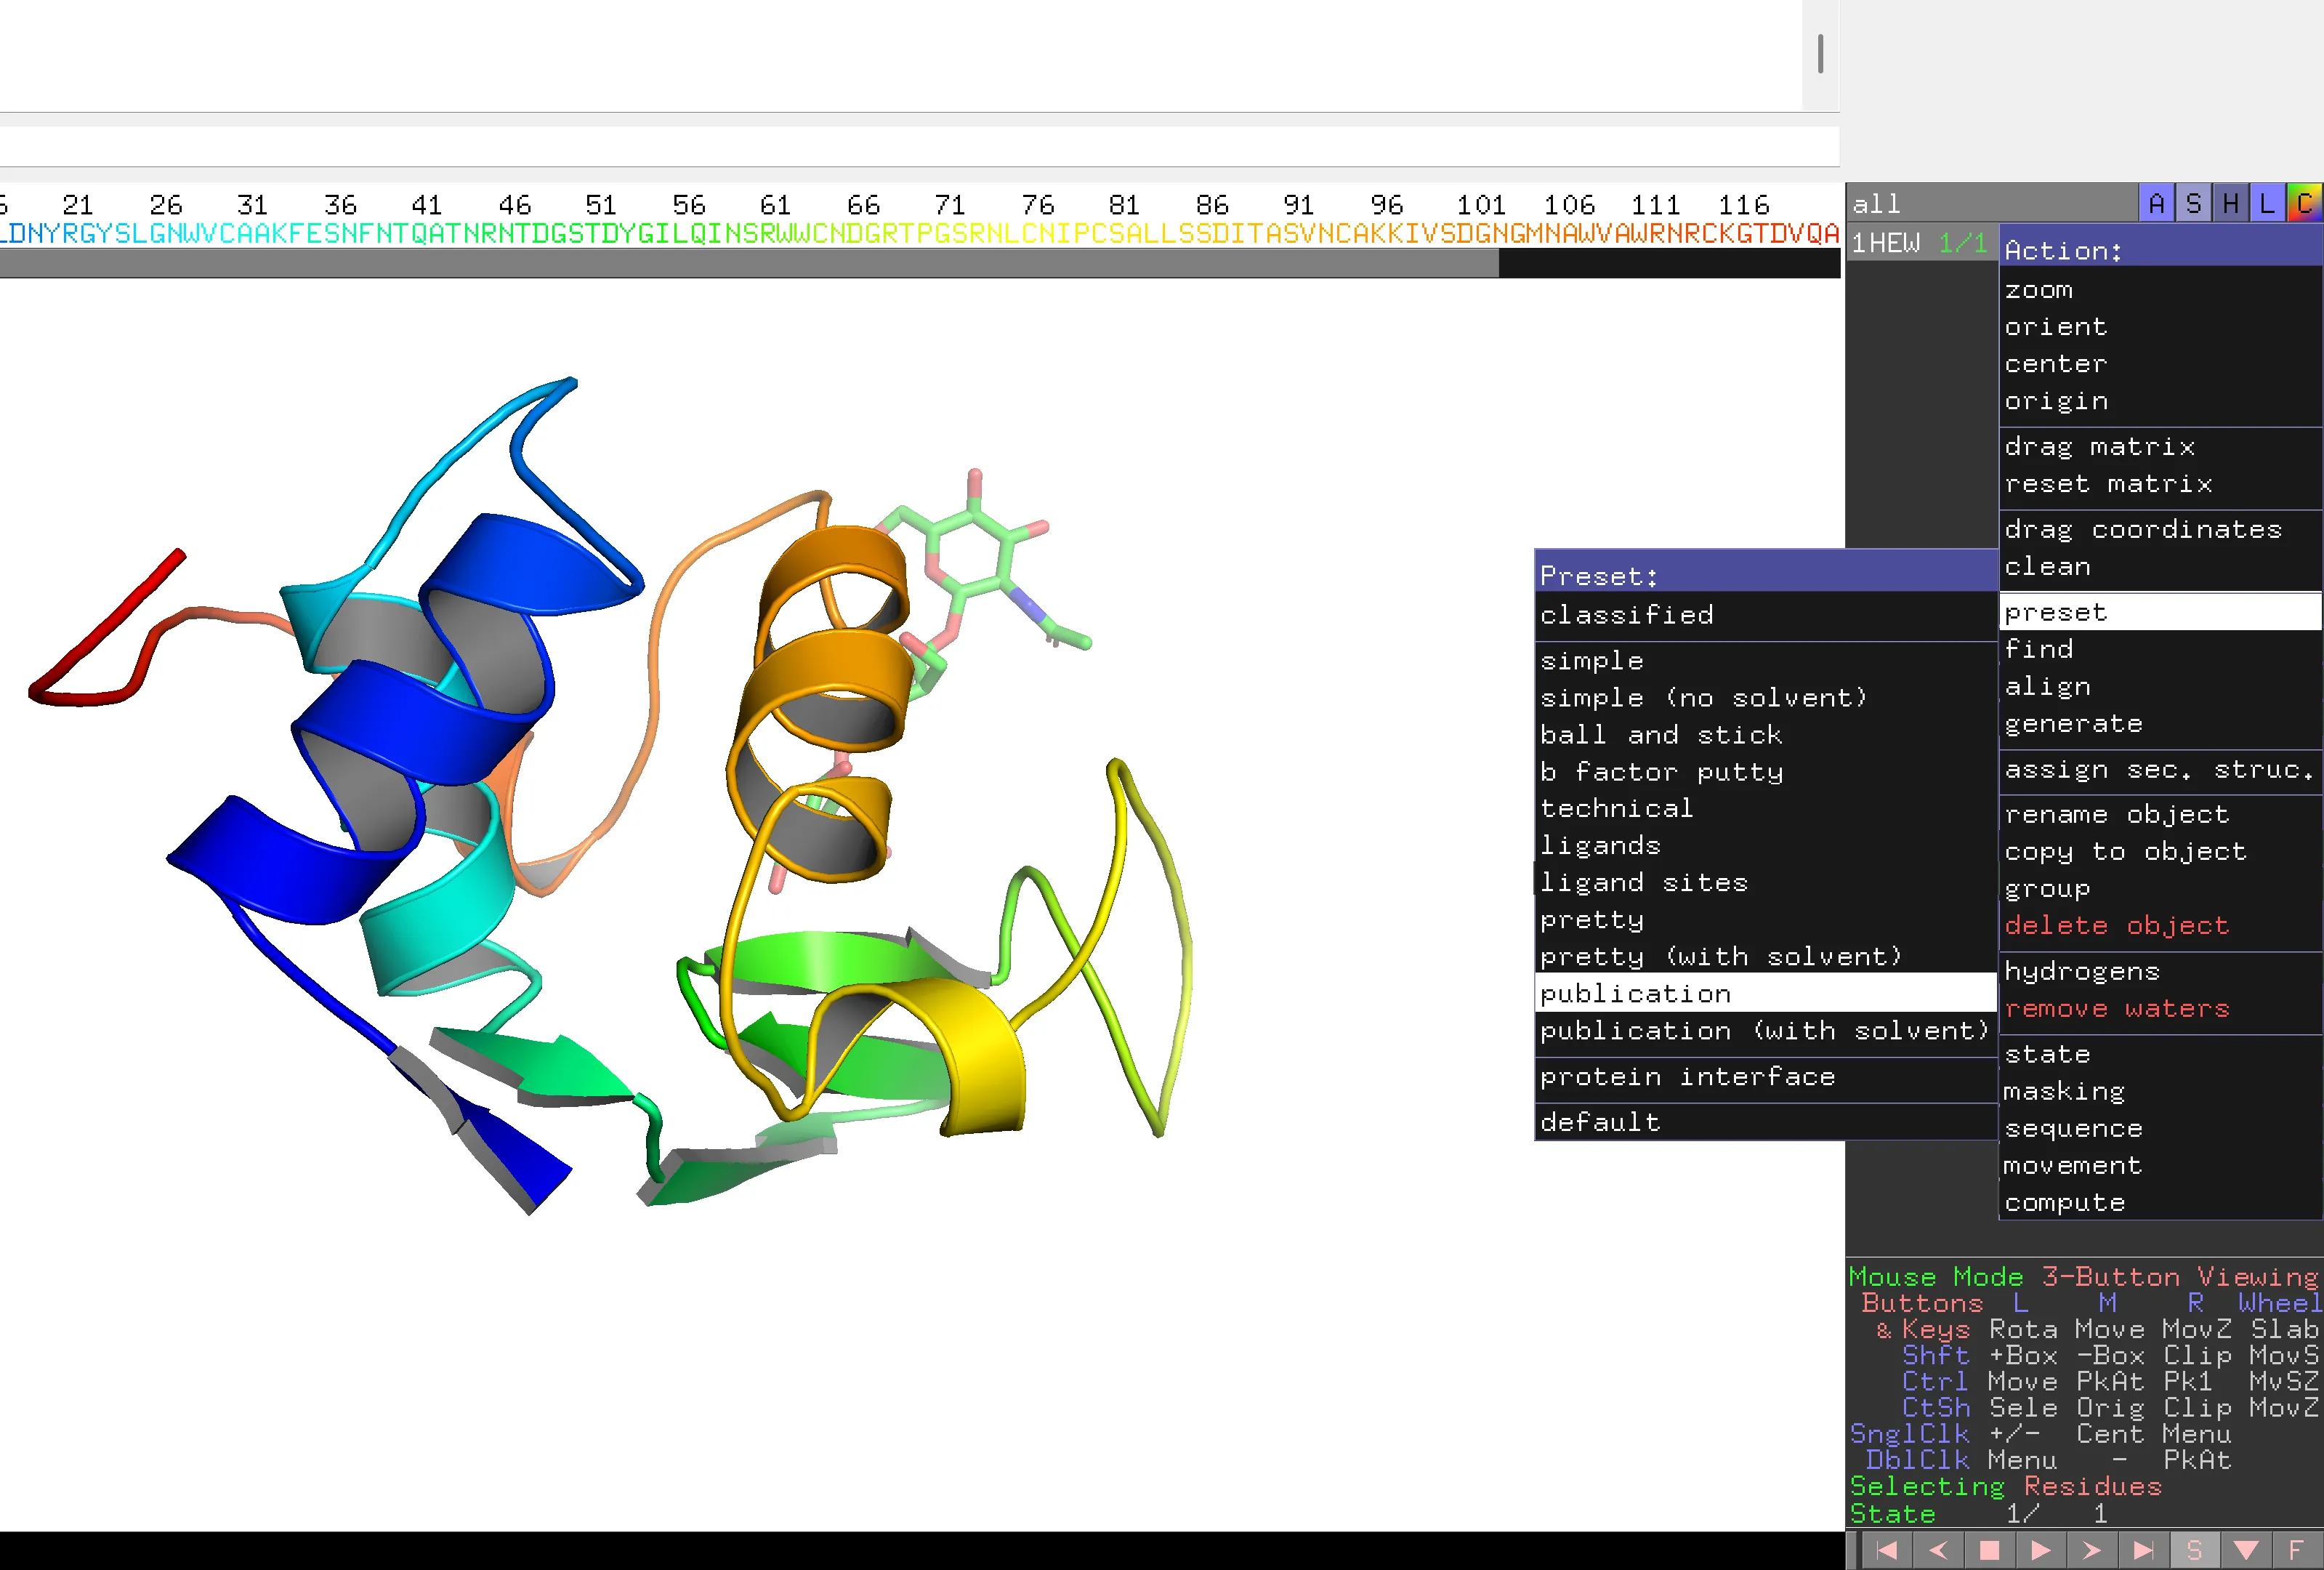
Si ho proves, observa com l’inhibidor trisacàrid es fa visible. Per tornar a la configuració anterior 1HEW ‘A’ > preset > default i repeteix els passos anteriors.
Per no perdre cap informació/selecció, etc. que hagis generat, et recomano fermament que desis la teva sessió a intervals regulars. Per fer això, ves a File > Save Session.
Això també és útil si vols desar una anàlisi particular de la teva estructura de proteïna utilitzant Save Session As… per generar un nou nom de fitxer.
Per iniciar la sessió en qualsevol moment en el futur, pots anar a File > Open i escollir el fitxer amb l’extensió .pse
Selecció i visualització
Per entendre i transmetre els elements essencials de la relació estructura-funció de les proteïnes, és important que se seleccionin i es destaquin els residus/regions individuals.
Hi ha diverses opcions predeterminades disponibles. Ja n’hem vist una (publication) anteriorment.
1HEW | C > by ss | Color per estructura secundària (selecciona una de les opcions) |
1HEW | S > spheres | Veure els àtoms segons el radi de van der Waals |
1HEW | S > surface | Veure la representació de la superfície de la proteïna – observa com es veuen les unitats NAG. |
A cada pas, recorda moure l’estructura. Per a la comprensió i presentació, és important que seleccionis l’aspecte de visualització correcte.
Prova altres opcions de presentació possibles per a la teva proteïna.
Seleccions definides i generació de noves pestanyes al panell d’objectes
Per seleccionar residus/regions, interactuarem amb el panell de seqüència a sobre de l’estructura principal de la proteïna.
- Canvia el color de tota la seqüència a verd (1HEW ‘C’ > greens > green)
- Mostra només el cartoon (1HEW ‘H’ > everything seguit de 1HEW ‘S’ > cartoon)
- Selecciona un residu al panell de seqüència, per exemple cys30 (C abans del 31).
Si no pots veure els números sobre la seqüència d’aminoàcids, ves a Display > Sequence Mode > All Residue Numbers números de residus.
Apareix una nova pestanya sota 1HEW al panell d’objectes anomenada (sele), el nom predeterminat per a una nova selecció.
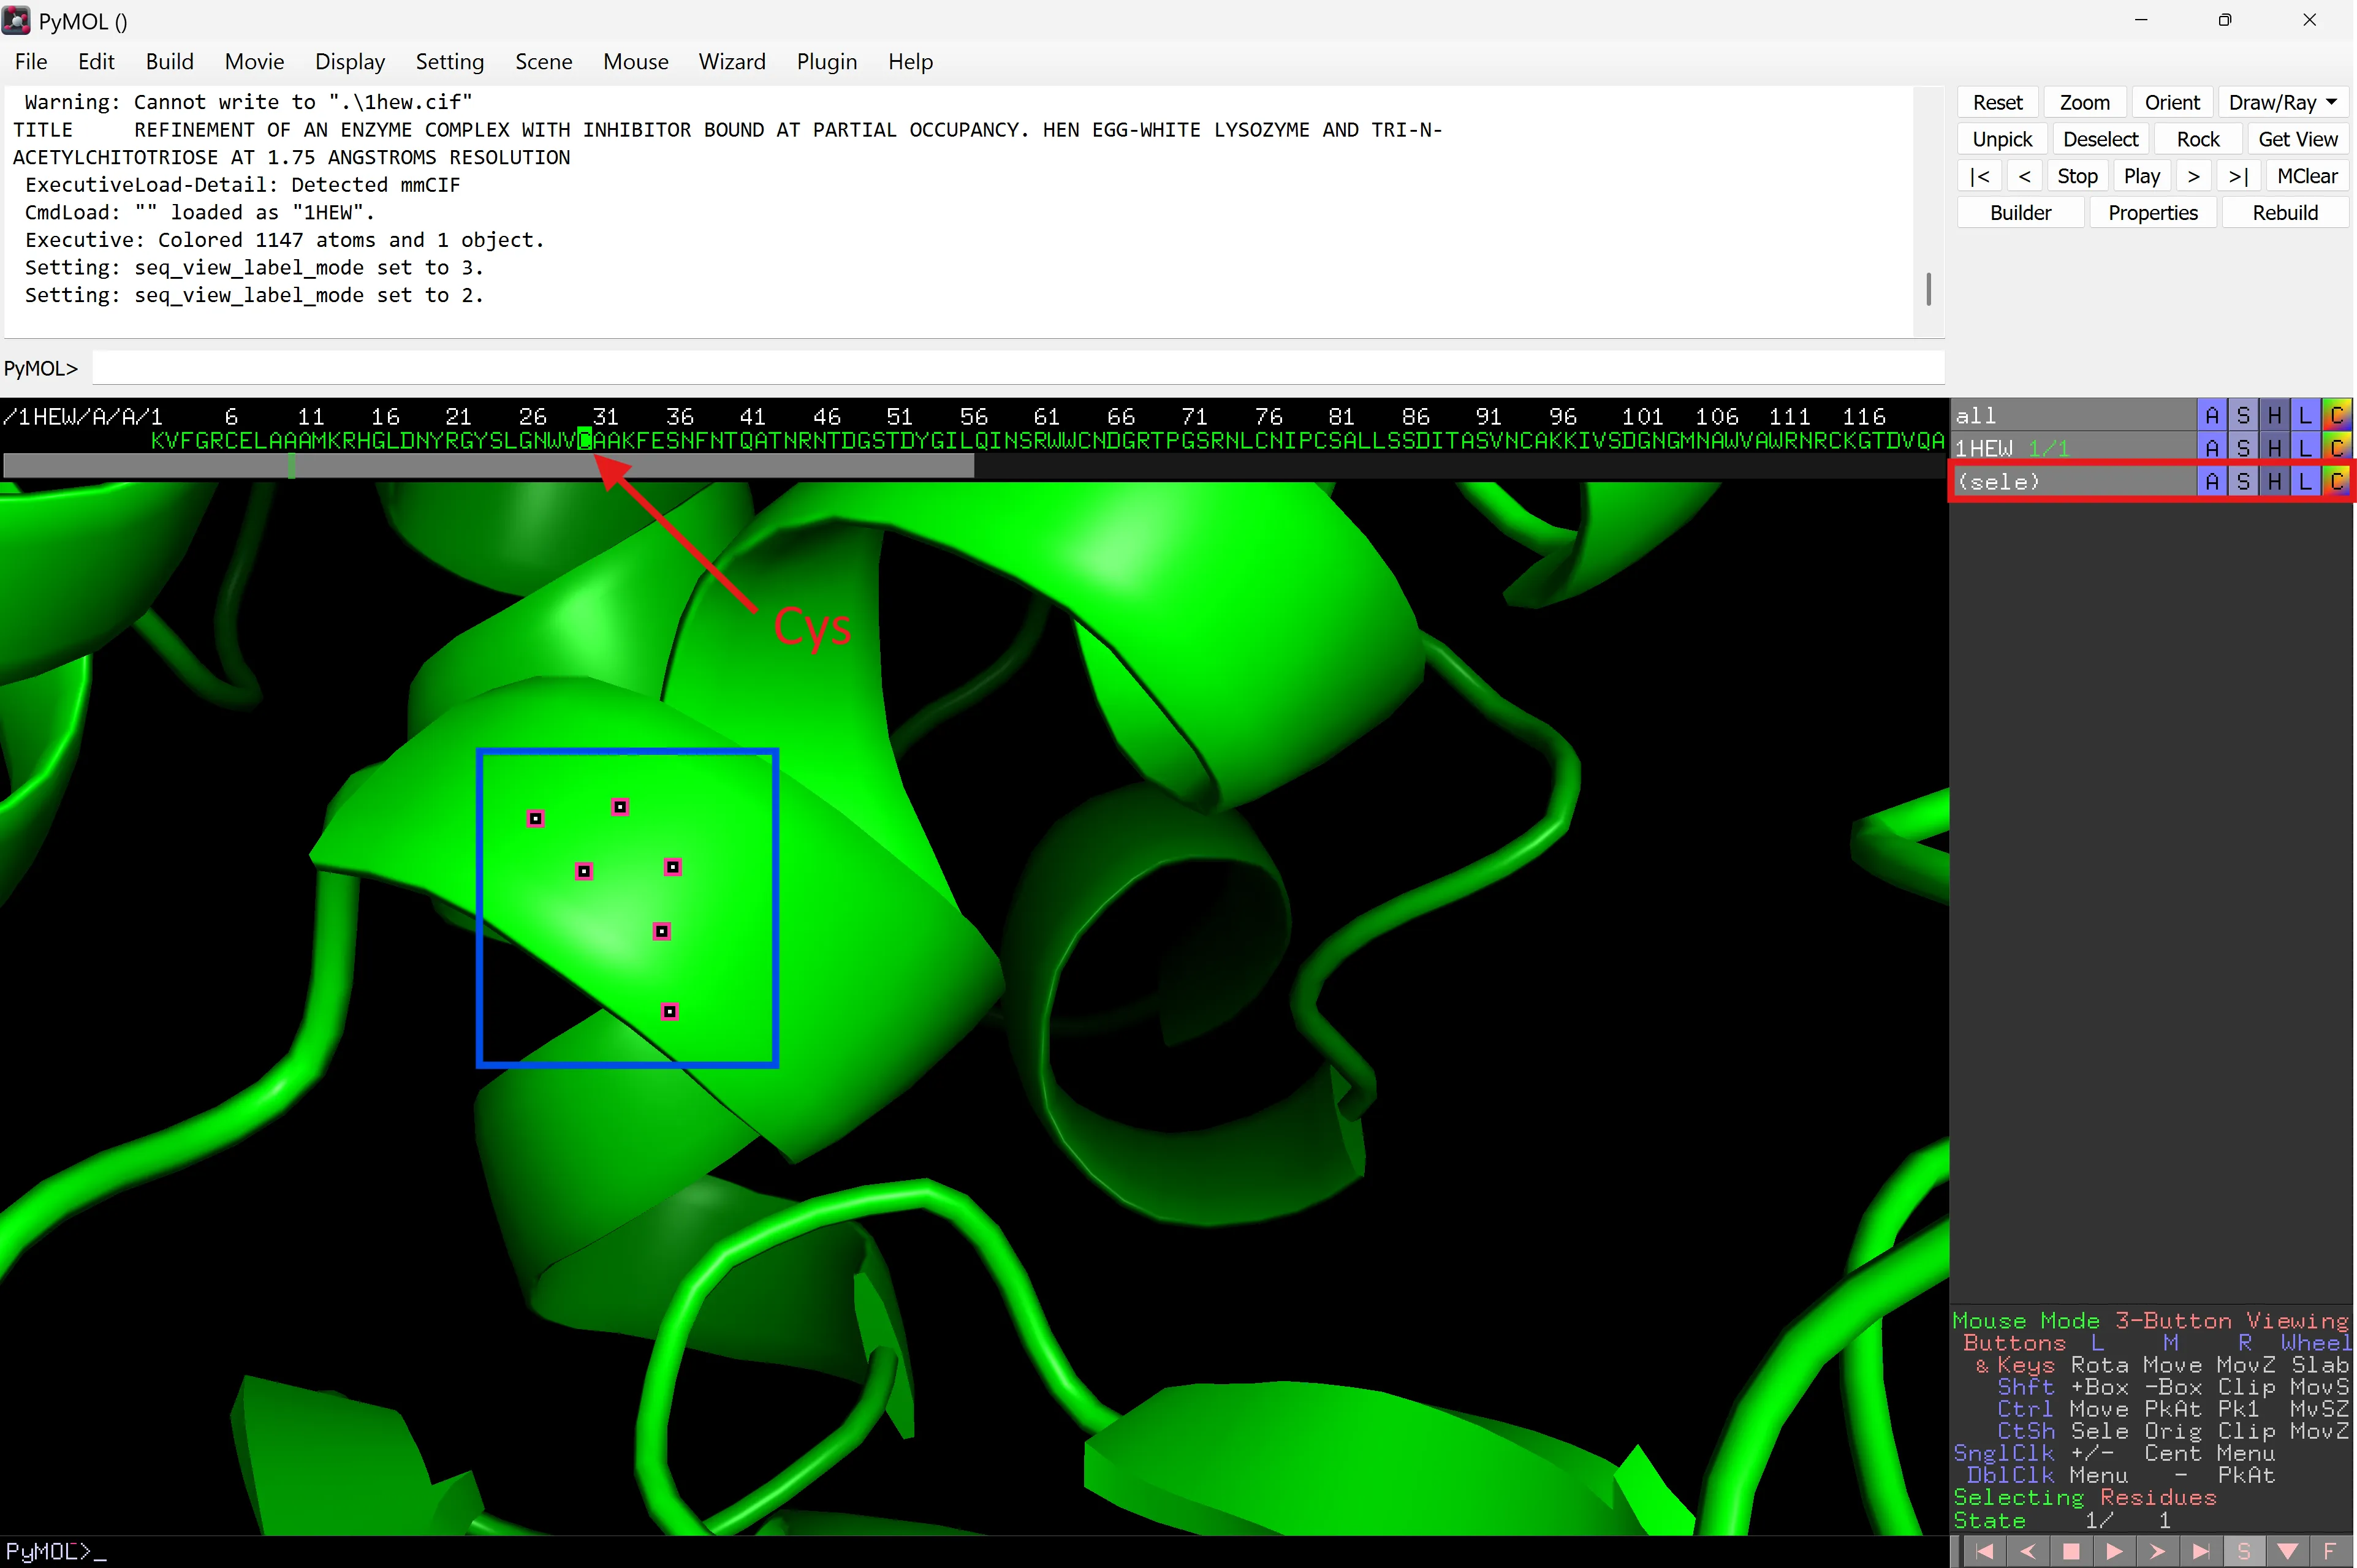
Nota que el residu seleccionat està ressaltat al panell de seqüència i apareixen punts vermells a la posició ocupada pel residu en l’estructura de la proteïna. Pots alternar entre seleccionar i desseleccionar el residu prement el botó esquerre del ratolí mentre el cursor està sobre el residu al panell de seqüència.
Canvia el nom de sele a Cys30 escollint (sele) ‘A’ > rename selection.
La selecció sota 1HEW ara és (Cys30).
Has de canviar la selecció predeterminada (sele) si vols restringir una selecció a un cert rang de residus, ja que si no, qualsevol selecció posterior al panell de seqüència s’afegirà per defecte a una pestanya ‘(sele)’.
A més, si la pestanya està “activa” (és a dir, el fons de la pestanya és gris) qualsevol selecció addicional de residus s’afegirà a aquesta pestanya particular, tant si és intencionat com si no. Deselecciona una pestanya si has acabat de fer addicions/eliminacions de seqüència.
També pots seleccionar directament residus/àtoms de l’estructura fent clic sobre ells en l’estructura mateixa. Qualsevol selecció s’afegirà a la pestanya de selecció “en ús” en aquell moment o a una nova pestanya (sele). Una selecció exitosa en l’estructura s’indicarà amb l’aparició dels punts vermells i blancs i la selecció del residu al panell de seqüència. Si vols deseleccionar un residu encara pots utilitzar el panell de seqüència.
Mentre t’assegures que l’objecte 1HEW està ressaltat, mostra Cys30 com a esferes i acoloreix-lo per color d’àtom:
Cys30 ‘S’ > Spheres i després (Cys30) ‘C’ > by element.
Alterna tant la pestanya (Cys30) com la pestanya 1HEW al panell d’objectes.
Per veure només el residu Cys30, amaga la representació cartoon de 1HEW (1HEW ‘H’ > cartoon). Només hauries de veure Cys30.
Centra en Cys30: (Cys30) ‘A’ > center. Apropa’t i mou-te al voltant. El punt focal de l’estructura ara està centrat en Cys30.
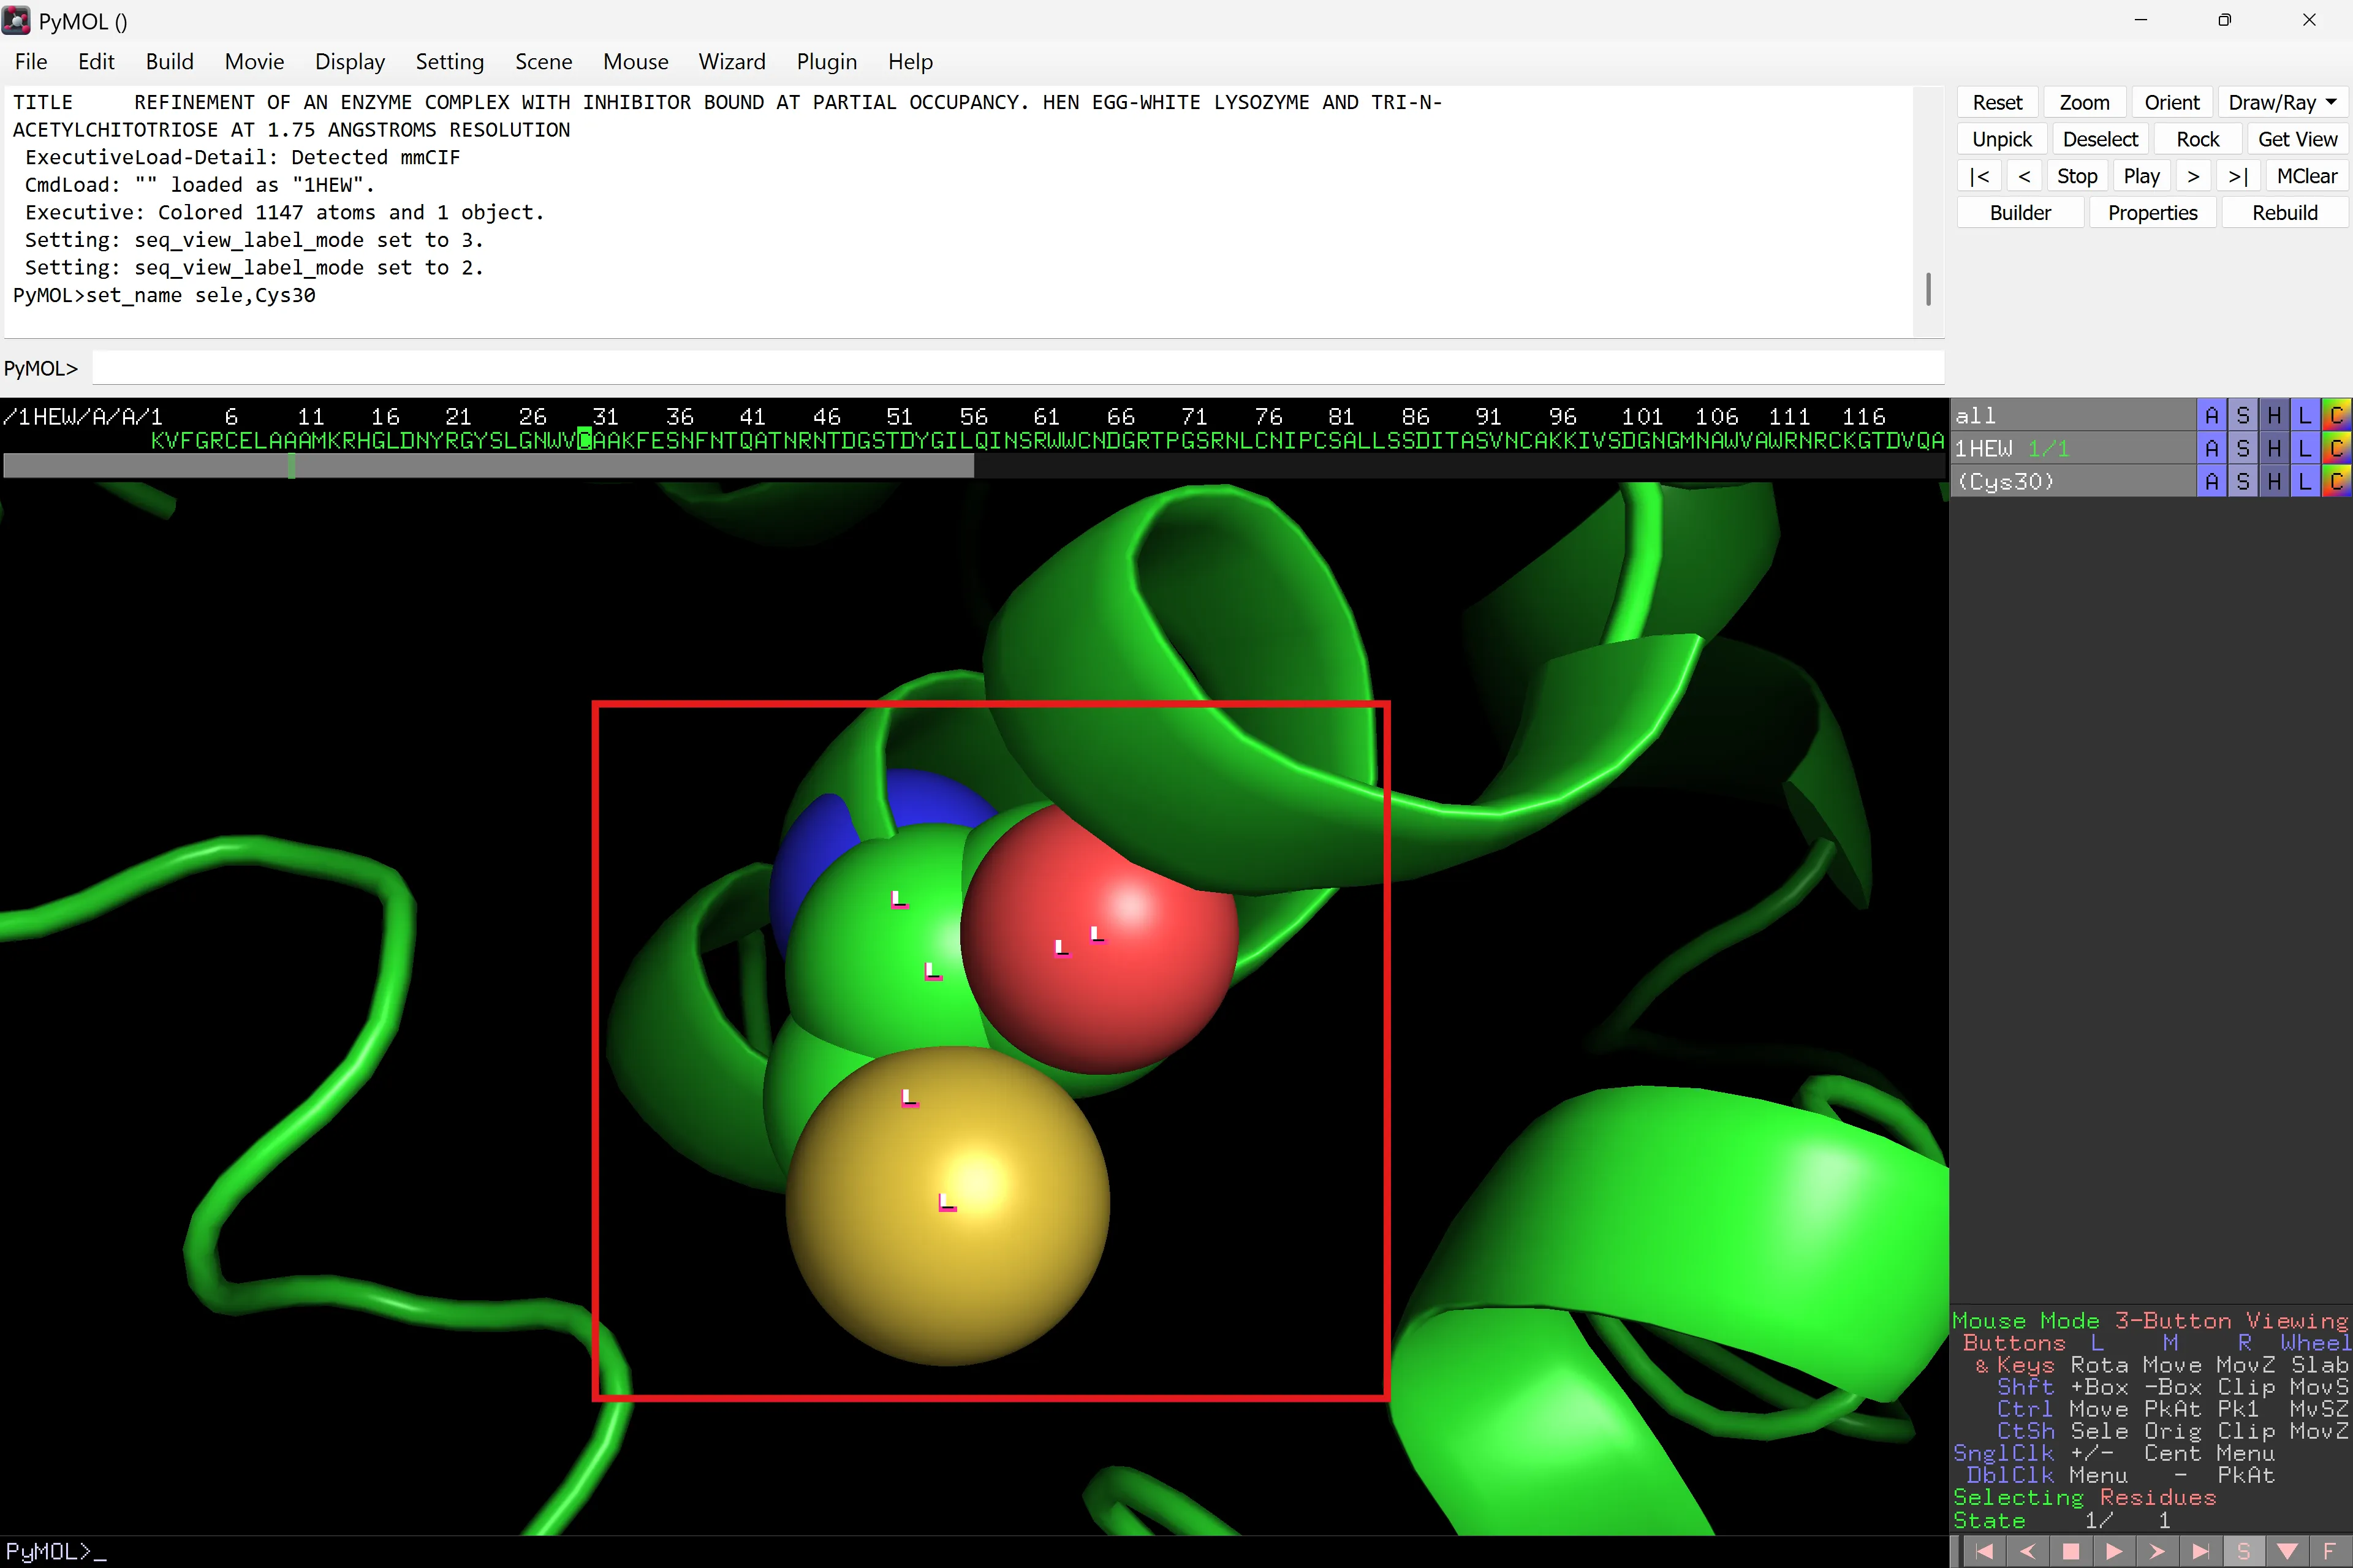
Per veure això clarament en el context de tota l’estructura de la proteïna, mostra la resta de 1HEW: 1HEW ‘S’ > cartoon. La representació cartoon hauria de reaparèixer. Repeteix el procediment de center però a la pestanya 1HEW i allunya’t per veure tota la proteïna. Ara amaga les esferes de (Cys30): (Cys30) ‘H’ > spheres
Desactiva la pestanya Cys30 – això és important perquè si no qualsevol selecció addicional s’afegirà a aquest panell. Practica seleccionant residus i canviant el nom predeterminat (sele).
Exercici: Ressalta una hèlix (NOTA si acoloreixes la proteïna per estructura secundària, el panell de seqüència canviarà de color per reflectir el seu color en l’estructura. Els residus en una hèlix es colorejaran en vermell o cian). Pots seleccionar (o deseleccionar) un residu individual o una sèrie de residus mantenint el dit sobre el botó esquerre del ratolí i arrossegant. Un cop facis una nova selecció, observa que apareix una nova pestanya (sele) sota (Cys30).
Hi ha moltes opcions disponibles – et suggereixo que les provis.
Recorda: Desa la teva sessió. Intenta desar-la com una sessió separada després de cada secció.
Displaying interactions
How particular residues interact with other residues within a protein or with other proteins or molecules is important in defining both the structure and function.
To demonstrate how PyMOL can be used to analyze and illustrate such interactions, we are going to look at selecting the trisaccharide inhibitor and show how it interacts with lysozyme. This is an example of how we can glean molecular information on interactions that define functional effects.
One easy way to manipulate the inhibitor segment independent of the protein is to separate it out as a new object (as opposed to a residue selection described previously). This will allow it to be manipulated independently of 1HEW.
First, delete any (sele) selections in the right-hand panel ((sele) ‘A’ > delete selection). Scroll to the right of the sequence panel and select the 3 NAG residues. These should form the new (sele) selection. Rename to Inhib as described above.
Extract the (Inhib) selection to a new object as followed: (Inhib) ‘A’ > extract object. A new _obj01 should be generated below (Inhib). Also, there will be new sequence below 1HEW in the sequence pane.
Rename the obj01 to Inhib (obj1 ‘A’ > rename object).
Ara observem l’inhibidor en si mateix. Acoloreix 1HEW amb un color uniforme a la teva elecció (això també afectarà (Cys30) ja que forma part de 1HEW).
Mostra Inhib com a sticks (Inhib ‘S’ > sticks). Acoloreix segons element (hi ha diverses opcions per al color del carboni, però el gris sol ser el predeterminat). Assegura’t que sigui diferent del que has escollit per a 1HEW perquè els dos objectes siguin fàcilment identificables. Inhib ‘C’ > by element.
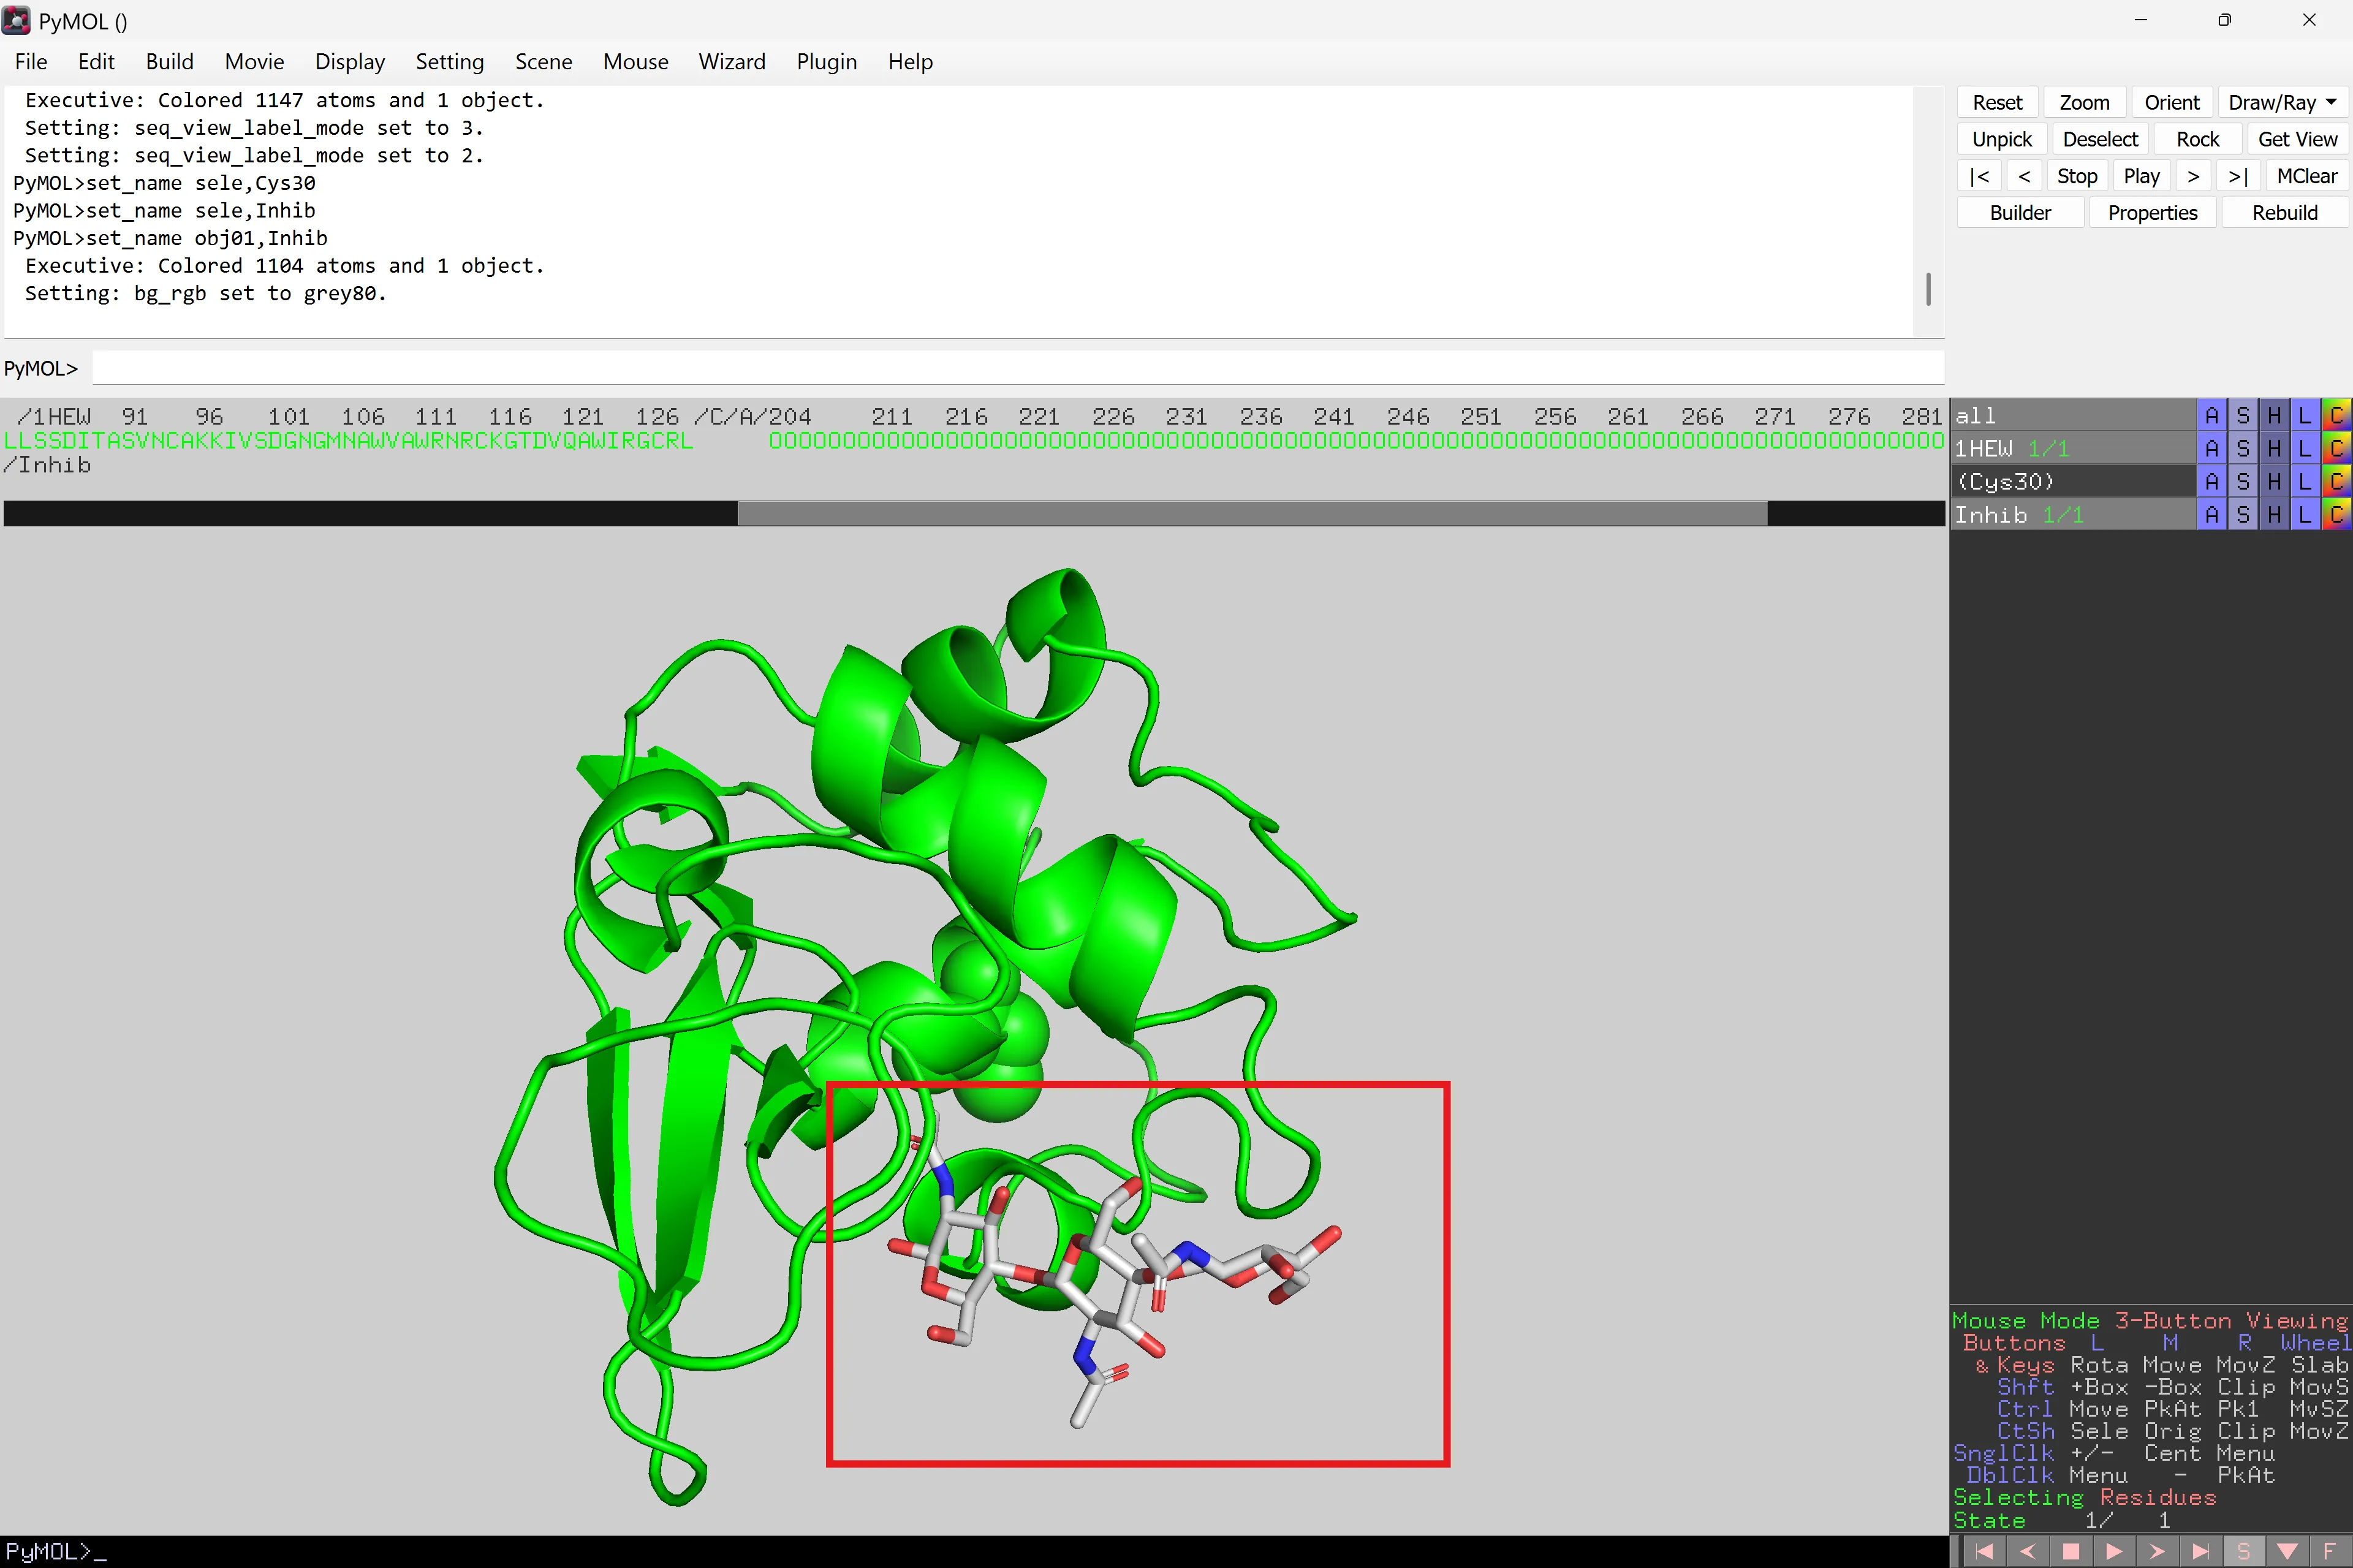
Rota i mou l’estructura al voltant
Ara analitzarem el complex inhibidor-proteïna per determinar els residus de la proteïna que interaccionen amb una unitat de l’inhibidor trisacàrid. Primer selecciona NAG201 (la primera unitat NAG) del panell de seqüència i canvia el seu nom a NAG201 ((sele) ‘A’ > rename selection).
Troba els residus que probablement fan contacte amb NAG201 mitjançant NAG201 ‘A’ > modify > expand > by 4 Å, residues. Això afegirà a la selecció NAG201 qualsevol residu dins dels 4 Å. Dins d’aquest rang de distància, aquests residus estan essencialment en contacte amb NAG201.
Els residus recentment seleccionats s’afegeixen a la selecció original (NAG201). Per tant, canvia el nom d’aquesta a NAG-interact ((NAG201) ‘A’ > rename selection). Potser voldràs regenerar (NAG201) creant una nova selecció amb només NAG201 seleccionat (vegeu més amunt). Això és important per calcular les interaccions (vegeu més avall).
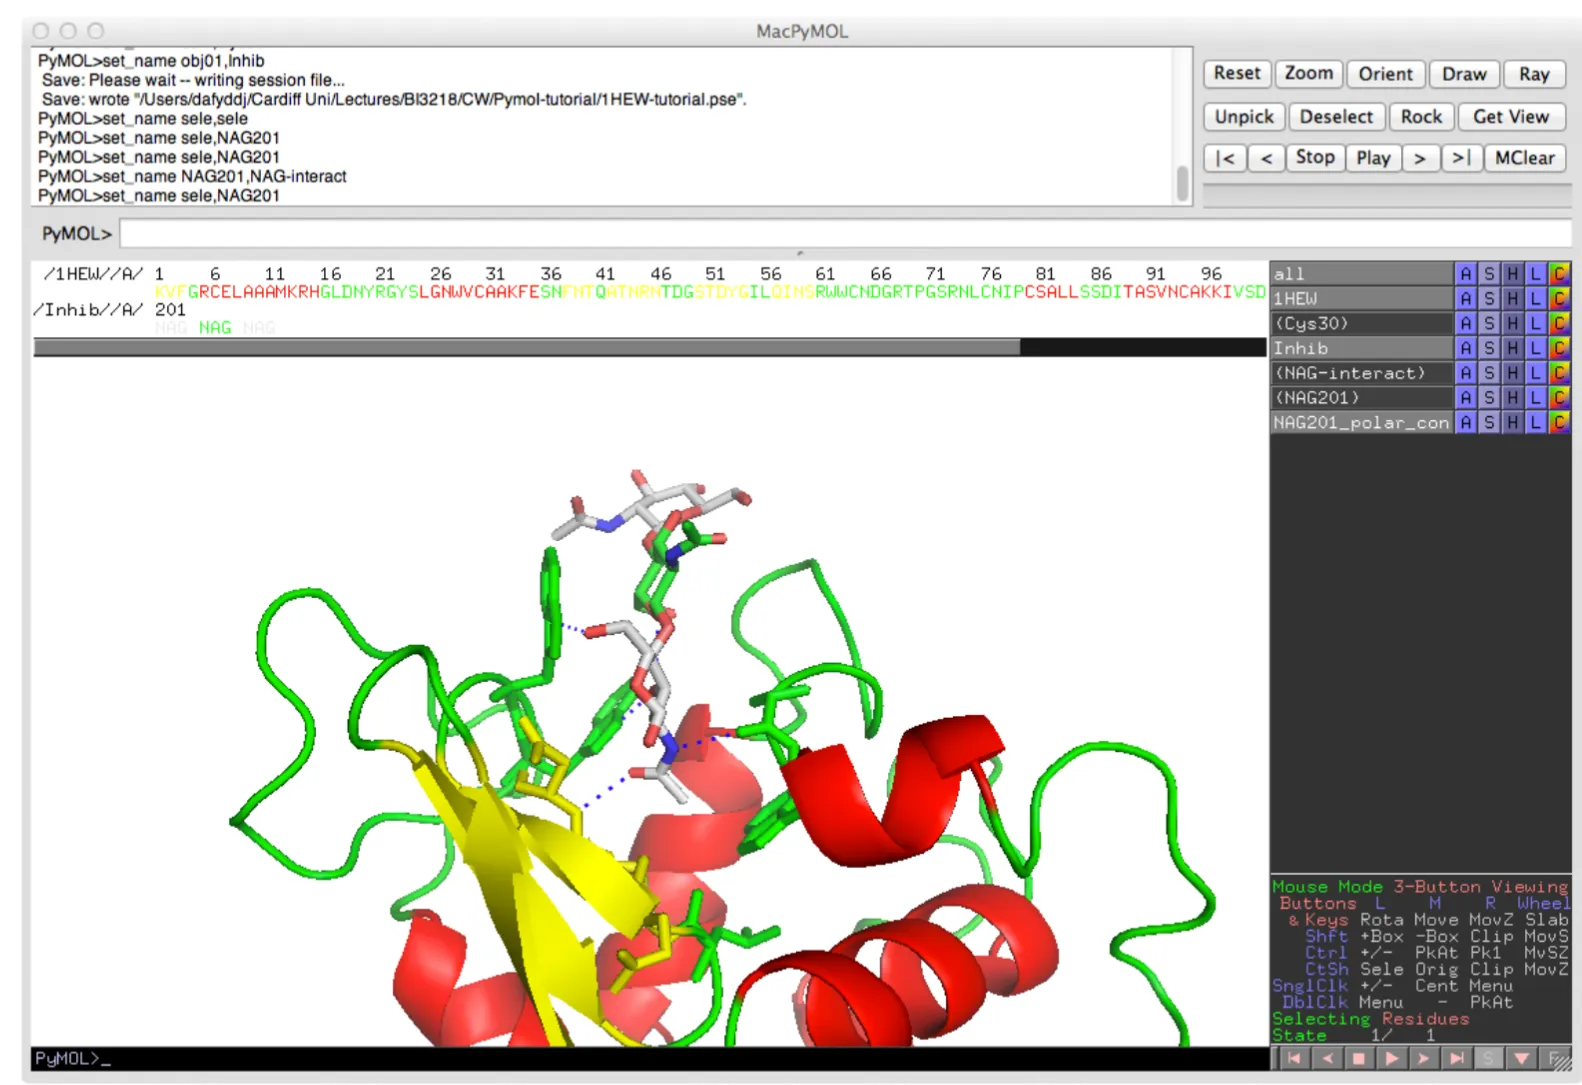
Show the new (NAG-interact) selection as sticks. By rotating and zooming, you should get be able to improve the view. Note that the residues with 4 Å are also displayed in the sequence pane so you can note which residues are forming the interacting interface.
Label the selected residues. NAG-interact ‘L’ > Residues. The residues selected are now labelled on the structure of the protein itself. Note. You can change the size and font of the labels through Setting > Label.
Now we will select and display polar interactions involving NAG201. Select polar interactions from NAG201: (NAG201) ‘A’ > Find > Polar contacts > to any atoms.
A new panel will appear below NAG201 called NAG201_polar_con. In this panel select a colour (e.g. blue) and the interactions will show as dashed lines. The end result of this procedure can be seen below.
Surface of a protein.
The surface representation of a protein can be quite informative, highlighting the general shape of a protein as might be encountered by a solvent (i.e. water) molecule. PyMOL is very at good calculating surfaces and allows for the surface to be transparent. Using the surface representation, we will see how lysozyme interacts with the inhibitor.
First, go back to the default cartoon for 1HEW (1HEW ‘S’ > Cartoon followed by 1HEW ‘H’ > sticks). Keep the existing colour schemes that differentiate Inhib from NAG-interact and the rest of 1HEW.
Add a new sele selection tab in the object panel by selecting the two catalytic residues, Glu35 (E35) and Asp52 (D52) from the sequence pane.
Rename this selection to cat-res ((sele) ‘A’ > rename selection).
Show them as sticks ((cat-res) ‘S’ > sticks) and colour them by element with the carbon set to magenta (purple) (cat-res ‘C’ > colour > by element).
Under 1HEW, select surface. You should now see a surface with Inhib still as sticks and lysozyme now shown as surface, with the different selections as different colours. Rotate and zoom in to look at the grove into which the inhibitor binds. Remember, if you want to centre on a particular selection, go to one of the selection tabs you generated on the right hand side and select ‘A’ > center.
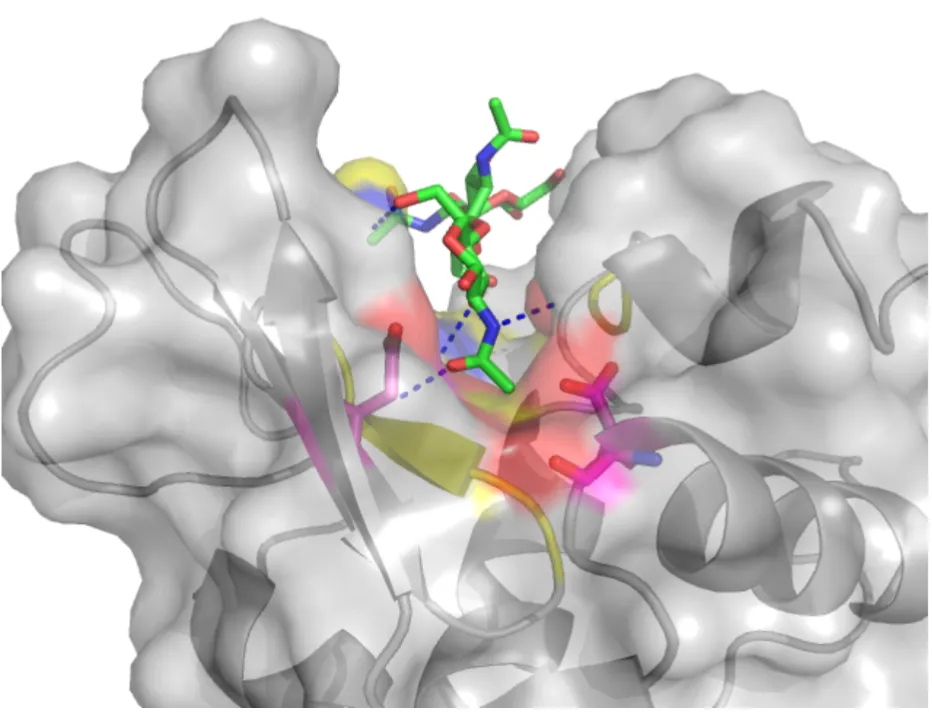
You can also make the surface transparent to different degrees to see some of the underlying detail. To do this, go to Setting > Transparency > Surface in the pull down menu and chose avalue. Your selection will be presented on the screen in real time. You can play with the setting for surfaces under the Setting menu.
By rendering (using the Ray button) the picture as described above, you can generate a smooth publication quality figure of your protein. The one above, clearly highlights key features of lysozyme, namely the binding cavity of enzyme, inhibitor binding, residues/regions involved in binding the inhibitor and the structural relationship of the protein with respect to the active site residues. This provides and essential aid to any description of the protein structure-function relationship.
Remember: Save your session. Try saving as a separate session after each section.
Tècniques avançades
Comparing and contrasting protein structures: alignment
One of the most important aspects of analysing the protein structure-function relationship is to understand how different amino acid sequences translate to changes in structure and function or the requirement of residue conservation to preserve required functional features (e.g. catalytic mechanism). This is achieved by comparing the structures of structural and functional homologues and/or mutants of a parent protein. We will go through the structural alignment process by comparing 1HEW, the Hen Egg Lysozyme, with the human equivalent 1LZ1.
Set the original 1HEW molecule back to the green cartoon as described above. You will need to use a combination of the ‘H’, ‘S’ and ‘C’ options.
Download the PDB file 1LZ1 from www.rcsb.org. Open within PyMOL (File > Open > 1LZ1.pdb). You should now see a new object tab in the object panel labelled 1LZ1. The first thing you will see is that the two structures occupy different regions in the window.
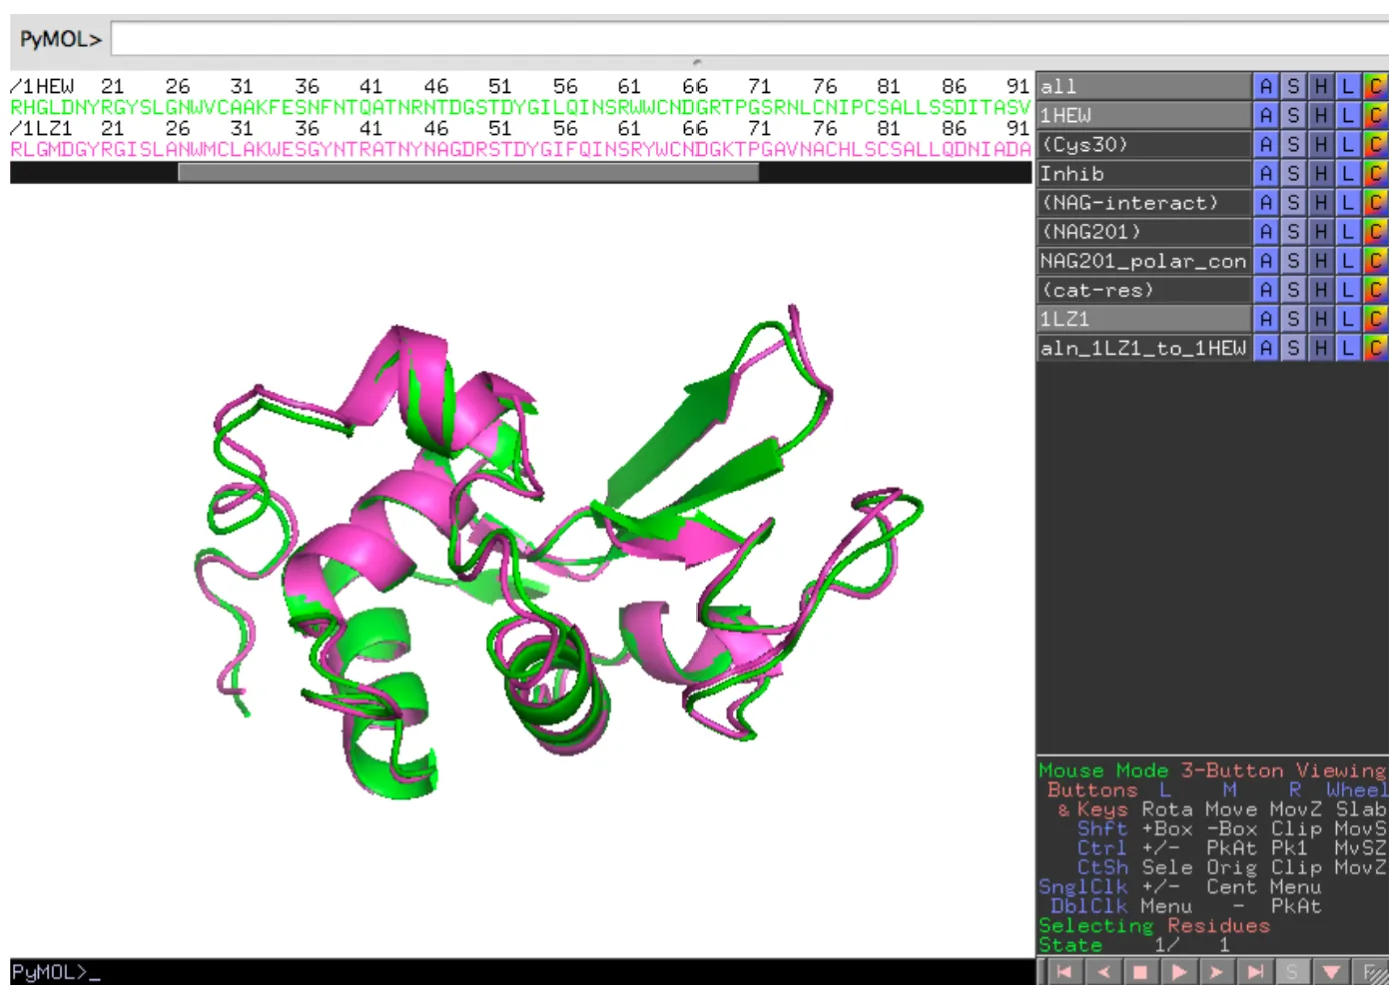
The next step is to align the Human enzyme with the Hen lysozyme. Select 1LZ1 ‘A’ > align > to molecule > 1HEW. The structures should now overlap and a new tab appears in the object panel (aln_1LZ1_to_1HEW), as shown in the image below. The new aln_1LZ1_to_1HEW tab is a program generated tab and aids analysis by showing via lines the major differences between the 2 structures.
Center the view on 1HEW (1HEW ‘A’ > center). Display 1LZ1 as cartoon and look at the general similarities between them.
We will now look at 1 set of residues that are similar and one set that differ. Remember. There are now 2 sets of protein sequences. They are easy differentiated by the object name (e.g. /1LZ1) above the sequence.
Select the catalytic residues for 1LZ1 (residues E35 and D53) from the sequence pane. Make sure they are added to the (cat-res) tab by highlighting that tab (switched to grey from black) before selecting residues.
Show the residues as sticks and look at the similarities. You will notice that they are virtually fully superimposable.
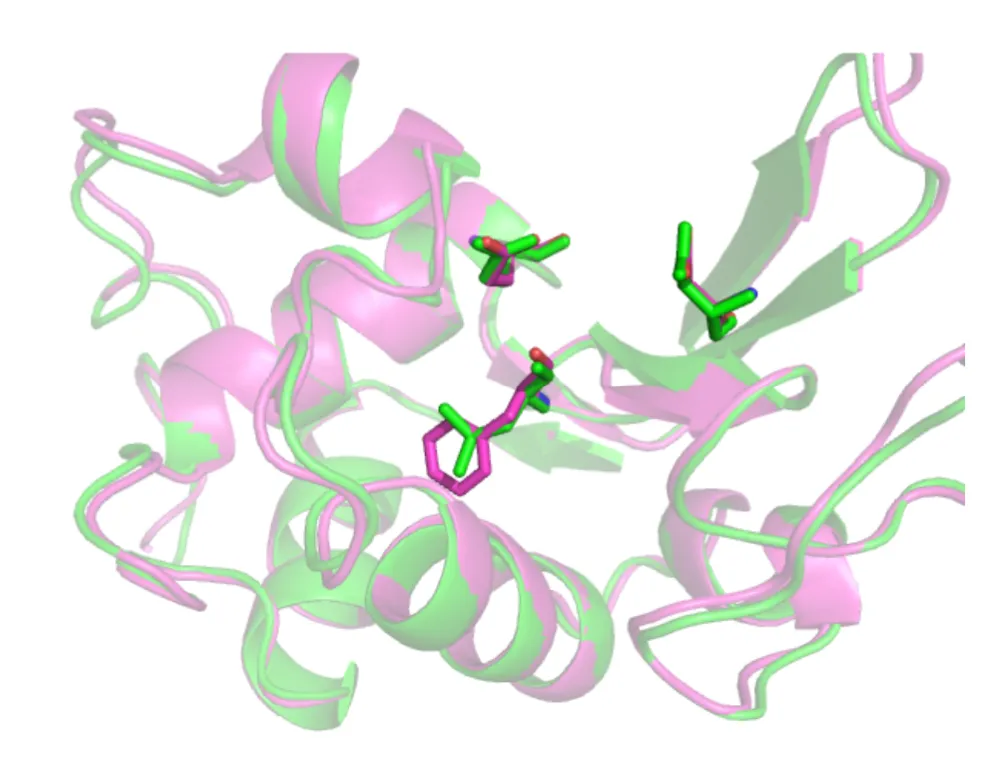
Now deselect (cat-res) (switched to black from grey) and in the sequence pane select residue 56 in 1HEW and 57 1LZ1. If you remember, residue 56 in 1HEW comes into close contact with 12 Inhib. Show both residues as sticks and see how they are similar (backbones) and different (side chain).
Quick quiz. Why does the residue number shift by one for D53 in 1LZ1 compared to 1HEW? How is this “insertion” incorporated as part of the overall protein fold?
We can now make the cartoon transparent to highlight the similarities and differences in these key residues. Setting > Transparency > Cartoon > . By rendering (ray) the figure, you can now have a publication quality figure concerning key residues involved in function, their position with respect to the whole protein and how sequence differences between homologues generated structure/functional differences.
In silico mutagenesis.
PyMOL also provides you with the opportunity to perform mutagenesis in which you can change one amino acid to an another and assess the impact on protein structure.
La mutagènesi in silico (a l’ordinador) és el procés de modificar un aminoàcid d’una proteïna per estudiar com aquest canvi afecta la seva estructura i funció. Es fa per comprovar si un petit canvi (una mutació) fa que la proteïna funcioni millor, pitjor o igual; això ens pot servir per a detectar enfermetats.
The mutagenesis tool can be found under the “Wizard” pull down menu at the top of the screen. Using the 1HEW structure, change the following residues: Asp 18, Trp62, and Cys80. You may wish to start a fresh session, so save your previous session (File > Save Session As…) and close then reopen the 1HEW structure.
What impact to you expect each mutation to have on the enzyme’s structure and function?
First, select the three residues. These will be highlighted in the (sele) in the object panel.
Rename the selection if you like. Show the all three residues as sticks (sele) > S > Sticks and
colour differently to the rest of the structure (sele) > C > by element > [chose preferred Carbon colour] as shown below.

Next open the mutagenesis plugin by going to Wizard > Mutagenesis. At the bottom of the right hand object panel you will see the Mutagenesis menu. There are several options in this menu, but we will focus on Mutation, Apply, Clear and Done. The later 3 buttons are fairly self-explanatory; Apply applies the selected mutation, Clear deletes the current mutation, and Done closes the mutagenesis menu. The mutation menu (first menu) allows you to choose between the 20 canonical amino acids plus selected ionisation states for selected amino acids.
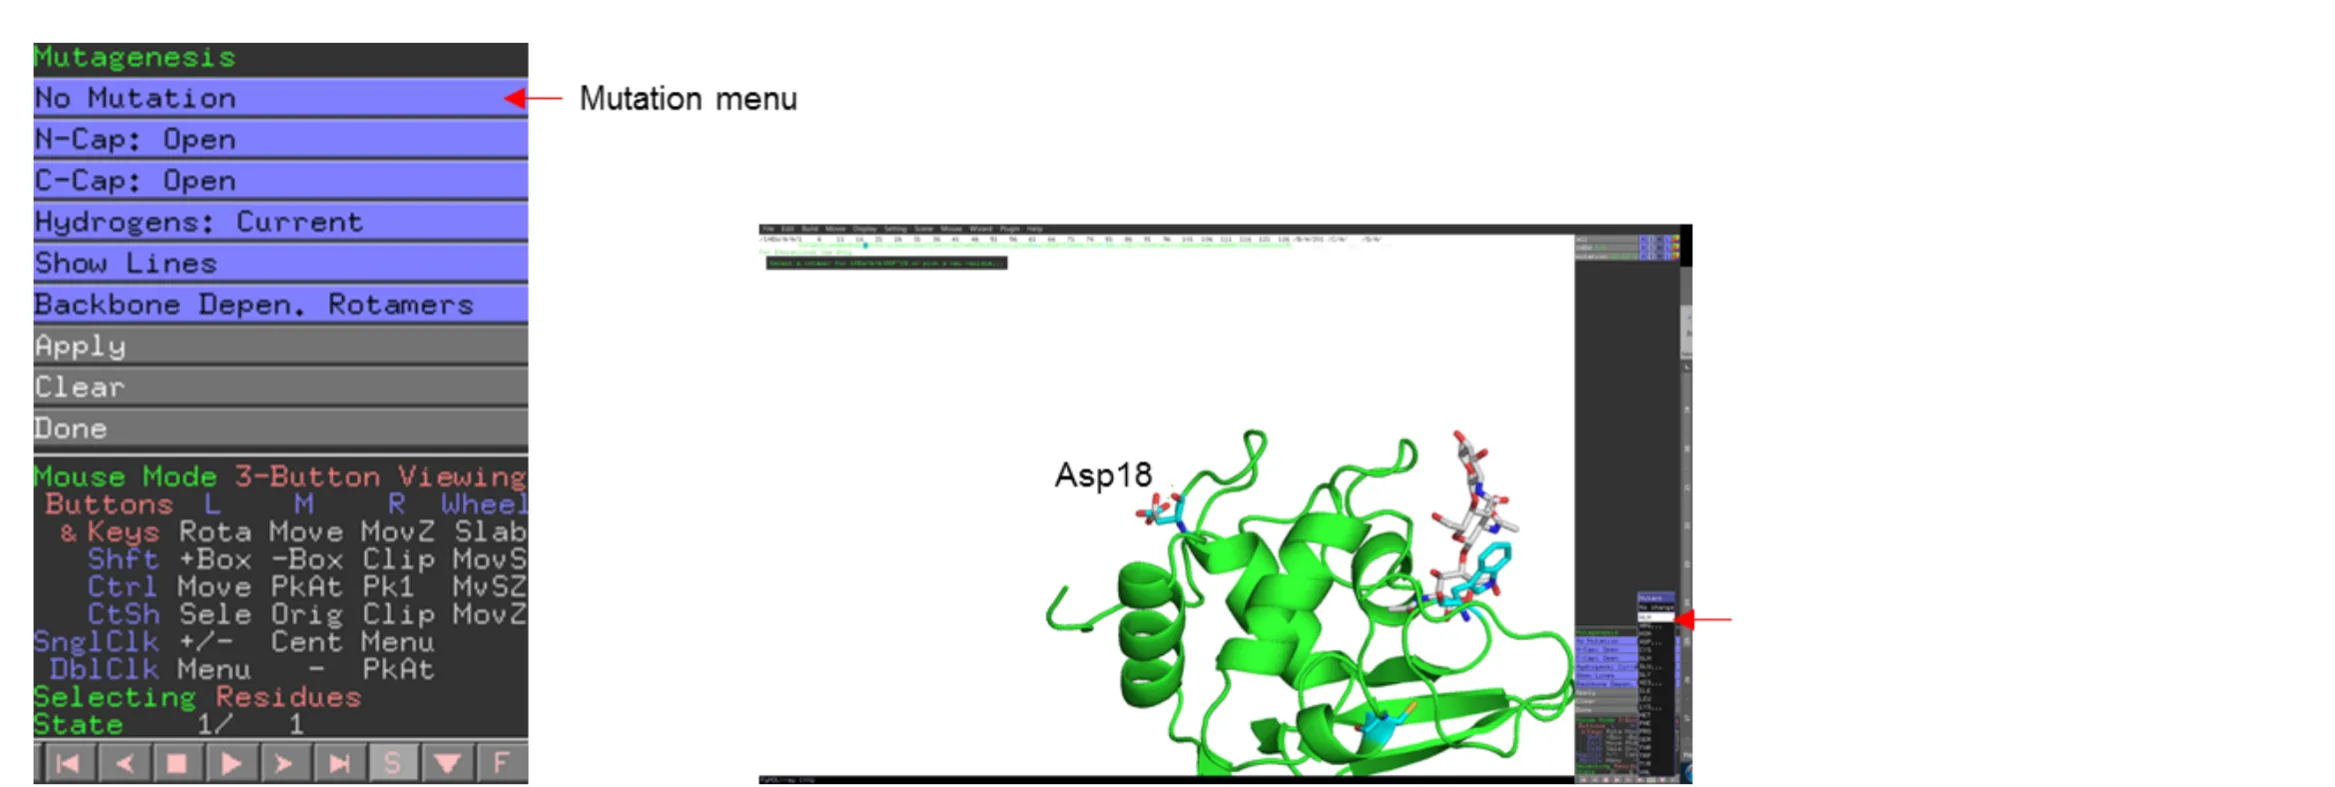
First select Asp18 by clicking on the residue then mutate to alanine by selecting Mutation > Ala and press apply.
What effect is any will this have on the protein? Consider the location of the mutation and what properties are changing i.e. charge, surface area, polar/non-polar.
Next select Trp62 an mutate to lysine Mutation > LYS… > LYS. By using the left and right arrow keys. Notice the command line prompt as you cycle through the possible rotamers. Once you are happy with the rotamer press Apply. Note the red disks show areas of steric clashes.
What do you think ‘strain’ refers to and how it could be used to determine the appropriate rotamer? What do you think this mutation would have on substrate binding? Why wasn’t there an option to change rotarmers for the D18A mutation?

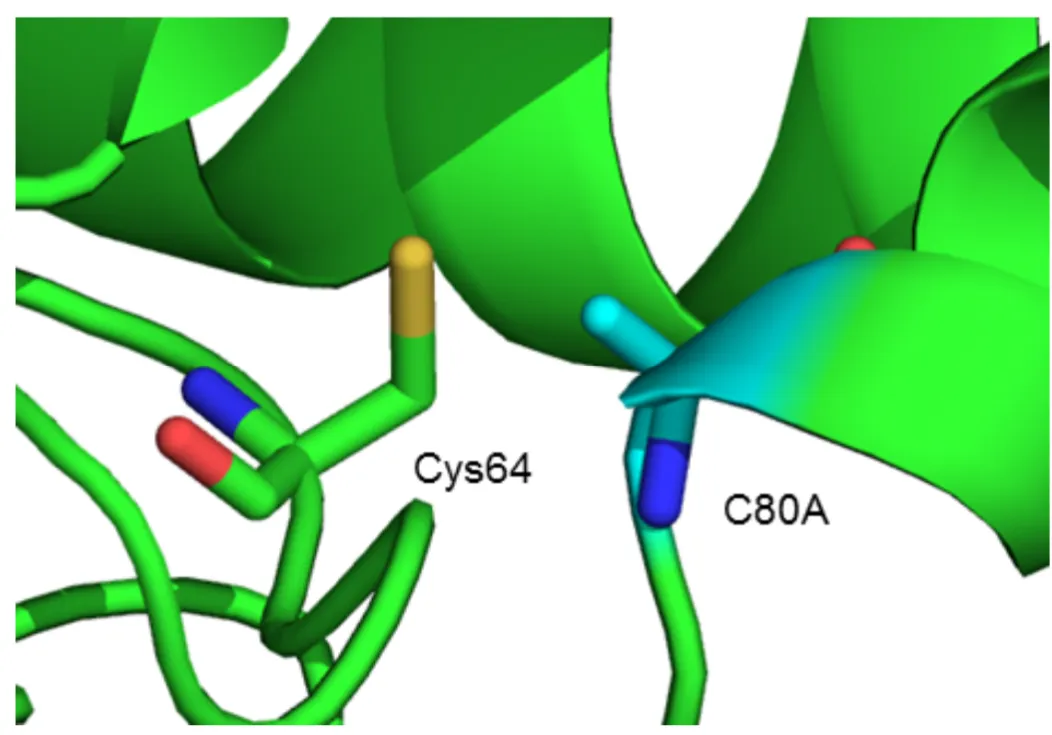
Finally, select Cys80 and mutate it to alanine (Mutation > ALA) and click Apply then Done to close the mutagenesis menu. Select Cys64 and show as sticks (sele) > S > Sticks.
What immediate structural change has occurred? How would this mutation affect the protein structure/function?
Try reversing the mutation C80A mutation back to cystine (Wizard > Mutagenesis; Mutation > Cys; select residue 80). What happens? Are you able to reverse the structural change?
Script
En la consola de PyMOL (o script):
fetch 5HFA, async=0Seleccionar y extraer solo la cadena A
# Seleccionar solo la cadena Aselect chain_A, chain A
# Eliminar todo excepto la cadena Aremove not chain A
Eliminar cofactores y ligandos
Los ligandos y cofactores usualmente no son cadenas proteicas estándar (aminoacidos A, B, etc.), sino heteroátomos.
Por lo tanto, en ocasiones no nos interesan para estudiar la proteina.
Para eliminarlos:
# Eliminar heteroátomos (ligandos, iones, cofactores, etc.)remove hetatm
# Alternativa más específica:
remove resn HOH  # elimina aguaremove not polymer  # elimina todo lo que no sea una cadena polimérica (como proteínas o ADN)
Tendrás un archivo PDB que contiene solo la cadena A de la acetilcolinesterasa, sin ligandos ni cofactores, listo para análisis estructural, modelado o docking.
Aquí tienes dos versiones para automatizar el proceso: una en formato PyMOL script (.pml) y otra en Python (.py) si usas PyMOL con su API en modo scripting.
Opción 1: Script .pml (para cargar directamente en PyMOL GUI)
Guarda esto como limpiar_acetilcolinesterasa.pml:
# Descargar y cargar la estructura de la acetilcolinesterasafetch 1EVE, async=0
# Seleccionar y conservar solo la cadena Aselect cadena_A, chain Aremove not chain A
# Eliminar heteroátomos (ligandos, cofactores, agua, etc.)remove hetatm
# Guardar el resultado limpiosave acetilcolinesterasa_chainA_clean.pdb
Abre PyMOL.
En la consola escribe:
@limpiar_acetilcolinesterasa.pmlOpción 2: Script en Python usando la API de PyMOL (.py)
Guarda esto como limpiar_acetilcolinesterasa.py y ejecútalo si tienes PyMOL instalado con acceso a su API (como con PyMOL Open-Source o usando pymol -cq):
from pymol import cmd
# Cargar estructura desde el PDBcmd.fetch("1EVE", async_=0)
# Eliminar todo excepto la cadena Acmd.remove("not chain A")
# Eliminar heteroátomos (ligandos, cofactores, agua)cmd.remove("hetatm")
# Guardar solo la cadena A limpiacmd.save("acetilcolinesterasa_chainA_clean.pdb")
Ejecuta en terminal (con PyMOL instalado):
pymol -cq limpiar_acetilcolinesterasa.pyremove water molecules and salts like Na⁺ and Cl⁻
remove resn HOH or resn WATremove elem Naremove elem Clremove ligans:
awk '!/^HETATM/' Complex.pdb > protein.pdbTask: Myoglobin
1MBN (myoglobin) serves as a reserve supply of oxygen and facilitates the movement of oxygen within muscles.
High concentrations of myoglobin in muscle cells allow organisms to hold their breath for a longer period of time.
Myoglobin belongs to the globin superfamily of proteins, and as with other globins, consists of eight alpha helices connected by loops. Human myoglobin contains 154 amino acids.
- Load the structure 1MBN (myoglobin)
- Rotate, zoom, and change the slab view with the mouse to explore the structure.
- Load the structure 1MBN (myoglobin)
- In the object panel, find the tab named
1MBN. - Try the following combinations:
- 1MBN ‘H’ > cartoon
- 1MBN ‘S’ > lines
- 1MBN ‘S’ > cartoon
- 1MBN ‘H’ > waters (if present)
- Toggle the all and
1MBNtabs on and off and observe what disappears and reappears. - Save the session and the protein in a new file with name
1MBN_ex1.pdb
Questions
Q1. Which representation (lines, cartoon, sticks) do you find more useful to understand the protein’s overall fold?
Q2. What happens when you hide waters? Does it become easier to focus on the protein?
Q1. La representació cartoon. Perquè mostra clarament les vuit hèlixs alfa de la mioglobina i permet entendre fàcilment com està plegada la proteïna. Q2. En amagar les aigües, la visualització de l’estructura de la proteïna es torna més clara i neta.
- Show the sequence panel (bottom‑right S button).
- Ensure residue numbers are visible:
Display > Sequence Mode > All Residue Numbers. - Select one residue from the sequence panel, for example His64 (or any histidine near the heme).
- A new selection tab (sele) appears under 1MBN.
- Rename (sele) to His64:
(sele) 'A' > rename selection. - Show this residue as spheres and color by element:
(His64) 'S' > spheres (His64)and'C' > by element.
Questions:
-
Where is His64 located relative to the heme group? His64 is located close to the heme group, pointing toward the ligand-binding pocket. It is positioned near the site where oxygen binds, but does not coordinate the iron directly.
-
Why might a histidine near the heme be functionally important? A histidine near the heme can: Stabilize oxygen binding at the heme iron and prevent unwanted ligands from binding.
- Hide the cartoon of 1MBN: 1MBN ‘H’ > cartoon.
- Center on His64: (His64) ‘A’ > center.
- Rotate and zoom to analyze this residue.
- Show the rest of the protein again: 1MBN ‘S’ > cartoon.
- Hide the spheres for His64: (His64) ‘H’ > spheres.
Questions:
- How does centering on a residue help you understand its environment?
- When you turn the cartoon back on, can you tell if His64 is on the surface or buried inside?
- Color the whole protein by secondary structure: 1MBN ‘C’ > by ss (choose an option, e.g. default).
- In the sequence panel, identify a stretch of residues that form an α‑helix (colored typically in red or cyan).
- Select the entire helix by dragging across its residues in the sequence panel, creating a new (sele).
- Rename it to HelixA (or a name of your choice).
- Display HelixA as sticks or spheres in a different color.
Questions:
- Is the helix on the protein surface or closer to the core?
- What advantage might helices give to a small globular protein like myoglobin?
- In the sequence panel, scroll to find the HEME (or similar ligand name).
- Select the heme and rename the selection to Heme.
- Extract it as a new object: (Heme) ‘A’ > extract object → new obj01.
- Rename obj01 to Heme_obj: obj01 ‘A’ > rename object.
- Show Heme_obj as sticks and color by element: Heme_obj ‘S’ > sticks and Heme_obj ‘C’ > by element.
- Color the protein 1MBN in a uniform color different from the heme.
Questions:
- How is the heme positioned relative to the rest of the protein?
- Do you think the heme is fully exposed to the solvent, or partly buried?
- Select the heme again in the sequence panel and call the selection HemeSel.
- Expand the selection by distance: HemeSel ‘A’ > modify > expand > by 4 Å, residues.
- Rename this expanded selection to Heme-interact.
- Show Heme-interact as sticks and color them differently from the rest of 1MBN.
- Label the interacting residues: Heme-interact ‘L’ > Residues.
Tasks:
- Write down the names and numbers of at least 5 residues that interact with the heme.
- Explain why these residues might be important for: Binding the heme and stabilizing the active site or oxygen‑binding pocket.
- Return to default cartoon view for 1MBN:
- 1MBN ‘S’ > cartoon
- Hide extra sticks of the backbone if needed: 1MBN ‘H’ > sticks.
- Keep Heme_obj and Heme-interact as sticks.
- Under 1MBN, select surface to show the protein surface.
- Rotate and zoom in to see the cavity where the heme is located.
- Change surface transparency: Setting > Transparency > Surface and choose a value.
Questions:
- How does the cavity shape fit around the heme?
- Does the surface show a clear channel/path where oxygen could enter and reach the heme?
Exercicis avançats (optatius)
- Download human myoglobin (e.g. PDB 1A6M) from RCSB.
- Open it in PyMOL (File > Open > 1A6M.pdb).
- Align 1A6M to 1MBN: 1A6M ‘A’ > align > to molecule > 1MBN.
- Center on 1MBN and show both proteins as cartoon in different colors.
Questions:
- Are the overall folds similar?
- Pick one residue near the heme in each protein and compare its position.
- Do small sequence differences change the pocket shape around the heme?
Using 1MBN:
- Select one residue near the heme (e.g. His64 or another heme‑contact residue).
- Show it as sticks and color by element.
- Open the mutagenesis wizard: Wizard > Mutagenesis.
- Change the residue to a hydrophobic one (e.g. leucine) and apply.
- Compare the original structure (use a copy) with the mutated one.
Questions (short write‑up):
- How does this mutation change the local environment of the heme?
- Could this affect oxygen binding or stability? Why?