Scene
Scene
A blank window is a great start, but let’s add some 3D scenery. Panda3D comes with a few built-in 3D models we can use for practice.
Open your main.py file again and change it to look like this:
=
# 1. Load a 3D model of some scenery
=
# 2. Put the scenery into our game world
# 3. Shrink it down and push it back so we can see it
You should now see a grassy green environment with a tree and some buildings!
What did we just add?
-
app.loader.loadModel(...)tells the game engine to dig into its files and pull out a 3D model called “environment”. We named this modelscene. -
scene.reparentTo(app.render)is crucial in Panda3D. Loading a model just puts it in the computer’s memory.app.renderis the visible stage. This line tells the computer to actually put the model onto the stage so the camera can see it. -
setScaleandsetPosadjust the size (making it 25% of its original size) and the position (moving it back and to the side) so it fits nicely in front of your camera.
Model
In the models folder, you should find a file named environment.egg.
This is a file that Panda3D uses to store 3D models.
The .egg suffix indicates that it’s in Panda’s human-readable file-format. Panda will automatically convert this to its other file-format, `.bam, which is more efficient, but not easy for humans to read.
Explore the World
The default action of the mouse is to control the camera.
Panda3D includes a built-in mouse camera control (where you click and drag), but it’s meant for debugging, not for actual gameplay.
While pressing the mouse button on the Window, move the mouse around to see how the scenery moves around.
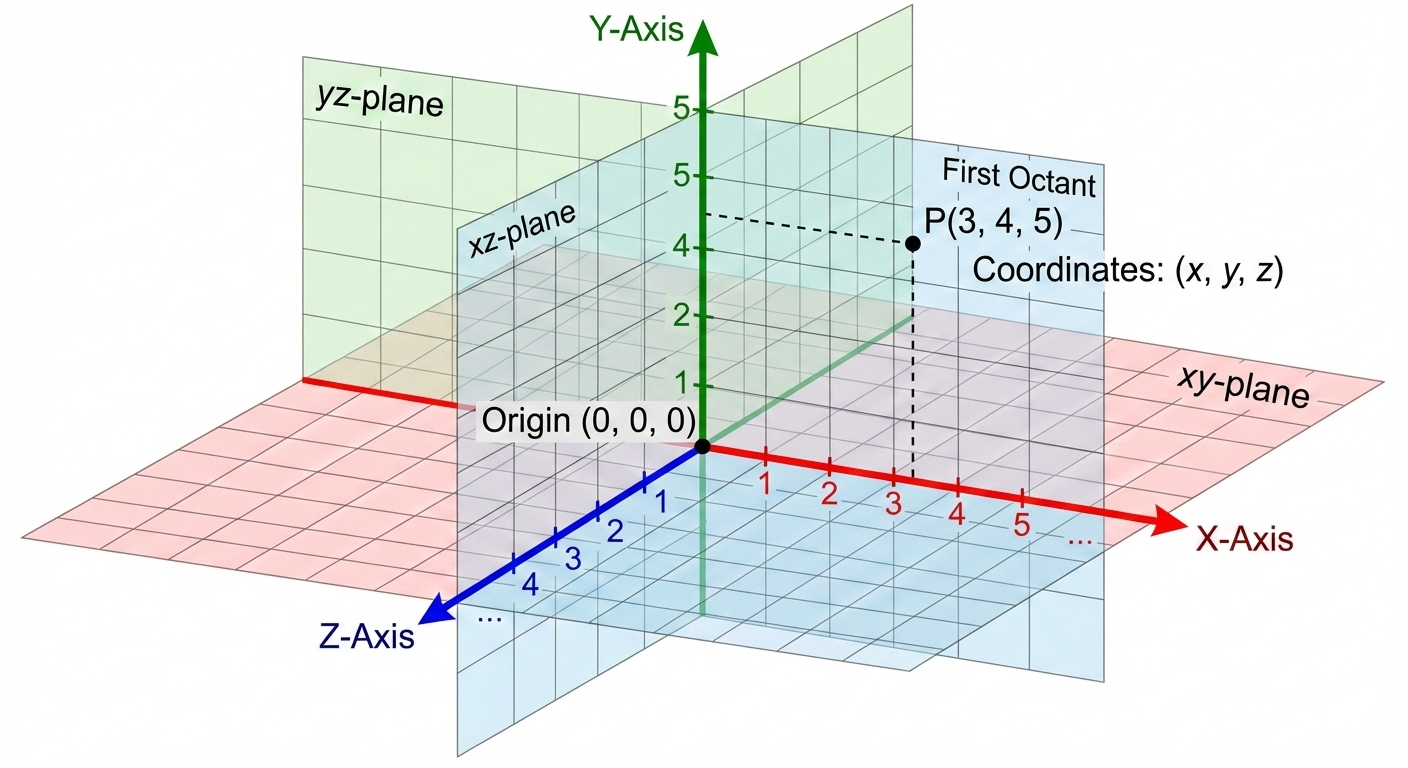
Cartesian Coordinate System
The three-dimensional Cartesian coordinate system is used to describe the position of a point in space using three numerical coordinates. The coordinates are typically represented by the letters x, y, and z.
-
X-Axis. The x-axis is the horizontal axis in the coordinate system, and its values increase from left to right. It represents one of the three dimensions used to specify a point’s location.
-
Y-Axis. The y-axis is the vertical axis, and its values increase from bottom to top. It is the second of the three dimensions in the system.
-
Z-Axis. The z-axis is the third axis and provides the sense of depth in the 3D system. In this representation, its values increase from the back to the front, and the z-axis is perpendicular to both the x and y-axes.
-
Origin. The point where the three axes intersect is called the origin. This is the reference point from which all coordinates are measured, and its coordinates are (0, 0, 0).
-
Coordinate Planes. The grid lines form three coordinate planes: the xy-plane, the yz-plane, and the xz-plane. These planes divide the space into eight octants, which are analogous to the four quadrants of a two-dimensional coordinate system.
-
Units. The axes are marked with numbers, which represent the units of measurement along each axis. This allows for the precise plotting of points and the measurement of distances within the space.
Positioning the Scenery
Look at the line of code that reads: scene.setPos(0, 100, 0)
-
Change the first number
(0)to30. Run the code. Which direction did the scenery move? (Left/Right?) -
Change the second number
(42)to10. Run the code. What happens to the scenery? (Does it look closer or further away?) -
Change the third number
(0)to5. Run the code. Which way did the scenery move? (Up/Down?)
Based on your experiments, label what each position controls:
- Number 1 (X) controls: ____________
- Number 2 (Y) controls: ____________
- Number 3 (Z) controls: ____________
The Shape Shifter (Scale)
Learn the difference between uniform and non-uniform scaling.
Look at the line of code that reads: scene.setScale(0.25, 0.25, 0.25)
-
Uniform Scale: Change all three numbers to
0.5,0.5,0.5. Run the code. How does the size compare to the original? -
Non-Uniform Scale: Change the numbers so they are different from each other. Try
scene.setScale(0.1, 0.5, 0.1). Run the code.
What happens to the shape of the 3D model when the three scale numbers do not match? Describe how it looks now.
The Spin Cycle (Adding a New Concept)
You can rotate objects in Panda3D using setHpr(), which stands for Heading, Pitch, and Roll.
Add a brand-new line of code right below your setPos line:
Run the code.
Change the 90 to 180. Run the code again.
What did setHpr() do to the scenery? Try changing the other two zeros to 45 and see what happens to the pitch and roll!
Asset Pipeline
Panda3D contains an extensible plug-in system for loading model files. These plug-ins enable Panda3D to load models in a variety of formats, without requiring an explicit conversion step.
https://docs.panda3d.org/1.10/python/pipeline/model-file-formats
Egg Files
The Egg format is a file format unique to Panda3D. It is a text-based format, which means it can be opened in a text editor to inspect its contents.
https://docs.panda3d.org/1.10/python/pipeline/egg-files/index
Here are two sources containing an assortment of models in the Egg format:
https://www.panda3d.org/download/noversion/art-gallery.zip
https://www.alice.org/pandagallery/
Nodes
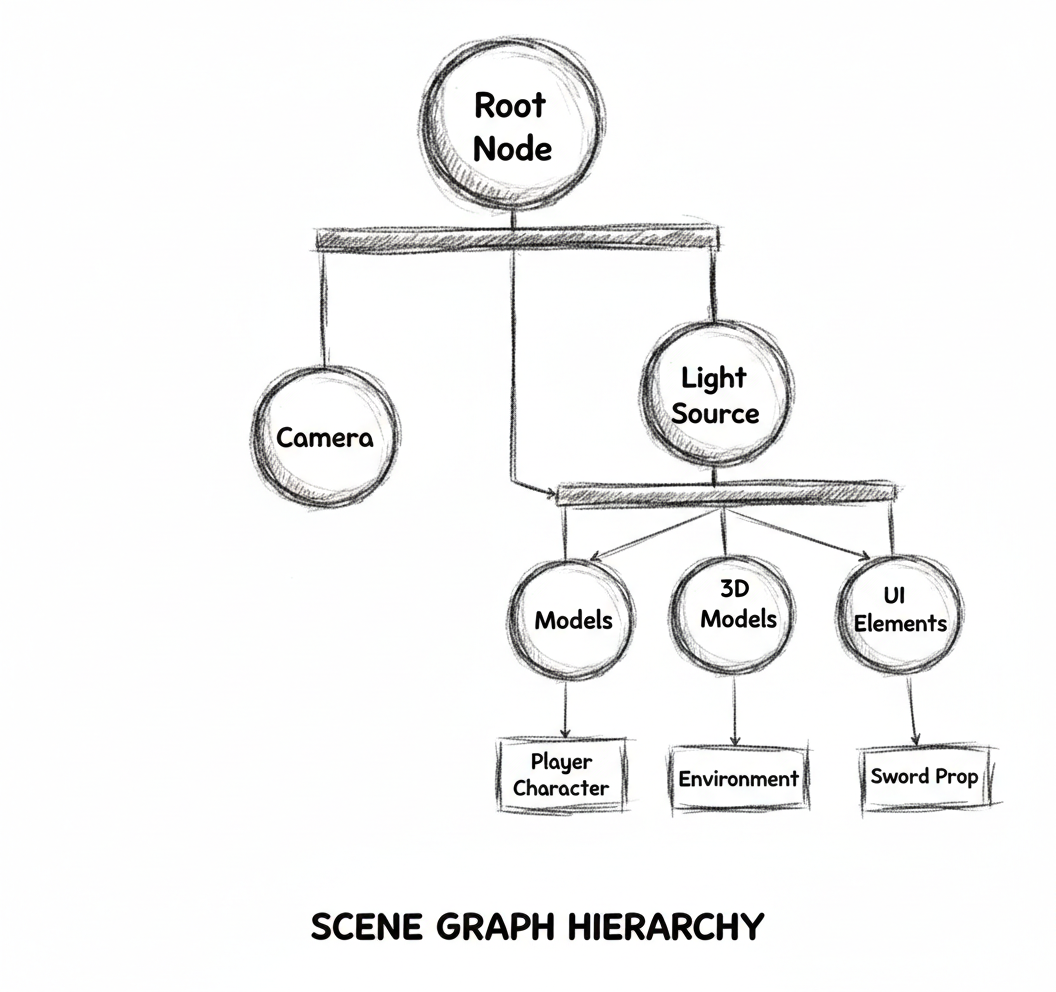
To understand how models are handled in a Panda3D scene, and especially how they’re manipulated, let us discuss how Panda3D arranges its scene.
Panda3D stores its objects in a “scene graph”. Essentially, this is a hierarchy of objects – called “nodes”.
You can imagine this hierarchy as looking a bit like a baby’s mobile, with nodes hanging by strings from the nodes above them, and a single “root-node” at the top, to which they’re all, ultimately, attached.
This relationship between objects is referred to as a “parent-child” relationship: for a given node, the node above is its “parent”, and any nodes below are its “children”.
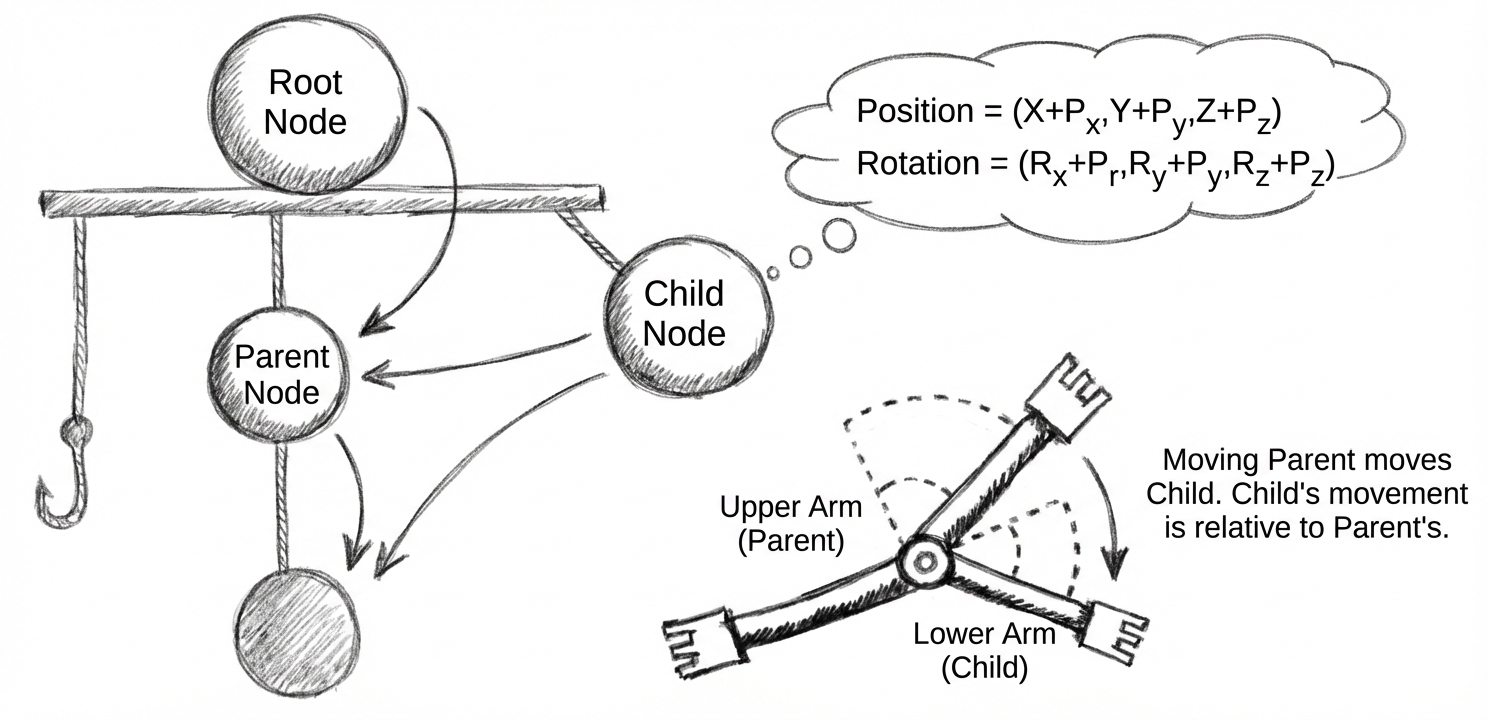
Furthermore, the state of a given node–such as its position or scale–is relative to that of its parent. That is, a position of “zero” means “at the same location as its parent”; a rotation of “zero” means “facing the same way as its parent”; and so on. Thus, each node affects its child-nodes, and their children, and so on.
You can think of it as being a bit like the arm of an articulated figurine: moving the lower arm results in effectively no change to the upper arm. However, moving the upper arm results in the lower arm being moved accordingly. Furthermore, if the upper arm is rotated to point upwards, the lower arm likewise points up, and any rotations of the lower arm are relative to that orientation.
However, most of the time we don’t interact directly with nodes. Instead, we work with an intermediary called a “NodePath”. This essentially describes a route through the scene-graph from the root to the node in question. It’s even possible to have more than one distinct NodePath for a single node.
For practical purposes, however, NodePaths can be considered to be nearly – but not quite – the same as nodes: most of what you can do with a node, you can do with a NodePath (and more conveniently). Furthermore, NodePaths contain a reference to their node, should you want to access that.